You remember when you got your first round of chickens, fell in love, and had to have more? So, you built a bigger coop, extended the run, and then moved on to ducks, goats, pigs, and more?
Okay, that might not be your exact story. However, if you’ve found excuses to build more than one outbuilding such as a coop, duck run, or other livestock shelters on your homestead, you’ve probably got the “building bug”. If that’s the case, you might be ready for a larger project.
Perhaps you’re thinking about building a potting shed or an outbuilding for hay, straw, or firewood storage. Or maybe you’re thinking about a guest cottage that you can rent out for a new income stream on your homestead.
Glamping pods are becoming quite the rage, providing an excursion out of the city, and a way to experience the intrigue of a homesteading lifestyle.
If you’ve got any inkling of plans to build a new multi-purpose outbuilding in your future, then you have to read this before you do!
Thinking Outside of The Traditional Box
When you grow up in cities and suburbs with lots of restrictions on how you’re supposed to live, you often have narrow ideas of what’s possible.
For example, in a typical suburban house, the living room is for visitors. The family room is where you watch TV or play games with your family. The dining room is for sit down dinners, etc. Every space has a precise use attached to it and we tend to use them that way.
When you start homesteading, that all changes. Your dining room becomes a workspace for projects, planning, drying herbs, cooling your canning jars, and more. While your family room turns into a crafter’s paradise. Your living room gets employed to cleverly hide all that extra food you can’t fit in the minuscule pantry that came with your house.
This process happens naturally the longer you homestead. You think outside of the box and become more practical and less inclined to conform to those no longer applicable rules of decorum. Yet, when we are planning new outbuilding projects, we often still think in terms of single-use spaces.
Consider Multi-Purpose Outbuildings
We may dream of making a coop for our chickens that includes bedding and feed storage for the chickens. Or we dream of a greenhouse for raising up seedlings to transplant.
Very few people, though, dream of harnessing the heat from their chickens to warm a greenhouse or to grow seedlings on top of your heated chicken brooder, while also storing hay for all your other animals to insulate your greenhouse in winter.
That kind of multipurpose thinking is still too “out there” for some of us. It shouldn’t be! There’s no reason in the world why our livestock shelters, greenhouses, potting and storage sheds, and guest cottages shouldn’t serve multiple homestead functions.
Why not think even further out of the box and have a climbing wall, tiny guest cottage, with a library, storage for all your seasonal equipment, a dedicated fermentation space for making wines and ciders, and an exercise studio in one multi-purpose outbuilding?
My Multi-Purpose Outbuilding & Climbing Wall
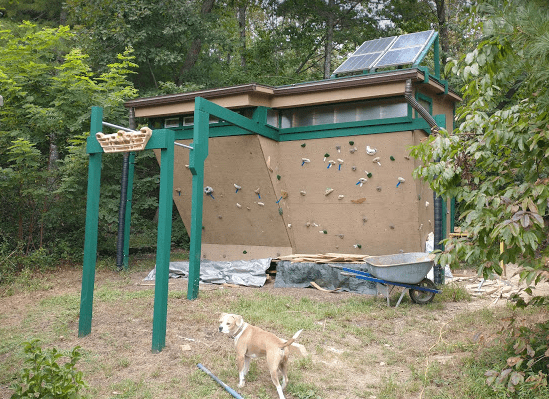
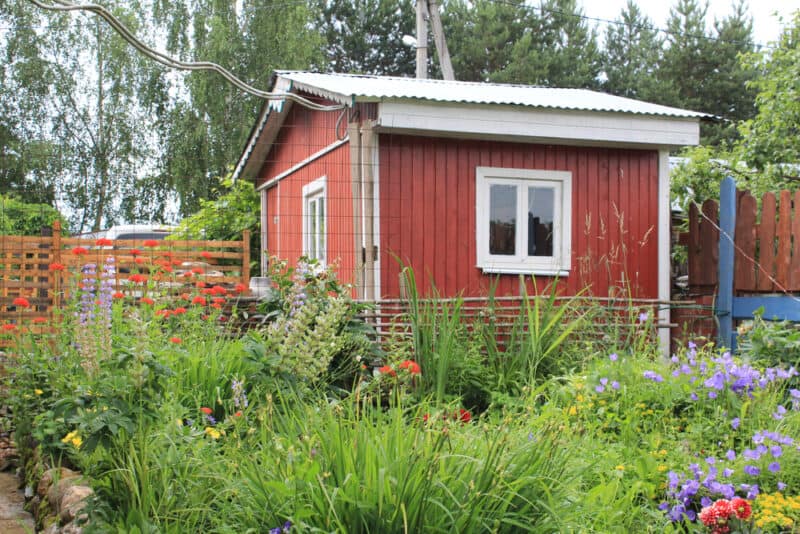
If that last example seems pretty specific, that’s because it is. This is a structure we are creating on our homestead, and above is the end product.
One day as we sat in our small house – with every corner filled with buckets of aging vinegar, fermenting elderflower champagne, buckets of kimchi, our hallways lined with books, trying to remember where we put the air mattress for arriving guests – we had a breakthrough moment.
We pondered “Wouldn’t it be nice if we had enough room for all our important stuff and activities instead of tripping over them trying to get to the bathroom and have a place for guests to stay that wasn’t our living room floor?”
Then we remembered we had 10-acres of rural property and the know-how to build structures. So, we started hatching our plan.
Know Your Rural Building Regulations
Small farm laws gave us the right to build whatever outbuildings we needed for our operations. Plus, since the structures weren’t going to be human-inhabited full-time, or tied to the grid, there were no permits required.
If you live in a rural zoned area, likely you have these same low regulation hurdles to overcome before building. However, even if you live in highly regulated areas, sometimes it’s easier to get an innovative project approved than a standard one.
Use What You Have To Think Outside The Box
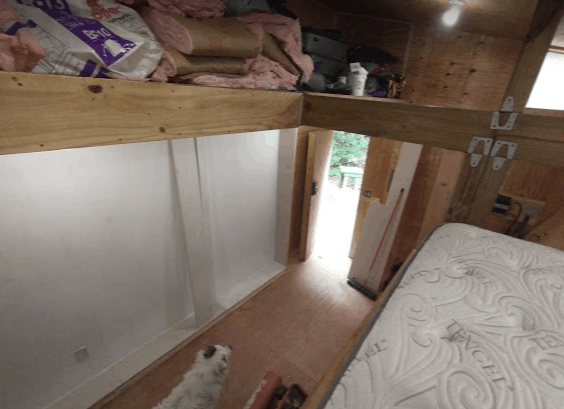
After researching applicable laws, from there, it was a short leap to realize that the climbing wall we had already built (to use in lieu of going to the gym), had the right size footprint for a new building.
Of course, there was work to do and costs involved in turning a 3-sided structure into an enclosed, insulated, human comfortable space. Yet, the job seemed easier than starting from scratch because we already had a building footprint to base our design on.
You may not have a climbing wall on your property. Still, you may have a sturdy structure to repurpose or a flat area of your land that seems well-suited to a new building.
Perhaps there’s a natural spot adjacent to your house you can use for your project. Proximity to your house makes extending electricity and plumbing easier if they are part of your plan.
Once you identify the location for a new structure, then you need to figure out how to build it so it can meet your needs. We kind of backed into our plan by trying to figure out how to use the building footprint we already had.
Our climbing wall is tall and overhanging. That created a wide opening at the top of the structure that made the 120-square-feet floor area feel expansive. It also offered some interesting design opportunities.
Use The Loft Areas
The high walls and overhanging areas afforded us space to create two lofts. One is a sleeping area for guests. The other loft is used for storing all those things we absolutely need, but only during certain times of the year. You know — skis, camping gear, pig processing equipment, grape presses, etc.
Create Custom Storage
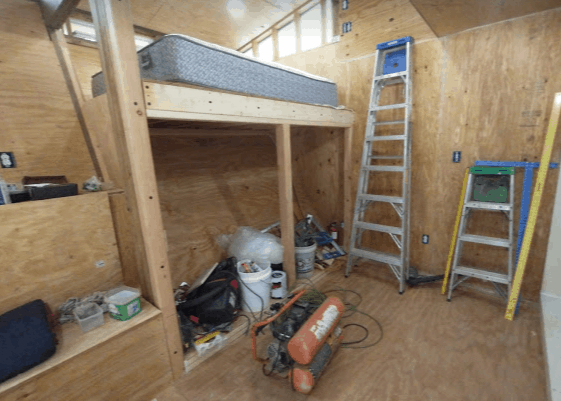
From there, we realized the space below the bed platform could be made into a fermentation locker. We could ferment our food to preserve it in there and use the area to store our pottery crocks and food-grade buckets the rest of the time.
Of course, fermentation is a gassy business. As such, we also installed an automated under roof vent fan and added windows on that side of the multi-purpose outbuilding.
The long back wall of the area would be perfect for built-in bookcases, or if need be, a Murphy bed. All the books would also help insulate that side of the building, which was the cold, shady, windy side during winter.
Make Extra Room
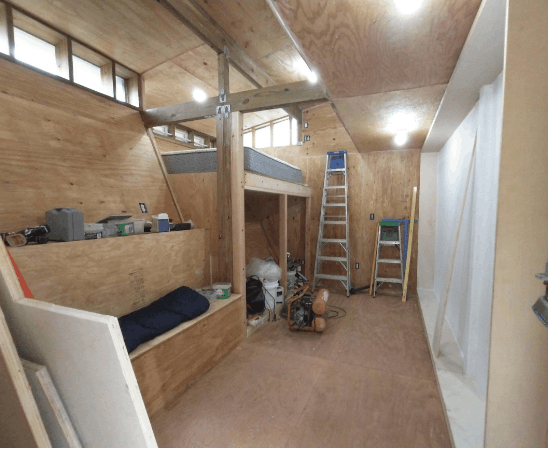
In the image above, you will notice all that floor space we were left to work with. Even after the bookcase is framed out on the right side, it’s easy to see how this can be a workout studio and living area. There will be a fold-down table in front of the storage bench on the left and some easy to move bean bags to make this cozy.
At that point, we realized we would use this space a lot more if we just made it climate comfortable. So, we started studying up on tiny houses and tiny space interior design.
We decided to go all the way and make this an off-grid, rustic tiny house with solar power, heat, and a living area. We figured we could use this for a quiet workspace and workout place, a retreat, and to host friends and family for overnight stays.
That’s the story of how we ended up making a multi-purpose outbuilding, aka a tiny house with a climbing wall, library, fermentation room, workout room, and storage space all in one.
The Practical Homesteader Approach
We never would have thought of something “out there” like this if we were still following the rules of our single-use spaces like we did before homesteading. However, frankly, given the experiences we’ve all had with COVID-19, even non-homesteaders are thinking of multipurpose ways to use available space.
I think it’s a really exciting time to expand our ideas of what our new normal lives should look like. So, if you are ready to build a multipurpose outbuilding or repurpose a structure you already have, then let me share some steps to make escaping conventional one-use thinking easier to do.
Step 1: Dream
The first thing to do is sit down and think about all the activities you do, or want to do, that don’t fit naturally into your living spaces now. Make a list and don’t hold back, even if it seems inconceivable that you can put all this stuff in one place.
Perhaps your list includes herb and spice drying and storing, fabric-making, natural paper creations, home crafts, candle and soap production, fermentation, indoor gardening, aging cheeses, seed saving, journaling and planning, meditation, yoga (goat yoga even), hay and straw storage, brooding young livestock, woodworking, basket-making, or whatever else you can possibly imagine that doesn’t already have a comfortable place in your life already.
Now, perhaps not all of these will fit in one place. Even so, you’ll be surprised how many can if you are willing to be creative about it. So, don’t eliminate anything right away.
Step 2: Ruminate
I am a goat person (if you haven’t already guessed that). So, I love the idea of rumination.
Goats eat up all sorts of stuff at once. Then they laze around in the shade letting their bodies take all that stuff and turn it into something useful.
Our brains are like this too. We consume a bunch of ideas and thoughts. Then when we lay around (e.g. sleep), or do other leisurely things we enjoy, our brains work it all into something useful.
Once you have your list, look around the internet to see all the clever ways other people have created spaces for doing those things. Consume those images and ideas. However, try not to get attached to any of them.
This is about gathering enough information that your brain has the material it needs to work with to start formulating original ideas.
Then, sleep on it. Think about it. Sleep on it some more. Try out different formations in your brain. See which things can fit together.
Step 3: Imagine
Starting to imagine concrete plants for your space is where the design process really gets fun.
Can you see yourself in your multi-purpose potting shed planting some seedlings, surrounded by an apothecary of dried herbs, stacks of straw, listening to the cheeping of just-hatched chicks in the brooder adjacent to your work table?
Is your year-round worm bed there too so you transfer your dirty chick bedding there, then scoop out worm castings while making your fertilizer mixes? Can you see yourself putting the seedlings on top of half of the brooder so the heat from the brooder rises to warm the soil and expedite seedling germination in late winter or early spring?
This is an example of what a multi-purpose space can look like. It can bring together activities you already do in a natural way.
If you really think it through and let your imagination run wild, you can stack functions and use fewer resources in a multi-purpose space.
Step 4: Plan
Once you have a good vision, then you need to get practical about how you plan to execute those ideas. You’ll need to think about insulation, ventilation, electricity, water, car/cart/wheelbarrow access, structural factors, and whatever else is necessary to make your space functional and comfortable.
This step is the hardest for me. I often find my grand ideas are difficult or too expensive to pull off with our resources. So, if you have these tendencies too, this is where you need another party to give you a reality.
For example, I wanted elaborate barn doors to hide the fermentation stuff in our multi-purpose outbuilding. Matt, my significant other and voice of reason, suggested that curtains would be cheaper, easier to operate in a small space, and allowed for better air exchange during fermentation.
Step 5: Adjust
Once you get into a project, unless you are an architect, designer, or structural engineer by trade, you’ll likely find that you must make some adjustments to your plan as you go. Since you aren’t using pre-made plans, and your ideas are unconventional on purpose, there’s no road map for these kinds of projects.
Be prepared to make adjustments, and sometimes you have to compromise. As you do, always keep in mind your original goals.
Make sure that whatever adjustments or new decisions you make still fit with the original intent. Sometimes, you’ll even find that your adjustments make your space even more functional for your way of living.
Step 6: Enjoy
Building projects always take more work, time, and money than you expect. If you are a homesteader with a tight budget, that might mean you have to build your multi-purpose outbuilding in stages. This doesn’t have to be a hardship if you enjoy each part of the process.
We finished the exterior of our structure then took a budget break. However, even at that stage, the space was functional for storage.
When we had a little money saved up, we installed the solar kit and ran our wiring. Then we began using the space for exercise on rainy days and as a makeshift cocktail lounge on windy nights.
Now we’re to the stage of building all the custom furniture. We’ll probably have to take another budget break after that before we start putting in all the decorative details. Even so, we’ll start using it as intended even before it’s aesthetically ideal.
Final Advice for a Multi-Purpose Outbuilding
Homesteading isn’t a destination. It’s a re-imagination of the way you live your life designed around greater self-sufficiency. You will be constantly refining and improving it as you gain new skills.
Moving past single-use and into the realm of personalized multi-purpose outbuildings, to give you even more freedom to live how you want using fewer resources. Embrace the entire process and don’t let anyone discourage you from seeing your vision through.
Also, tell your friends and family what you are doing and what supplies you need. You’ll be amazed at how much useful free or less costly stuff finds its way to you if you let your needs be known.
Are you inspired to start your own multi-purpose outbuilding? Then here is an article with excellent she shed ideas for added inspiration.
