
Do you hunt for your food? Is venison a staple in your home?
If like us, you love to hunt deer and want a delicious way to preserve it, you’ve come to the right place. My family depends upon venison for a good portion of our meat throughout the year.
When my husband brings it home, the first two things I do with it is to make jerky (for snacking purposes) and can the meat for quick meals.
If you’re curious how to go about canning venison, come along with me. I’ll walk you through the straightforward process of storing your deer meat in jars on a shelf.

Here’s what you’ll need:
- Venison
- Mason jars
- Pressure canner
- Lids and rings
- Cutting board
- Sharp knife
- Jar grabbers
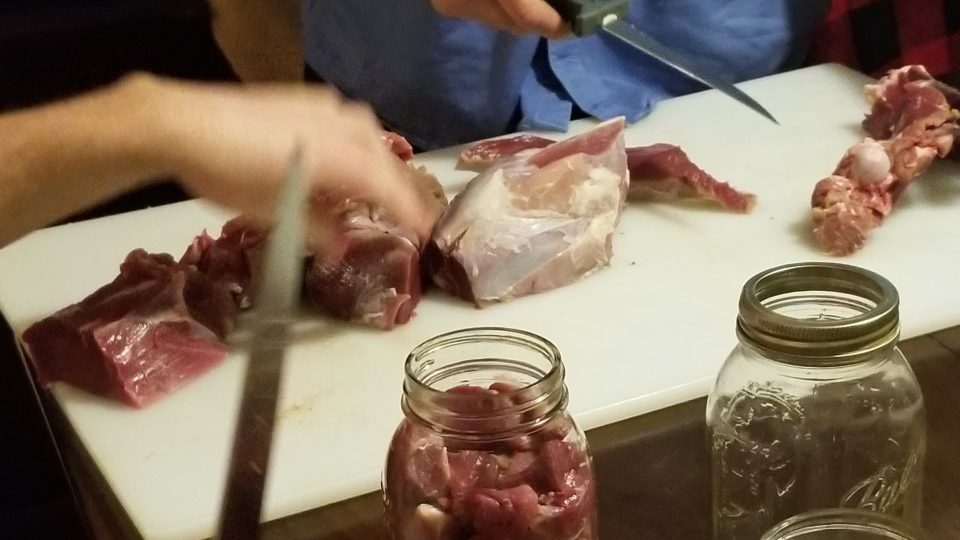
1. Butcher the Meat
The first step in the process is to prepare the meat. After my husband brings the deer home, we process it and leave it on ice in a cooler for five to seven days.
We’ll place the cooler in a slanted position with the drain open on the cooler to allow all the blood to drain from the meat.
The more of the blood you remove from the meat, the less of a gamey taste or flavor it has in my experience.
When the time frame has ended, we drag the cooler to the front porch, break the ice with a hammer, and pull each piece of meat from the cooler one by one.
I bring the meat in the house, wash it in a clean kitchen sink under cold water. This will remove any remaining ice, hair, or dirt which may have made its way onto the meat during processing.
From there, it goes to a cutting board where the meat is deboned. The main thing to point out during this step is to make sure you remove as much fat as you can from the meat.
Deer fat doesn’t add flavor to the meat like fat does for pork or beef. In my humble opinion, the fat on a deer is gross.
Therefore, the more you remove, the better flavor the meat will have. Also, look for the glands in the meat. It is another source which will produce a game flavor in the meat.
The glands are located in the hams and front shoulders of the meat. When this is removed, venison tastes like lean beef.
Prepping your meat before canning venison in this way should help produce a delicious meat you’ll use in a variety of recipes and enjoy!
2. Prepare Your Jars
Before canning venison, you must prepare your jars. We use a pressure canner to preserve this meat; therefore, the jars won’t require as much preparation because a great deal of the sanitizing is done within the canner.
However, you should wash your jars with warm soap and water. You can also run them through an express wash in your dishwasher.
Dry the jars. You should also wash the rings at the same time. They can either be washed by hand or in the dishwasher.
You should use new lids. Once the rings and jars are washed, they’re ready for the canning process.
3. Fill’em Up
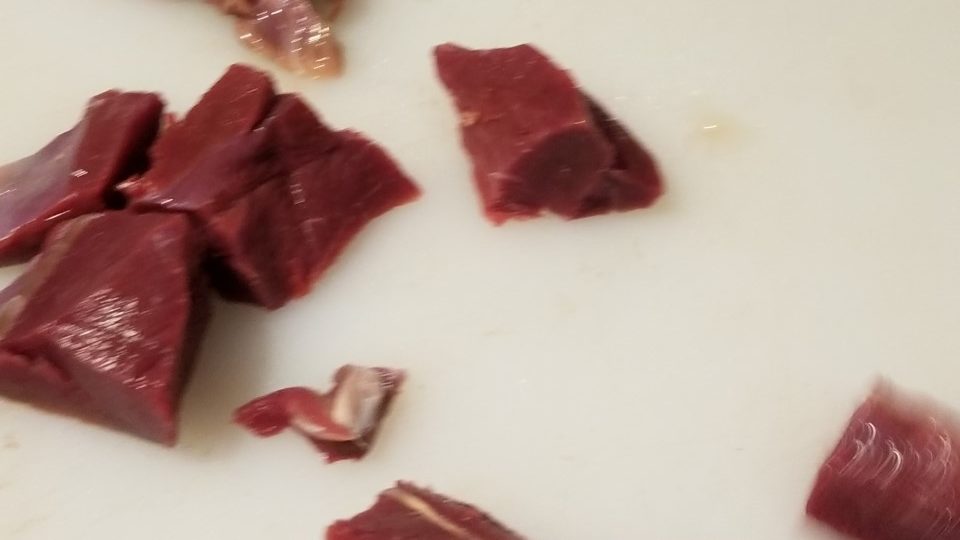
The meat you processed in the first step should be cut into cubes. I prefer one inch by one-inch size cubes.
However, you can cut them into any size you’d like. From there, pack the meat tightly into the clean jars.
Leave approximately an inch to an inch and a half headspace. There’s no need to add liquid to the jars. During the canning process, the meat will produce its own liquid.
When the jars are full, place new lids and clean rings on each jar. Make sure the rings are secure on the jar and put them in your pressure canner.
4. Process the Jars
Be sure to follow the instructions for your particular canner. In my case, I must add three quarts of water to my pressure canner before beginning the venison canning process.
I place the lid on the canner and make sure it locks in place. Be sure to check the gasket on the top of the canner to make sure it’s sitting in the proper position on the lid.
Also, check your pressure release valve to make sure it’s pushed into the lid as well. If not, the lid won’t hold pressure.
After the lid is locked in place, I place my weight on the lid. Deer meat should be canned under 20 pounds of pressure.
I turn my stove on high and wait until the canner builds up enough pressure. When the weight begins to jiggle, I turn the heat on the stove down to medium and set my timer for 90 minutes.
Once the time is up, I turn the stove off and allow the canner to sit undisturbed until the pressure plug drops to demonstrate the pressure has fallen safely inside the canner.
Your process may look a little different depending upon what type of pressure canner you’re using and the manufacturer’s instructions.
The portion of this step which applies to everyone is to be safe when using a pressure canner and process the deer meat for 90 minutes under 20 pounds of pressure.
5. Clean Up
While waiting on the deer meat to can, it’s a good idea to begin the cleaning process. If you used a cutting board, be sure to wash and sanitize the board.
Also, wash and sanitize all surfaces the deer meat may have come in contact with. If you used a cooler to bleed your deer meat out, empty the cooler of the ice and hose it out.
If you don’t, the cooler will develop an undesirable smell which can carry over to other items stored in the cooler.
Also, any deer scraps you may have such as the fat or glands, if you have pigs or chickens, they’d appreciate the treat.
Once your mess is cleaned up, you can relax while the canner does its job.
6. Wait and Properly Store
After the pressure on the canner drops, you can safely remove the lid. In my canner’s case, there’s a pressure plunger which indicates the pressure has dropped.
Again, be sure to check the manufacturer’s guidelines for your canner. When the lid is removed, use jar grabbers to remove the jars of freshly canned venison from the canner.
They should be placed on a hard surface which won’t scorch. It’s a good idea to add a few layers of thick towels beneath the jars to ensure they won’t burn the surface beneath it.
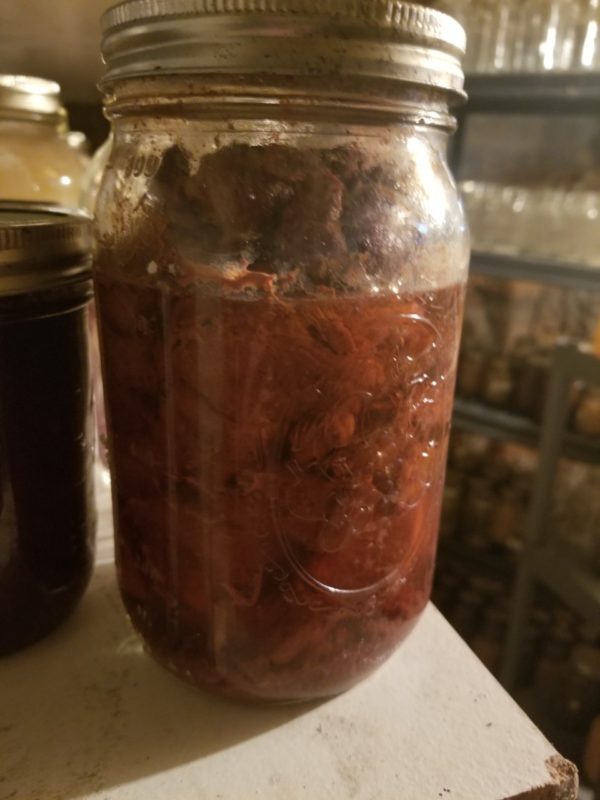
Leave the jars alone for 24 hours. During this time, you should hear the lids seal with a ‘ping’ sound. You’ll know the jars have sealed when the round button in the center of the lid has suctioned down toward the jar.
At the end of the 24-hour waiting period, check the tops of each lid to make sure they sealed. If not, place a new lid on the unsealed jars and reprocess.
For the jars which sealed, wipe them down with a soapy washcloth. Use a second damp washcloth to wipe them again.
This is to make sure any grease or juice which may have come out of the jar during canning doesn’t stay on the jar. It can attract bugs and mice to your jars.
Label each jar with the date and what’s inside. From there, store them in a dark, cool location until you’re ready to use them.
How to Use Canned Venison
Canned venison is one of my favorite items to preserve because I use it a great deal. When you need a meal, open a can and warm it up.
This is a great meal by itself with a side of rice and a little gravy. You can also use canned venison in different soups such as vegetable soup.
They also go well over a bed of egg noodles with gravy. The same way you would use beef tips, canned venison would work as a delicious substitute.
Well, you now know how to go about canning venison and preserving deer meat you bring home. Canning venison is a wonderful and healthy option for many fast and delicious meals.
Hopefully, this will help you to enjoy a healthier lifestyle on a budget even when life keeps you moving at a swift pace. Deer meat is a delicious item, healthy and low in fat and you’ll be glad you have it on your pantry shelf.


