This past summer I have been a woman on a mission.
We have remodeled our kitchen, remodeled each of our boys’ bedrooms, built a front porch, a bigger goat lot, and a few outdoor structures as well.
Still, that didn’t stop me from wanting to make our free chicken coop pretty.
We have spent so many years building and making things functional that I haven’t had the time or resources (truthfully) to worry if things looked good. Well, the time has come and my husband has finally agreed that we can focus on making things looks better.
So I went to my neighborhood hardware store and purchased some paint.
I had it all worked out in my mind that I was going to paint this coop to look like a little red barn. I spent a pretty decent amount of money only to realize a few things:
- My coop wasn’t going to look like a barn.
- It wasn’t benefiting my chickens to add ‘charm’ this way.
Which led me to begin scouring the internet. Then suddenly it hit me.
I wanted my coop to look old-timey so why not whitewash it?
And so my journey to whitewashing has begun. Which is what I have for you today. I’m going to tell you all you need to know about whitewashing your coop, barn, rabbit hutches, etc.
Here is what I’ve learned so far:
Why You Should Consider Whitewashing
When most people think of whitewashing, they think of just an antique form of painting. However, in reality, the homesteaders before us were very intelligent.
And they had a reason for doing almost everything they did. Whitewashing was no different.
Here are a few things for you to chew over if you are considering whitewashing:
1. It Is Super Simple
Whitewashing is very simple to make and to apply. Whitewash requires:
- Water
- Salt
- Hydrated Lime
You’ll have to be sure that you don’t use the type of lime that you use in your garden. It is actually the type of lime that is used for masonry. However, hydrated lime is still very easy to find. You should find it at your local hardware store (or at Amazon through the link above).
And then you’ll apply it just like you would any other paint. It is that easy. Need other supplies to help you with this project? It can all be purchased at the links below:
2. It Is Antibacterial
If you could apply something inside your chicken coop that would fight bacteria, why wouldn’t you? And after reading here about how chickens (especially) have such sensitive respiratory systems, anything extra you can do to keep them healthy is an added bonus.
Furthermore, whitewashing the inside of the coop won’t harm chickens’ respiratory systems either because there are no fumes. Just one more reason to love the idea!
3. It Keeps Insects Away
Every time I would enter our chicken coop there would be flies everywhere. This was one of the main things that turned my attention to whitewashing.
I faced the same troubles with my rabbits.
Once I learned that flies around rabbits could be a real issue, I became very concerned.
So I was very excited to learn that whitewashing actually deters insects of all kinds from laying eggs inside of the wood of the coop or hutches. This by itself was worth the effort of whitewashing everything in my opinion.
4. Gives A Little Charm To Your Yard
My husband has built some fabulous houses for our animals. And from mostly free resources we’ve come across or have been given to us. However, as much as I love the rustic wood look, at times, I like a little antiquity charm too.
Whitewash can offer this.
The next time you think, “I’d like something a little brighter but still natural in appearance in my backyard,” turn your mind to whitewashing.
5. Not Harmful
I mentioned this a little already, but the natural whitewash recipe which is meant for indoor use is not harmful to your animals. That is great news for you.
Because now you can do preventative maintenance to keep unwanted pests out of your coops and hutches without harming your animals with harsh chemicals.
So again, just one more reason to consider giving whitewashing a try around your homestead.
How To Make Whitewash
1. Indoor Whitewash Recipe
If you want to whitewash your rabbit hutches, chicken coops, barns, or any other outdoor building then you’ll need to use two different recipes. The first recipe I’m going to share with you is the old-timey indoor recipe.
And the reason it is meant for indoor use is that it is water-soluble. It will have to be gone over in the future again to keep all of the benefits I mentioned above going strong for you and your animals.
You will need:
- Water
- Salt
- Hydrated Lime
As mentioned earlier, hydrated lime is not the same as what you use in your garden or in your yard. It is what is used for masonry work. You can find it at most local hardware stores. And for your convenience, I have provided a link so you can easily purchase them online.
Once you have all of your ingredients on hand, you will need to decide what tone of whitewashing you would like. If you’d like a lighter color then you need a 1:1 ratio of your ingredients, a medium is 2:1, and a darker color is 3:1.
Then mix your salt and water together first until all of the salt is dissolved. I recommend using hot water to make the process a little easier.
Finally, you’ll mix in the proper portion of hydrated lime and mix until it is thoroughly dissolved as well.
Now you’re ready to paint.
Again, I don’t recommend this recipe for outdoor use because it will so easily chip away.
2. Outdoor Whitewash Recipe
Let’s say you are like me and really want a finished look on the outside of your coop too. However, what you envisioned just isn’t coming together, and you aren’t sure what to do.
Well, fret no more.
When I began researching how those before me painted their coops and got such a clean, finished look I ran across whitewashing. However, I realized that the most common form of whitewashing was the water-soluble method and most of the internet only talks about using it on the inside because of this.
However, I was pleased to learn that if you take white paint and water it down to the consistency you desire you can still get the whitewashed look on the outside of your coop.
Now you not only have the whitewash protection inside your animals’ homes, but you can get a finished, clean look for the outside too. And the white helps keep their homes cooler too as it reflects sunlight.
So your ingredients for outdoor use whitewash are simply:
First, pour the white paint into the bucket. Then, add water.
The ratio is usually 2:1 with paint to water.
Then you’ll mix the ingredients together until you get the color and consistency you desired. Now, it is worth mentioning that you could use gray or white paint. It is all your preference.
Finally, you’ll apply the whitewash paint as you would any other paint to wherever you desire. And that is all there is to whitewashing the outside of your coops, hutches, and any other outdoor area.
How To Whitewash Your Outbuildings
Painting might seem like a self-explanatory thing. Still, just in case, I thought I’d give you a quick rundown of how to whitewash your buildings. Here are 3 easy steps to hopefully help you find great success with your whitewashing efforts.
1. Begin Inside
Painting the inside should be your first step. The reason is so you won’t smudge the outside of the coop, building, etc. while trying to paint the inside.
You’ll begin by painting large areas such as walls or the ceiling first. Then go over smaller areas like supporting beams, inside door frames, inside window frames, and any other smaller area that has not been painted yet.
2. Paint Large Outdoor Spaces
Next, you will have to move to the outside of the structure. You will begin by painting the larger portions of any outside structure.
This equates to any of the outside walls. Depending upon how large the structure is, you might have to use a roller or a sprayer. If you are painting a barn then the sprayer would be handy.
However, if you are painting a larger chicken coop, you could probably get by with a larger roller brush. It is all about preference.
3. Trim Windows And Doors
Finally, you’ll complete the job by painting all outside doors. Then you’ll trim out the doors and windows.
Also, be sure to add the paint very liberally. And you might have to go back and add a few extra coats. Still, this is all about your preference.
And after all of that work, you should hopefully look back upon your work with a smile. While also having a beautiful touch of old-timey charm sitting right out in your yard.
What Does The End Result Look Like?
I realize whitewashing isn’t as common today as it once was. So I wanted to finish this post out with some ideas of what your coop, barns, etc. could eventually look like with whitewashing.
Now, understand, yours might come out a little different as your painting skills, carpentry skills, etc. may not be the same as these individuals. So this is all just for informational purposes.
1. Barn
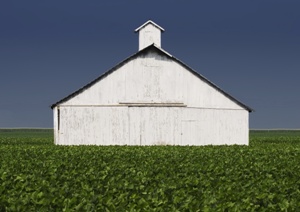
Here are a few pictures of what whitewashing the inside and outside of a barn could possibly look like. I love how clean everything looks because of the whitewashing.
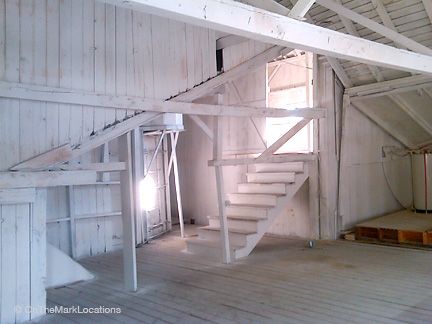
And that is another great benefit of this process. As with how a white car hides dirt so does whitewashing. So you are giving all of your outbuildings a little help with their cleanliness factor.
2. Chicken Coop
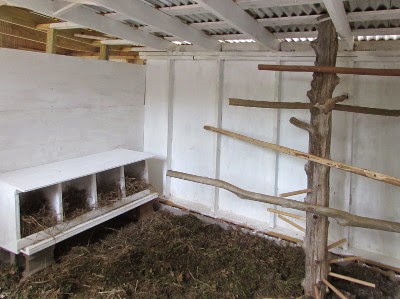
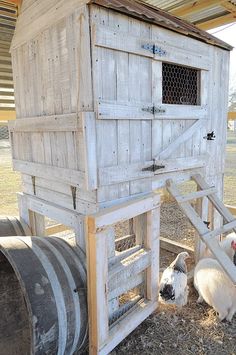
This chicken coop looks really good inside and out because of the whitewashing. Everything looks really clean and very homey.
And doesn’t it look like something you’d find on Little House On The Prairie or in Anne Of Green Gables? It is just so rustic and charming.
3. Rabbit Hutch
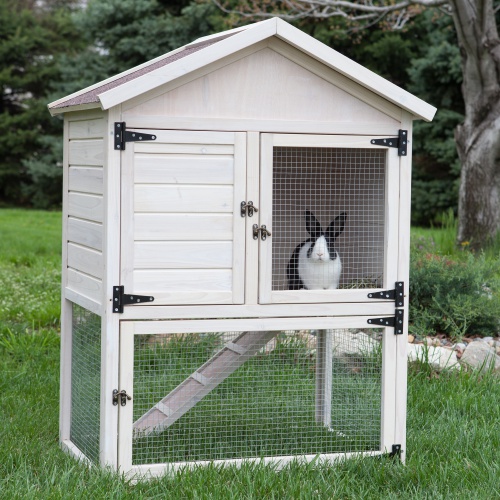
I love the way this rabbit hutch looks. It too looks so clean and pristine. And honestly, it just looks cooler. After this terribly hot summer we’ve had, I know how much my rabbits would appreciate having an extra coating on their hutches to protect them from some of the heat.
So remember, with rabbit hutches, not only does it help reflect some of the heat. It also helps with deterring pests and keeping the hutches’ appearance up as well.
4. Outbuilding
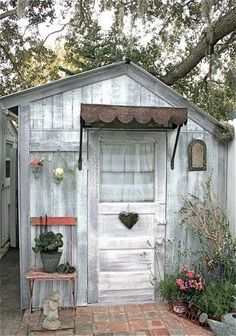
This outbuilding is cute and full of charm all on its own. I love all of the pretty décor things they’ve done to add a touch of unique beauty to it.
However, the whitewash certainly helps drive their theme home. So if you have an outbuilding, you could very easily add some rustic charm to it as well with very little expense attached. And it would help to reflect heat on your outbuilding as well.
There you have it, guys. I hope after reading this you feel much better informed on why whitewashing was so brilliant a few decades ago and why it could still be a great option for you today as well.
