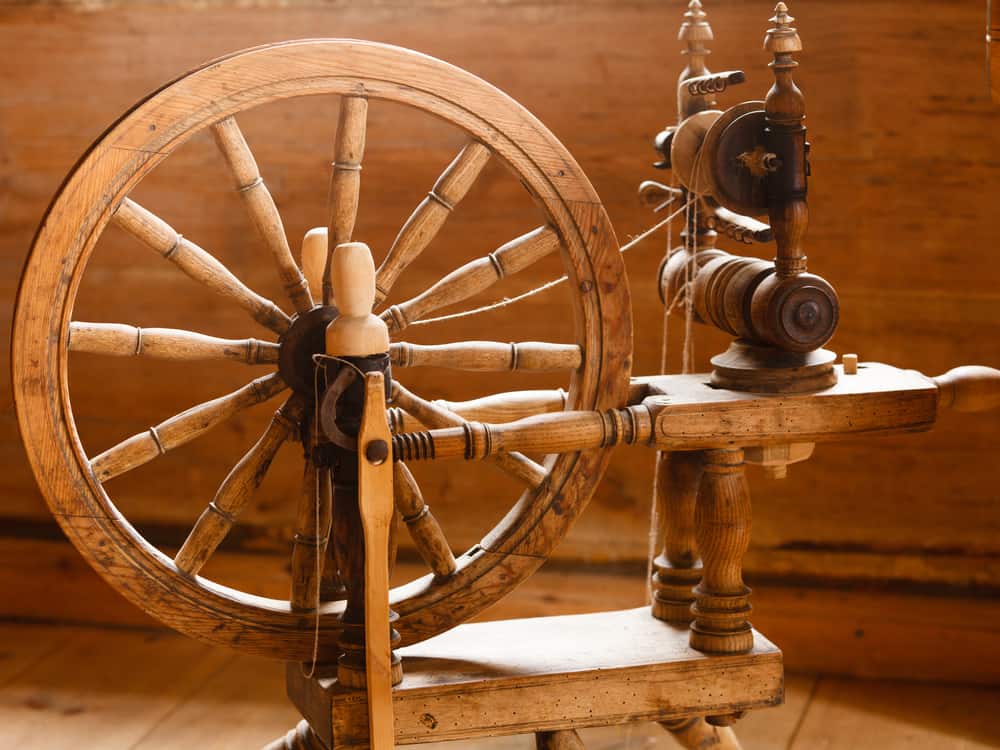
A spinning wheel can be an invaluable asset to any homestead. In addition to being able to transform animal-sourced fibers like sheep, alpaca, or goat fleeces into usable fibers, they can also be used for cotton, hemp, bamboo, and more.
That said, some people find the cost of modern wheels prohibitive, as the most basic wheels start at around $650.
As such, refurbishing antique spinning wheels is also an option. Some people prefer to work on antique wheels, as they feel a stronger connection to ancestral work with these machines.
Here’s what I learned to help you refurbish your own spinning wheel – and decide if you even want to try.
How I Got an Antique Spinning Wheel
I’ve worked on both modern and antique wheels, but since I’m a hobbyist rather than a full-time spinner, I lean toward antique wheels over contemporary designs.
I live in rural Quebec, so there are a lot of antique shops around here. People settled in this area around 400 years ago, and one can find absolute treasures when folks empty out their grandparents’ attics and garages.
Last autumn, my partner surprised me with an antique spinning wheel for our anniversary. To say I was delighted would be an understatement, and I eagerly looked forward to spinning some roving into yarn as soon as possible.
Unfortunately, it turned out that it was a Frankenstein’s Monster of a piece that required a significant amount of refurbishing before it was usable.
I’ve chronicled the work we’ve done on it so far, as it’s now usable. It’s not finished by a long shot, as we still need to make or buy a few parts to make it perfect, but at least it spins now!
Spinning Wheel Parts
Before diving into everything we fixed, let’s have a bit of a 101 on spinning wheel parts so you know what I’ll be blathering about here.
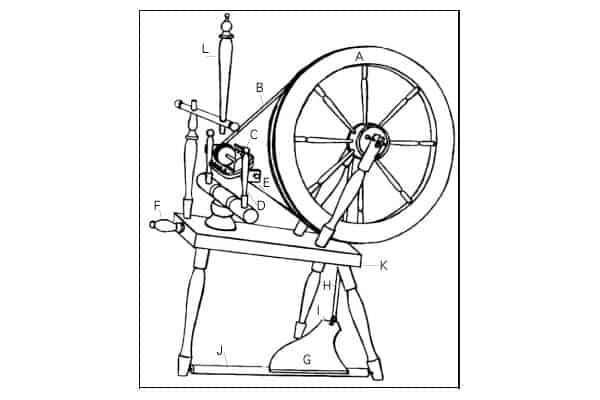
Parts of a treadle wheel:
- A – Wheel: This part is rotated by the treadle, and is the key to operating all the other parts.
- B – Drive band: A cord that goes around both the wheel and the flyer whorl so they turn and twist roving into yarn or thread.
- C – Flyer assembly: The flyer is a U-shaped tool with hooks. It has a spindle going through it (with the orifice at one end) and a bobbin on the spindle. The spun yarn or thread is collected and wound around the bobbin.
- D – Maidens: These upright posts support the flyer assembly.
- E – Bearings: The leather or metal bands that
- F – Tension Screw
- G – Treadle: This is the flat pedal you push with your foot to make the wheel spin.
- H – Footman: The bar that leads from the treadle up to the brass crank attached to the wheel (to make it turn).
- I – Treadle connection: Where the footman attaches to the treadle.
- J – Treadle bar: The piece that connects the treadle to two of the wheel’s legs.
- K – Table: The foundational frame that supports the wheel and the maidens.
- L – Distaff: Not found on all wheels, it holds the unspun fibers (roving) for you to draw from as you spin. Many modern spinners have the roving in their laps or a basket beside the wheel.
My Wheel
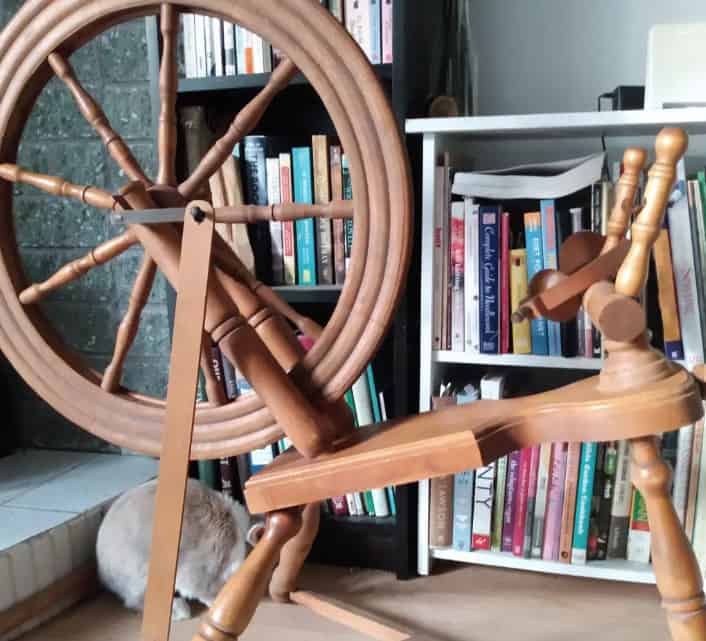
This is my double-drive spinning wheel, Charlotte (and my rabbit companion, Birch). As you can see, it doesn’t have a distaff (“L” in the diagram above) but has most of the other parts.
I mentioned earlier that my wheel is a “Frankenstein’s Monster.” This is because it looks as though it has been cobbled together with parts from a few different wheels over the years. The main parts are those of “Quebec Production” wheels, made here between 1870 and 1955.
While most of the wheel parts are over a century old, the treadle and bar look more contemporary. A carpenter friend estimated that they were replaced sometime during the 1980s.
I haven’t replaced these parts yet because I have to order a few more pieces, so I’m using the cobbled messy bits as they are.
How I Treated It
The wheel was a dry, dusty mess when I first brought it home. Everything squeaked and groaned when it was moved, so I had to offer it some TLC.
First, I took everything apart and spread it out on a blanket. Then I wiped down each piece with a damp cloth to remove the caked-on dust, spiderwebs, and accumulated grime.
Once that was cleaned, I treated everything with homemade wood polish. This comprised 70% olive oil, 20% walnut oil, and 10% beeswax. I also added a few drops of lemon essential oil because it makes the polish smell amazing.
After the wood was treated, it was time to sort out the metal. I used a steel wool brush to remove any rust and then slathered mineral oil on everything. Once I re-assembled the wheel, I was delighted to discover that it had stopped squeaking when it turned, and the treadle moved much more smoothly.
Replacement Parts
While most of my wheel was intact, there were a few pieces that needed replacing.
Maiden Bearings
These bits of leather that held the flyer and bobbin between the maiden poles were unusable. In fact, they crumbled to pieces when I was cleaning everything. Needless to say, I have to replace these.
I’ve been using wire as a temporary fix until I can get my hands on some thick leather. Once I manage to score some, I’ll measure and cut the pieces to size, bore through them with an awl, and set them into the place with glue and rivets.
The next bit is slightly more daunting.
No Orifice!
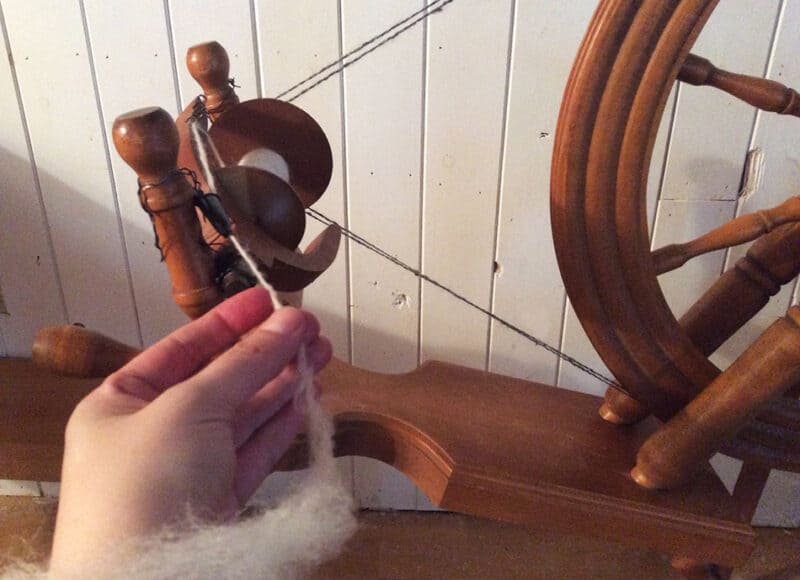
One of the most essential parts of a spinning wheel is the draw orifice. This is a hole or loop that’s at the end of the spindle, and it’s the part that allows you to feed roving to connect to the flyer hooks. These will turn and twist the fiber into yarn or thread so you can work with it.
Well, at some point over the past century, some imbecile decided to solder my wheel’s spindle orifice shut, rendering it unusable.
I attached a pen cap to one of the maidens with some wire as a temporary fix and ordered a similar intact, antique flyer assembly from overseas. It hasn’t arrived yet, but I’m so looking forward to using that instead.
The wonky pen cap is doing the trick for now, but it’s far from ideal. I’m looking forward to trying this out with a flyer assembly that actually works the way it’s supposed to!
Drive Band
This is the cord that wraps around the wheel and attaches to the bobbin to spin it. I created my own drive band by plying cotton and wool yarn together on a drop spindle, and then winding that around the double drive and bobbin.
Footman Attachment
The footman wasn’t properly attached to the brass crank, so it kept falling off. My guess is that it had been the footman for another wheel and was wired onto this one so it could be sold.
This sounds a bit cheap, but I glued an antique button onto the crank so the footman wouldn’t slip off. It’s pretty, and it works, and that’s really all that matters to me at this point.
When it comes to the antiques I refurbish, I definitely adhere to the “Form Follows Function” school of thought. It’s great if it looks pretty, but I’m more interested in whether it can do the job or not.
Does it Work?
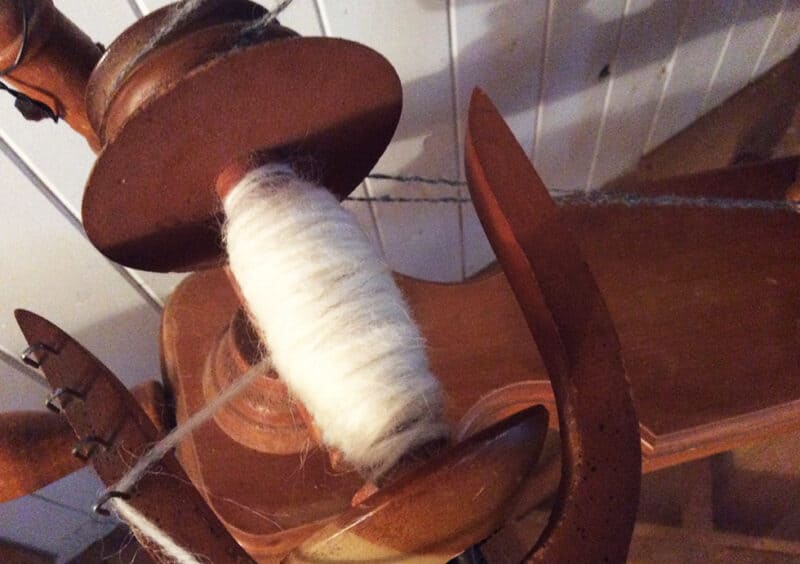
The answer is “yes.”
Does it work well? Not yet, but it will.
Knowing that it has the potential to function properly means the world to me, as it simply requires a few more tweaks. Then all I need to do is convince Himself to let me get some sheep.
Pros and Cons of an Antique Wheel over a Contemporary One
Having refurbished this antique wheel, I now have firsthand experience with the benefits and downsides of an older wheel vs. a new one.
Pros of Antique Wheels:
- High-quality craftsmanship.
- Pleasing aesthetic (many are “Saxony” aka “Cinderella” style wheels).
- Lower cost.
Cons of Antique Wheels:
- Require a great deal of work to get them running efficiently.
- Often have parts missing that are difficult to find, expensive to replace, or time-consuming to create.
- Need more oil and maintenance.
Pros of Contemporary Wheels:
- Easy to order and replace parts for it.
- If new, most have a warranty in case anything breaks so that the manufacturer can repair it.
- Generally, good condition, especially if brand new.
Cons of Contemporary Wheels:
- Expensive: expect to pay around $1,000 for a decent wheel.
- More utilitarian than aesthetically pleasing, unless you shell out several thousand dollars for an exceptionally gorgeous Golding spinning wheel.
As you can see, there are pros and cons to both, and there may be additional detriments and benefits depending on the wheel itself, as well as the person refurbishing it.
If you have a lot of time on your hands and you like to fuss with things on your own, then bringing an old spinning wheel back to life is a great project!
Alternatively, if you’re not comfortable with woodworking, or if you’re impatient and just want to get on with it, then consider buying a new or gently used modern wheel.
Depending on where you’re located, you may be able to score a really good one for $400 to $600.
Be Wary When Buying Antique Wheels
Many people have accidentally purchased SWSOs (spinning wheel-shaped objects) at antique shops and fairs. These were produced in the 1960s and 70s as decorative pieces, but aren’t functional wheels. Y
ou can tell whether your wheel is a real one by whether there are actual grooves in the wheel (the drive) so a band can be attached and if the bobbin and flyer can spin separately.
While some SWSOs can be adapted to spin yarn, many of them are unusable and are strictly to be used decoratively.
Furthermore, many antique wheels will have a manufacturer’s mark and number somewhere on the table. Mine was underneath, and though the name has been worn off over time, I can still make out the number 283 under there.
If you find an antique wheel for sale and you fall in love with it, ask the shop owner whether it’s functional or not. Then, if they reassure you that it is, ask for a demonstration. If they can’t figure out how it works or don’t seem to have the pieces necessary to make it happen, walk on by.
