
Do you work from home? Are you in need of space to pay bills, grade papers, or to do basic paperwork?Well, if so, then you need a desk.
But they can be so expensive to purchase, and if they aren’t, often the quality is lacking. So why not build your own? That is exactly what my husband did for me.
See, I work from home as a writer, and I also handle paying our bills. Plus, we homeschool so I need a place to plan, organize, and check assignments. That is when he decided to build a very simple desk for me.
And the best part, it cost around $20 to build.
Here is how he did it:
What You’ll Need:
- 1- 1x12x8 piece of wood
- 2- 2x3x8 piece of wood
- 2- 1x4x8 piece of wood
- Nail gun with nails (optional)
- Hammer and nails
- Miter Saw
1. Design the Desk

This design is basically a small table. I didn’t want anything with drawers, a roll top, or any other upgrades. The reason is that I like simple items. They are easier to build, cheaper to build, and they also force me to stay organized, or I have to look at the mess.
So even if you don’t like this design for a basic desk, you could also make adjustments to broaden or lengthen it, and create a nice piece of furniture. If it were a little larger, it could work well as a kitchen table, or it could also work well as a buffet piece in the kitchen.
But if you like simple designs like me, then you’ll hopefully love it as a desk. I know I do!
2. Cut the Legs to Height
So once you realize what you are building, it is important to decide what height you’d like your desk. I wanted mine to be able to slide a rolling office chair underneath it easily so I could have a comfortable space to work.
Which means, we decided to cut the legs to about 29 inches in height. We used the 2×3’s for the legs of this desk.
Once you have your four legs cut to length you are ready to move on to the next step.
3. Create the Bracing and Skirting
Next, you’ll want to pull out your 1×4’s and put them to work. We’ll start first with the bracing. You’ll cut 1 of the 1×4’s into three separate pieces. You’ll need the two sides to measure 17 inches, and the back brace to measure 43 inches.
Once you get your bracing measured, you’re ready to cut your skirting to length. Again, you’ll pull out your second 1×4, but this time you’ll need four pieces. You may have to use some of what was left over from the wood you cut the bracing out of.
So you’ll need the sides of your skirting to be 17 inches, but you’ll need both a front and back piece for your skirting that each measure at 43 inches.
Again, these measurements could vary depending upon the size you plan on making your desk. This is just the measurements we used.
Now that you have all of the pieces cut you are ready to begin assembly. We used a nail gun because my husband uses them regularly, and they do make the job go faster.
However, if you aren’t familiar with a nail gun, then by all means use a hammer and nails. It will work wonderfully for this project.
4. Assemble the Bracing and Skirting

Now that you have all of your pieces cut to length it is time to begin the assembly process. Begin by standing two of the legs up. You might want to enlist the help of someone to hold the pieces in place, or you could try using clamps. It is up to you.
Next, you’ll take one of the 17 inch pieces of the skirting and place it at the top of the legs. Then you’ll stand up a third leg and take one of the 43 inch pieces of the skirting and attach it to the top. You’ll repeat this process all the way around rotating between the 17 inch piece on the short side and the 43 inch piece on the long side.
The idea is to have all four legs standing and connected by this rectangle of skirting. Then you’ll want to repeat the same process around the legs at the midway point to ensure that the desk is stable.
Obviously, you’ll use the longer portion for the backside of the desk, and the shorter portions for the sides of the desk. You won’t have a front portion to the bracing because you wouldn’t be able to slide a chair under the desk otherwise.
5. Make the Top and Assemble
After you’ve got the bare bones of the desk assembled you are ready to create the top. You’ll utilize the 1×12’s for this step. The top of my desk is about 48 inches in length. This creates a little overhang which I like.
So you’ll cut the 1×12 to the length you desire it to be. Then you’ll have to do it again with the wood you have remaining.
Next, you’ll have the two cut boards which will be the top of your desk. You will either use a nail gun or a hammer and nails to secure them to the frame of the desk. Your desk is now functional. Congratulations!
6. Stain to Fit
I have not completed this step yet because I’ve been so busy. But I do hope over the winter months I’ll make the time to paint or stencil my desk to make it look more like my desk.
However, if you have the time to go ahead and stain it, stencil it, or paint it I would recommend getting it out of the way. The reason is that because my wood is still unprotected I have to use coasters at my desk or I’ll end up with wood rings.
So go ahead and put a protective coating over the wood so your desk will look like new for a long time to come. Then get busy enjoying your new space as you work away on daily tasks or on your job.
7. Our Price

So I told you that we were able to build this desk for around $20. I’m not affiliated with the business where we purchased our materials, and their prices may change.
But these are our prices:
- The 1x12x8 was purchased for $13.
- The 2- 2x3x8 boards were purchased for $2.18 a piece.
- The 2- 1x4x8 boards were purchased for $1.98 each. They are also referred to as furring strips.
All of these items were purchased at Lowe’s Home Improvement Store. So you can easily check what their prices would be in your area.
Also, as mentioned, we did use a nail gun, but we already had that from doing numerous other projects in the past. Obviously, if you were just going to need something to put this desk together, a hammer and nails would be much more economical. We also had the miter saw from other projects as well. There are more economical ways to cut wood besides using a miter saw as well, if you only need it for this project.
So that brings our total to $21.32 plus tax.
And that, my friends, is how I got a very functional, simple, DIY desk on a very modest budget.
Plus, my husband is quite the handy man so he had it thrown together in less than an hour. Which is also great because I’d say even beginners could master this project, and it shouldn’t take an extremely long time to accomplish it.
5 Inexpensive Desk Plans & Ideas
So you see my desk and think, “Man, I really need a desk, I’m on a tight budget, but I’m not sure this is the desk.” No hard feelings. I get it. Finding the right desk can be difficult.
Which is why I’m going to give you a few other DIY tutorials that are budget friendly and hopefully you’ll find something that will help you to build the desk of your dreams.
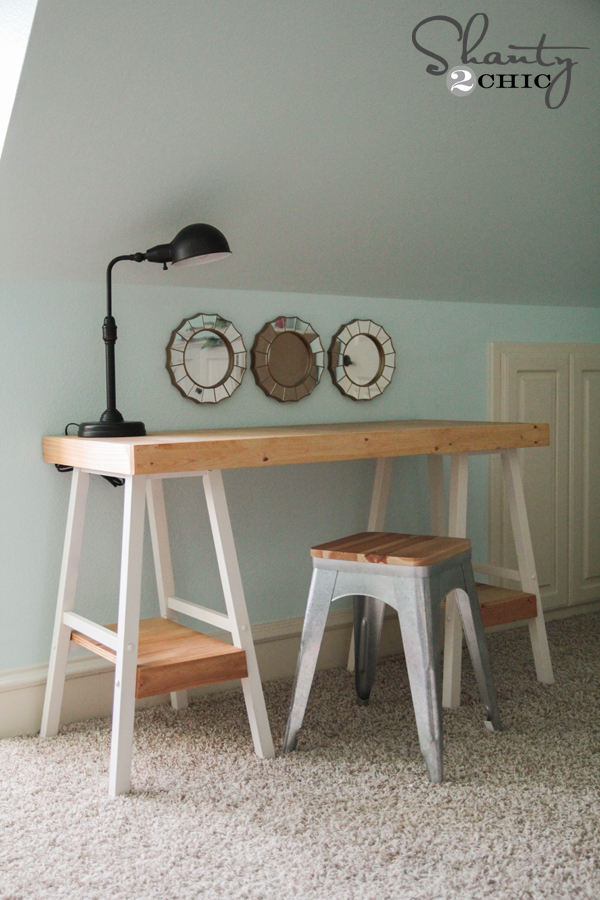
1. The Shanty-2-Chic Desk

If you haven’t gathered by now, I pretty much love practically every project this site comes up with. They take inexpensive materials and make some gorgeous masterpieces.
Naturally, this desk is no different. It appears to be very simple to build, and it is also budget friendly. The site says that you should be able to build this desk for around $60. It is a little more than my desk, but if it works for you, then it is money well spent in my opinion.
2. The Piping and Butcher Block Table

This desk looks very modern and industrial. I’m personally a fan of it. Granted, it appears it would cost more because of the butcher block and piping.
But if it has the look you are looking for then again, it might be money well spent. Plus, this desk looks pretty simple to build. Give it a look and see if it the desk you’ve been dreaming of.
3. The Simple DIY Desk
These ladies have done it again! Let’s say you need a simple and inexpensive DIY desk, but you also desire to have some type of shelving in the desk.
Well, then you have to check out this desk. They basically took two stools and some wood and created an awesome desk. It looks great and also appears to be functional as well.
4. The File Cabinet Desk

Let’s say you want lots of organizational space but also a really cool looking desk. Then you will probably love this one.
So it begins with an old file cabinet which makes for great drawer and organizational space. Then you place a piece of wood on top of it and hold up the other end with furniture legs. Then you add your own touch of style by using wrapping paper and paint to give your desk its own flare.
5. DIY Corner Desk
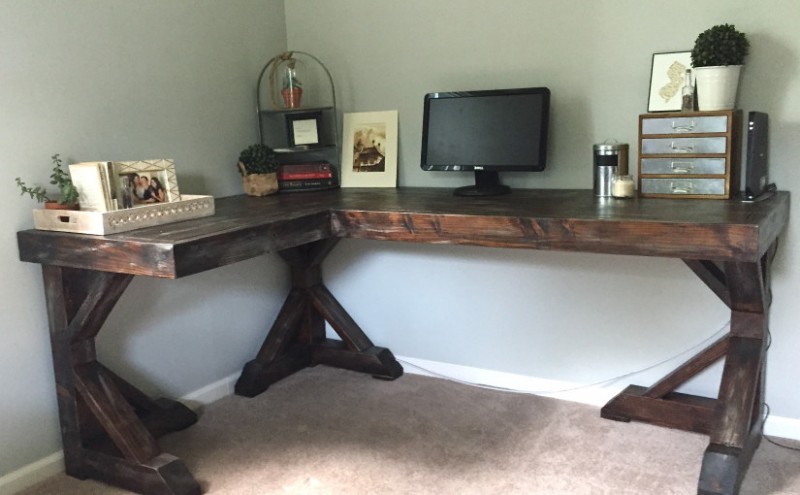
This desk looks like it might be a little more complex to build and maybe on the higher end of a budget, but it is still gorgeous.
And if you are someone that really needs a corner desk, then you might really enjoy this design. It still keeps the simple, rustic look while also taking up the corner space and giving you much needed extra space on the desk as well.
Well, there you have it. That is how we were able to build an inexpensive DIY desk. I really hope it helps you to create the desk you need on a tight budget.
But if not, I hope some of the other ideas shared will inspire you as well.
However, I’d love to hear your thoughts. What are certain things you absolutely need in a desk? For me, it was flat work space that requires me to stay organized. But do you need drawer space? Maybe a Murphy desk because you are limited on space?


