
Are you toying with the idea of getting chickens? Are you having to wait on getting them because of the expense of the coop?
I’ve been there.
There are some really awesome chicken coops out there.
The only problem is a lot of them come with quite a price tag.
We invested very little money into our first coop and it showed. It didn’t last very long. We also made the mistake of using a poor layout and made poor material choices.
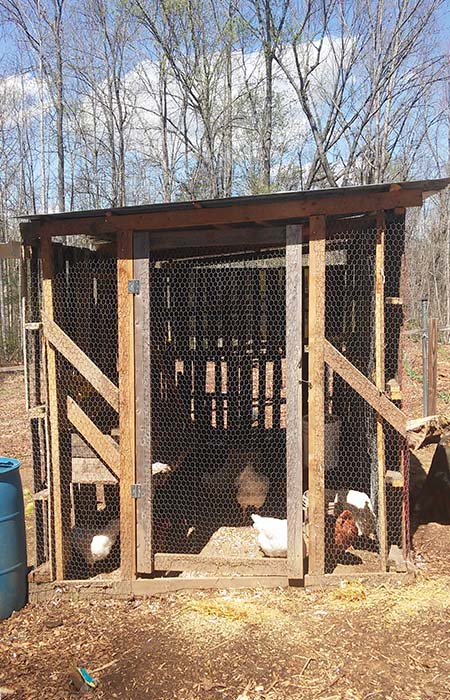
So when we decided to build a new one, we were stunned when we built a functional free chicken coop for practically no money.
That’s right, I said it was practically free!
We made sure to make better material choices this go round and knew the design we needed to make our chicken coop fully functional.
Here are the Materials You’ll Need:
- Pallets
- Scrap wood
- Hinges
- A latch for the door
- Chicken wire
- Materials for the roof (We used an old metal roof that was preassembled.)
- Materials for the nesting boxes and roosts (We used scrap wood and slabs.)
Here are the Tools You’ll Need:
- An impact drill
- Screws
- Sawzall or hand saw
- A level (to make sure your wooden perimeter is as level as possible)
- Tape measure
Here is how we built it:
1. Start The Manhunt For Pallets And Scrap Wood
In case you haven’t heard by now, pallets are the greatest free building material around. You can make a ton of neat pallet projects from them.
In this instance, you will be building a chicken coop.
Most of the time you can find pallets for free by going around to local businesses. You are actually saving the business owner money by taking them so they won’t have to pay anyone to come to collect them.
You will need to determine what size coop you hope to build so you will know how many pallets you will need to collect.
In order to make it a walk-in coop, you will need to stack pallets two high. So keep that in mind during the time of collecting pallets.
We used 2×4’s that we had from old projects.
If you have to buy them, it isn’t too expensive but hopefully, you’ll have some just lying around the homestead somewhere.
I don’t know about you, but I prefer free to cheap.
A great place to look for old scrap wood is on sites like Freecycle.com.
Here are also a few more ideas of places you could find the needed scrap wood for this project.
2. Lay the Ground Work

Depending upon how many 2×4’s you have will depend on how large the perimeter of the coop will be.
You basically just want to lay a rectangle shape.
Any dimensions will work. Just use what materials you have.
We used cordless power tools and screws to screw the 2×4’s together.
Make sure you are satisfied with the dimensions of the coop before you move on because this will tell you how large of a coop you will have.
It is always better to go larger because you always end up with more chickens than you originally thought you would.
3. Put Those Pallets To Use
Now you need to start building your pallet walls.
Start with the first row of pallets. Screw them into the wooden perimeter.
It is easier if you have pallets that are close to the same size.
If not, you may have to go back with old scrap wood and do some patchwork.
After you get the first layer of the wall built, add a second pallet on top of the first row of pallets.
This will make it tall enough that you can walk into the coop. You add this second tier by screwing the second row of pallets to the first row.
You can also use a hammer and nails if you don’t have screws and power tools.
Just use whatever tools you may have.
4. Operation: Keep Henny Penny Dry
This is where you can get really creative.
Your chickens need to stay dry. That is the only qualification for a suitable roof.
We had an old metal roof from an old outbuilding that had fallen down.
We cut it down to fit our coop and just slapped it on top. Then we screwed the roof into the pallets to hold it in place.
If you don’t have an old metal roof, you could actually lay pallets across the top and cover it with old feed bags, plastic, a tarp, or sheets of metal.
Basically, whatever materials you have on hand will work.
Remember, chickens don’t care about how their coop looks.
They care about it protecting them from the wind, rain, and not being overcrowded.
5. Shut The Front Door
Even your chickens need a front door.
There are lots of ways you can go about giving them one. You can always buy them a door or even find a second-hand door and customize it to fit your free chicken coop.
We (yet again) used old pieces of wood from another project to frame up the door.
All you need to do is screw a piece of wood to the top of the wooden perimeter that you laid in step 2.
Screw a piece of wood to the roof to connect the two pallet walls. Then add two additional pieces of wood to either side of the pallet walls. Then use wood to build a door frame in the middle.
Fill in the gaps in the door frame with chicken wire.
Then you can actually build a coop door if you have any excess wood.
We framed a door with excess wood we had left and then used chicken wire to fill in the middle. Then you just add a handle to the door with a proper latch and some hinges.
Finally, put the door on the hinges.
You now have a fully functional coop.
6. Add The Décor

For a free chicken coop to be fully functional your chickens need:
- Nesting boxes to lay their beautiful eggs
- Roosts to rest their tired feathers
- A secondary door into their run or chicken yard (in our case)
We built our own nesting boxes.
We had more scrap wood that we put to use by building a platform for the boxes and then built a few sides to divide each individual nesting box.
You could also just screw milk crates to the wall or buy nesting boxes.
We placed the roosts at the back of the coop to try to keep the chickens from sleeping in the boxes. Notice I said try because our chickens just love their nesting boxes for whatever reason.
We have a sawmill up the road from our house where we are able to get slabs for free all year long.
Needless to say, we build a lot of things out of slabs.
We had small strips leftover from some of the slabs we had used previously and used them as the roosting bars. All you do is cut them to fit the width of your free chicken coop and then drill them into the pallets.
You could use any type of scrap wood you may have.
We do not let our chickens completely free-range.
They have a chicken yard attached to their coop so we had to add a chicken door for them to get in and out of their yard and into the coop.
All you do is cut a spot big enough for them to get in and out of with a Sawzall. It is very simple. If you do not have a Sawzall, then a regular hand saw should do the same thing.
If you feel like you need the added protection, you can always make a little door (again, from scrap wood) that you can open and shut nightly.
We don’t have a large population of predators in our area so we’ve never had to add such a door.
7. ADT For Your Chickens

Your chickens may need extra security if predators are a huge threat in your area. Our chickens are actually in the fenced part of our backyard.
We did this for extra protection.
We still added chicken wire to the inside of our free chicken coop and also put slabs along the perimeter outside of the coop as extra reinforcement.
This allows for protection with proper ventilation.
If you notice that there might be too much of a draft in your coop, you can use old feed bags or a tarp to stop the rain or wind. You could also do some patchwork with old pieces of scrap wood to block any holes that are too big in the pallets.
If you have a lot of predators on your property, then you could always add chicken wire under the ground for predators that might try to dig their way in.
For the most part, as long as you don’t leave any large holes, and you protect your flock from digging creatures and toddler-proof latches to keep raccoons out, they should be okay.
8. A Place For The Chickens To Walk And You To Clean

Even a free chicken coop needs a floor.
There are also many different options.
Mulch is an excellent option for a coop floor. The reason is you can get it for free from local tree service companies.
Again, this saves them money so they are usually more than happy to help.
It helps keep the odor down in the chicken coop while your chickens also turn it into compost for you by scratching.
Another option is to use rive rock to fill the bottom of the coop. It is smooth so it will not hurt your chickens’ feet but is also easy to clean. When you go in to do your cleaning just spray the rock down with a water hose.
This is an upgrade I’m hoping to make to our coop in the near future.
You could also lay plywood and put linoleum in the coop as well. It is also easy to clean with a water hose.
This can be purchased, but you might also be able to find some for free on sites like Craig’s List.
A lot of times when people do remodels they’ll put their waste on the internet for someone to come get for free so they don’t have to pay to haul it off.
This free chicken coop was built free by utilizing all of our scrap materials.
It is meant to be more of a guide to encourage you to see what free materials you can gather in order to build a coop for very little money (and hopefully free!)


