
You know what I hate about moving to a new home? It’s the idea of starting all over at making a new place feel like home.
Don’t get me wrong; I’m thankful to be where I am. I love our new home, and I love the land which came with it.
But there are certain things we had at our previous home; I haven’t been able to make happen here yet. Some things are more significant items, while others are small.
One item I was able to build this week which makes my house feel more like a home, is a clothesline. It may not sound like much, but I’m thrilled. I was able to accomplish this task on a tiny budget.
Here is how I constructed our clothesline for less than $10:
The Benefits of a DIY Clothesline
I know when some of you read my introduction you probably thought, “Really? A clothesline makes her house feel like a home?”
Yes, isn’t it crazy how something so small can make such a huge difference, but it does. I first discovered line drying my clothes when I gave up washer and dryer for a year and washed our clothes by hand.
Though it was a ton of work, it inspired my family to embrace our homesteading lifestyle. We are now in the process of recreating many of those ideas in our new home on our larger homestead.
Before I dive into the nitty-gritty on how we built this clothesline on such a small budget, I wanted to give you a few of the benefits of having your own clothesline on your property:
1. It Saves Money
Dryers use energy. In turn, this costs you money. At Saving Electricity, there’s a calculator which allows you to calculate how much you spend drying a load of laundry per week.
According to my laundry routine, I can save over $200 per year by hanging my clothes outside to dry. Any penny I earn which I don’t have to turn around and pay back out is a bonus in my book.
Therefore, if you like the idea of saving some extra money without having to make a huge investment to do it or put forth a ton of energy, line drying your clothes could be the solution.
2. It Saves Electricity
I’m all about living a greener lifestyle. It makes me feel good to know I’m not cluttering the earth or being a wasteful person.
Since I know dryers use a hefty amount of electricity, it doesn’t hurt my feelings one bit not to use my dryer.
Whether you want a break on your electric bill, or you want to lead a greener life, line drying is a great way to accomplish both.
3. Clotheslines Add a Touch of Home
While I’m outside on a pretty day, busy hanging my clothes out to dry, I can’t help but remember my grandmother’s yard.
I remember when my mom would starch her curtains, and we’d drive a mile up the road to my grandmother’s home to hang them up because she had a clothesline.
Clotheslines take me back to a simpler time, and this seems to be a common thing for most people. It makes your house feel like home.
4. Makes You More Self-Sufficient
We think we have it made as humans until disaster strikes. It can be something simple such as a thunderstorm knocking the power out for a few days.
It could be a much larger issue such as a hurricane impacting people far and wide. Some larger storms don’t do mass amounts of damage everywhere, but they leave those who get the outer skirt of the storm without power for longer periods.
When these things happen, we realize how much less we knew than our ancestors. It’s important to have these ‘back-ups’ in place when tragedy strikes.
It also teaches you a valuable skill, which sounds simple enough, but how to dry clothes without modern machines or electricity.
5. Keeps You Moving
We are becoming a sedentary generation. It simply means we don’t move. Two generations ago, our family members were working outside all day long to provide for their families.
Now, we sit in front of computers and draw larger paychecks than most of our elderly family members could have ever dreamed possible.
Regardless of our financial situations, our health is failing because we don’t move enough. A clothesline could change this.
Currently ‘doing laundry’ consists of moving clothing from the washer to the dryer. However, it should instead be a process where you walk outside, move around while hanging clothes, and walk back indoors.
Do you realize this gives you a reason to get Vitamin D and breathe fresh air all while being productive? It’s a win-win.
With all of this said, let’s move on with how I built my super simple, inexpensive clothesline.
How to Build a Clothesline Cheaply
There are lots of fancy and gorgeous clothesline out there in the world. I’ll be the first to admit, my clothesline is nothing fancy, but it allowed me to use materials I had on hand and does a great job. Here’s what you need to build this clothesline:
Materials:
- Two landscape timbers
- Wire
- Auger or Post Hole Digger
- Two 2×6 pressure treated wood
- Pliers
- Drill
1. Lay Out Your Clothesline
A good thing about building our larger homestead is that I get to learn from the mistakes we made our first go around on our smaller homestead. With those mistakes in mind, I can apply what I learned when I rebuild items, like this clothesline.
For instance, my previous clothesline had only two rows to hang clothes on. We are a family of five, meaning I need more space.
This time, I decided to make my clothesline longer and add four rows to hang clothes on instead of two.
There’s no exact science to figuring out the width of your clothesline. Hold the posts up until you have them the right distance apart for your satisfaction and mark where you want them on the ground.
However, be sure you have enough wire to stretch from one post to the other.
2. Cut the Wood
When you know where you want your posts to go, it’s time to cut your pressure treated wood down to size. I used scrap wood I had hanging around my property from other projects I had completed.
The desired size is two pieces of pressure treated wood. I used two 2×6’s and cut them to be four feet long. When you have the pieces of wood cut to size, you’re ready to move on with the process.
3. Drill the Holes
Once your wood is cut to size, you need to figure out how far apart you want your wires spaced. If you only need two wires on your clothesline, you should put one wire at one end of the 2×6 and one at the other end.
In my case, I have four wires, meaning I put one hole at each end of each 2×6 and two evenly spaced in the middle.
When you’ve figured out where you want your wires to be, measure and mark them. From there, you’ll drill the holes in both 2×6 pieces of wood.
4. Put the Posts in the Ground
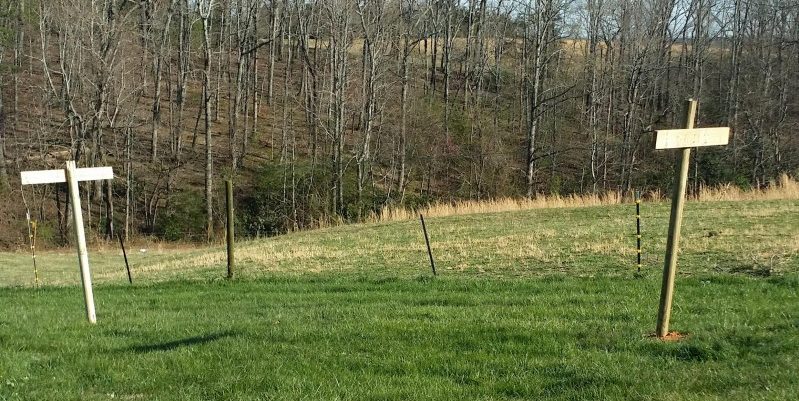
Since all of your pieces of wood have now been cut and drilled, it’s only a matter of putting it all together at this point.
You’ll need to use an auger or a post hole digger to dig the holes where you marked them on the ground. Try to do this at an angle.
This way, when the posts go into the ground and have pressure applied to them from the wires and laundry, they’ll be pulled together in an upright fashion.
Whereas, if you dig the holes straight down, the posts will bow in the middle under the weight and cause your clothesline to sag.
When you’ve dug the holes, insert the landscaping timbers into the ground. Be sure to pack the dirt around each post as much as possible.
5. Add the Supports
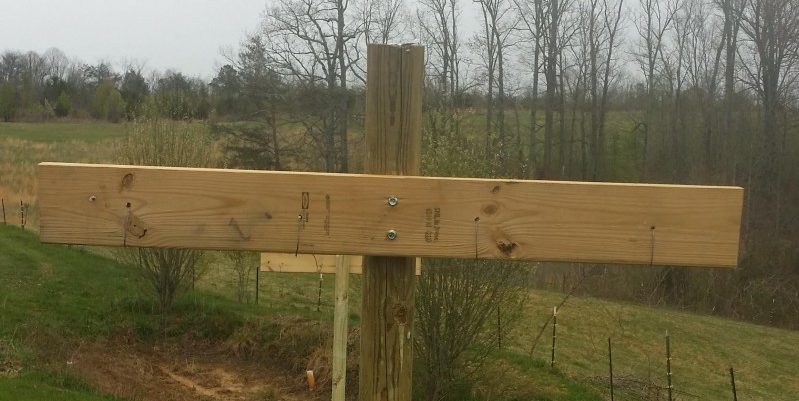
Next, you’ll need to add each of the 4×6’s to the landscaping timbers.
Again, there’s no exact science. You need to decide how high you want your wires to be when hanging clothes.
If you can reach the wires, you’ve found a good location for the 2×6’s. If it’s too high, lower them and vice versa if it’s too low to the ground.
When you get them situated correctly, attach them to the posts with screws or a hammer and nails will do the trick as well.
6. Run the Wire

Finally, you will run a piece of wire through the first hole from one landscaping timber to the other. Wrap the wire under the 2×6, leaving enough wire to wrap it around the clothesline to secure it.
However, before you wrap it around the clothesline, use your pliers to pull it as tightly as you can get it. When the wire is tight, snip the wire and wrap the remaining part of it around the wire you tightened to secure it.
Do this on both of the outside holes first. If you have middle holes for additional clothesline room, you’ll do this after the outside holes.
The reason being if you secure the outside wires first, no wires should sag in the process of getting them situated on the clothesline.
After this, your clothesline is ready to be put to work.
Recap of Expenses
Here is the breakdown of what the clothesline cost me for materials:
- Two landscaping timbers – $3.33 each.
- The wire from a previous project – Free.
- Two 4 foot 2×6 pieces of wood from an earlier project – Free.
- Total: $6.66
Well, you now understand the benefits of having a clothesline and how to build a functional clothesline with very little out of pocket expense.
Now, I want to hear your thoughts. Do you have a clothesline? Why or why not?
We’d love to hear from you. Leave us your thoughts in the comment section below.


