The concept of intercropping seemed completely revolutionary. Not only did you get to grow more food in a small garden, but you could reduce weeds, minimize pest pressure, water less, better control soil fertility, and more.
Well, I couldn’t wait to put those ideas to practice in my own garden. So, I set about intercropping in all my garden beds. It took forever to plant and my garden was a complete disaster. I had fungal problems, pest issues, piddly crop production, and my soil was barren by the end of the experiment.
Frustrated, heart-broken, and hungry for answers and vegetables, I went back to the text to find out what I’d done wrong. That’s when I read these words, “Just as with companion planting over time, you should proceed with care.”
Intercropping Must be Implemented with Care
I tell the story earlier as a cautionary tale. I still think intercropping is revolutionary and can transform your garden over time, but there is no magic formula. You’ll need to do some careful experimentation to find out what works in your garden.
With that in mind, let’s dig into the details on intercropping and how it might actually benefit your garden.
Examples of Intercropping
You probably already have some idea of what intercropping is, but looking at a few examples is the best way to understand the concept.
Three Sisters
You may have heard of this planting method – corn, squash, and beans – as the ultimate interplanting combo or plant guild.
For the three sisters, you plant corn a few weeks before you put in beans and squash to let it get established. Then, you use the corn as a trellis for pole beans. The corn is a heavy feeder, so it will take all the nutrients from the soil. However, beans – with the help of nitrogen-fixing bacteria – will supply their own nitrogen so they don’t need to compete for nutrients.
Squash vines are grown below the corn and beans as a kind of living mulch. That keeps down weed pressure. Plus, by shading the ground, it helps keeps the soil moist.
Carrots and Radish
Perhaps you’ve heard about planting carrots and radish together. Carrots take a long time to germinate and radish can be harvested in 21-35 days. That makes them the perfect pairing.
The radishes keep down the weeds until the carrot tops are large enough to see and weed around. Then, you harvest the radish and the carrots keep on growing.
Throughout the article, you’ll find some more examples and how they work together. So, read on.
How Intercropping Works
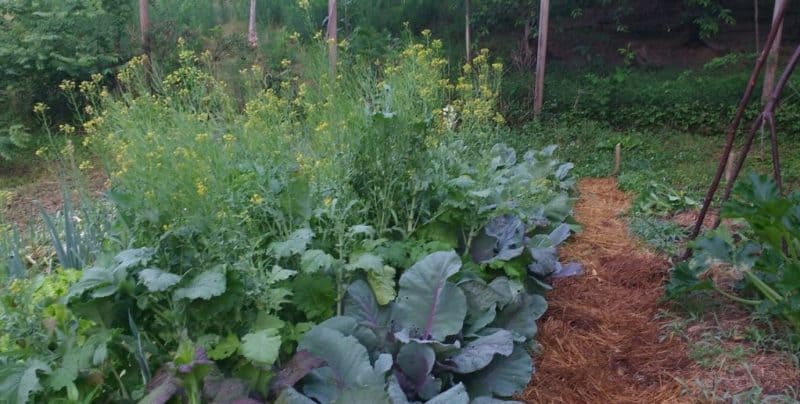
Interplanting or intercropping basically involves using 2-3 crops in the same planting area, at roughly the same time, for some beneficial purpose. The goal is to get the interplanted crops to support each other’s growing habits, so you get a better result in the garden.
Here are a few broad concepts to demonstrate some of the ways that plants can benefit each other.
1. Sun and Shade
Where I live, we have long, hot Summers that make planting cool-season crops for fall very difficult. Our erratic spring also makes it hard to grow cool-season crops to maturity before hot weather gets the best of them.
With intercropping though, I can start cool-season plants in the shade of warm-season plants in summer. Then, when temperatures cool down, the warm season crops come out and my cool-season plants get full sun. Or I can start fast-growing tall warm crops in front of late-maturing cool-season crops in spring.
I plant sunflowers in front of spring cabbage. I plant my cabbage on the Northside of my still-drying dent corn in fall.
I start winter spinach and collards in the shade of my trellised Malabar spinach. Turnips go in on the shady side behind pole beans.
2. Root Depth
There are two primary root structures you see in a vegetable garden – fibrous and taprooted. Fibrous root systems for annual vegetables tend to spread in the top few inches of soil. Taproots go down 8-10 inches or more.
Taproots get stunted if there are too many nutrients in the top few inches of soil. If you plant taproots next to fibrous-rooted plants, those fibrous roots will take the nutrients in the upper inches. That will help drive taproots deeper.
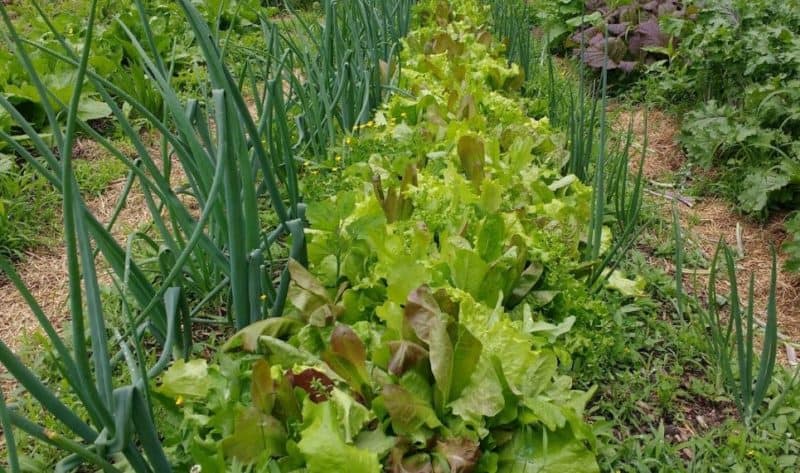
Alternating rows of lettuce with rows of carrots is a good example of this kind of interplanting at work. It also makes for a pretty display if you use red-colored lettuces.
3. Leaf Structure
Similar to interplanting based on root structure, leaf structure can impact interplanting decisions. By mixing and matching upright with low growing plants, or bushy with spindly plants, you can plant closer together and still get good airflow. For example, cabbage with its bushy growth habit pairs well with more spindly, upright onions.
Onions go in first, in late winter and get a little time to establish. Then, the cabbage gets transplanted in early spring just about when weeds might try to take over your onion bed. From my own experimentation, this seems to work best if you choose faster-maturing cabbage that can be harvested before the onions start to bulb.
4. Growth Speed
Using fast-maturing plants with slow-growing plants is another good interplanting option. Those carrots and radish mentioned earlier are classic examples. But I also like to grow baby crops with full size crops for the same effect.
The baby crops get densely planted to crowd out weeds. Some get harvested for greens, others for baby bulbs. The key is that you must harvest your baby crops by the time your full-size or slower-growing crops begin to need that soil space for their root systems.
5. Feeding Habits
Some plants are heavy feeders that require a lot of nutrients. Others are gleaners that will take whatever is left in the soil and make the most of it. Legumes, inoculated with rhizobia, are able to fix their own nitrogen and can glean the other micro and macro-nutrients they need.
You would never want to interplant a heavy feeder with another heavy feeder. But, putting gleaners or nitrogen fixers with heavy feeders tends to work well. Mixing legumes with grains is a perfect example of this kind of interplanting.
6. Companion Planting
Companion planting is another form of intercropping. For example, planting basil and tomatoes in your asparagus patch to deter asparagus beetles also gets you more yields from your asparagus patch.
Growing coriander with your cabbage can be a deterrent for cabbage pests on young plants. Plus, it also gets you a fast crop of coriander greens while your slower-growing cabbage gets going.
7. Mix and Match
The best interplanting strategies tend to fulfill multiple roles. The crops may be beneficial companions in terms of pest control while also maximizing root growth and leaf structure aspects as well as feeding habits.
The Problems with Intercropping
Now, back to that warning at the start of this post.
As good as all that sounds, intercropping won’t work in every situation. Also, the things that work for someone else might not work for you.
The three sisters’ interplanting system is an absolute disaster in my garden. When I plant those three things together, I end up having massive pest and fungal problems due to my climate and the invasive pests in my area. Whereas, when I plant them separately, I can easily manage pest and fungal issues with no problem.
To help you figure out what might work for you, here are some things to consider when making decisions about which type of intercropping would suit you:
1. Airflow
If you live in a humid area, your plants need good airflow to limit fungal issues. Some intercropping will trap moist air around your plants. That will increase the likelihood of your plants developing fungal problems and being less productive.
2. Pest Problems
If you are an organic gardener, you need to be able to handpick pests from your plants at times. So, you’ll want to make sure that your intercropping doesn’t make it hard for you to do that.
Also, your intercropping shouldn’t create safe havens for insects. For example, low growing lettuce might not get in the way of more upright growing cabbage. But slugs can easily hide under lettuce during the day and then eat your cabbage leaves at night.
3. Soil Fertility
Intercropping does not work well in soil that is not fertile. If you have a brand-new garden with very little organic matter and few nutrients, then your plants need extra soil space to access sufficient nutrients.
As you begin to improve your soil with annual applications of complex compost and mulch and the use of cover crops, then interplanting becomes more effective.
4. Plant Spacing
When you interplant in fertile soil, you can group plants more closely together. Those closer groupings get you the benefits I mentioned at the outset like watering less, fighting fewer weeds, and getting more food from a small space. However, many gardeners take this too far.
Realistically, intercropping might allow you to plant 10-20% more plants in the same space. Many gardeners, though, try to double yields with this method.
I can tell you from experience that you can get away with it for a few years. Eventually, though, you’ll run up against the reality of a nutrient-depleted garden.
How to Interplant Well
With all that background, here are some tips to help you start using this revolutionary tool in your garden with the wisdom I wish I’d had at the outset.
1. Go Slow
First off, take John Jeavons’ advice (and mine) and proceed with care. Don’t revise your entire crop rotation to interplanting all at once. Try a couple of interplantings a season and see how they go.
2. Choose the Right Varieties
Second, varieties matter. A giant ball head cabbage is a whole different thing than a small 65-day cabbage, like Earl Jersey Wakefield or Golden Acre.
Bunching onions are used differently in intercropping than bulbing onions. Romaine, leaf, and head lettuce are each unique in terms of leaf structure. Beans can be runners, half-runners, or bushing in style. Squash can be vining or non-vining. Tomatoes are determinate (bush) or indeterminate (vining).
Make sure you choose specific plant varieties with the growth habits, size, and nutrient needs for your interplanting goals.
3. Make Adjustments
If you interplant and see that it’s not working, pull your faster-growing crop ASAP and start them somewhere else instead. Or, add fertilizer to get plants back on track.
Interplanted crops should not grow slower or produce less than your individually planted crops. If they seem to be doing poorly or not producing, then treat them just like you would individually planted crops. Yank ‘em or fix ‘em so you don’t end up with pest or pathogen issues invited in by sickly plants.
Conclusion
Intercropping is an awesome gardening tool that requires a bit of skill to use effectively. If you are new to gardening, save interplanting for your second or third year of gardening. But, if you already have some experience growing plants individually, then take your time building your interplanting skills.


