
Do you raise tomatoes in your garden? There isn’t anything quite like a home-grown tomato. The flavor can’t be matched.
However, one of the downsides to growing tomatoes is they need to be staked. If you’re only planting a few tomato plants for salads and sandwiches, your budget may not take much of a hit.
But if you grow enough tomatoes to share, sell, or preserve, staking them gets costly. Which is why my husband and I have done our research and discovered a new simple, inexpensive method to keep the plants off the ground.
This method is known as the Florida Weave. There are two ways to use this method. I’ll share with you the process we prefer and why.
But I’ll also share with you the alternate method as well. I’m also going to share with you a cheap, homemade approach to creating a trellis for your cucumbers and squash too.
These methods should keep your vegetables healthier, and your garden much neater. Here’s how you can stake and support your plants with little fuss:
The Florida Weave
You’ll need:
1. Gather Supplies
When staking your tomatoes using the Florida Weave, you don’t need many supplies. You’ll need a T-post for every six feet of tomato plants you’ve planted.
Choosing a sturdy garden twine is best for this method. However, if you already have sturdy string on hand, you could potentially use it instead.
Finally, you’ll need a pair scissors for cutting the twine. The belt and PVC pipe is an optional step. It’s something my husband uses to make the process go a little smoother.
2. Plant the Posts
Now that you have the supplies needed to perform this task, you can start by putting your T-posts into the ground.
Begin by planting one at each end of the row of tomatoes. From there, walk off six feet and plant another T-post every six feet.
When you have the T-posts planted every six feet in the row of tomatoes, you can move on with the process.
3. Gear Up
This step is optional. It’s something my husband does to make the process go a little smoother for him. He begins by sliding the twine on a belt. Twine comes like a large spool of thread, making it easy to push onto a belt through the hole in the middle of the reel.
Once the twine is attached to his belt and the belt is fixed around his waist, he begins pulling the end of the twine away from him. From there, the twine is run through a piece of PVC pipe.
The height of the PVC will depend on how tall you are. The purpose is to keep you from having to bend over as you run the twine along the tomato plants.
When the twine has been pulled through the PVC pipe, tie the end to the bottom of the T-post. That will be your starting point.
4. Start Walking
When you arrive at this step, you should have the spool of twine attached to your belt around your waist.
You should have the line of twine started. It should be running through a piece of PVC pipe and pull even further out.
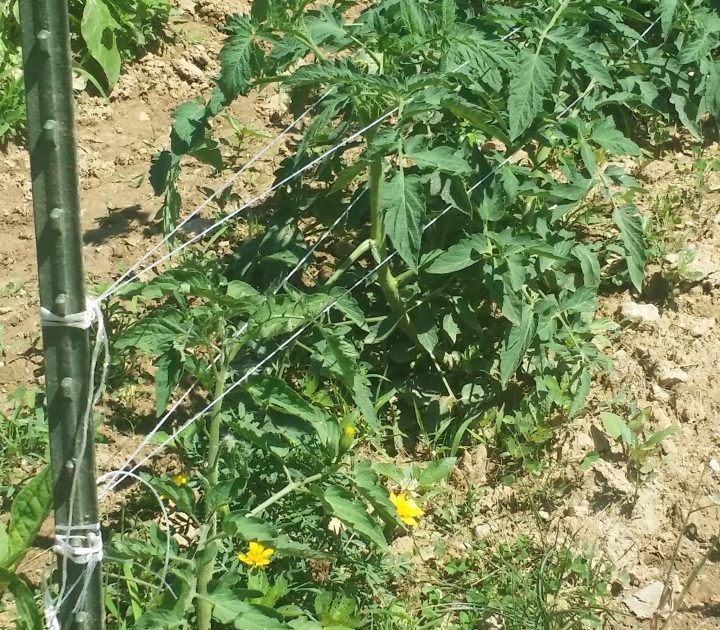
The end of the twine should be tied to the T-post. When you’re ready, begin walking the twine down the row.
You’ll have to pull twine from the roll attached to your waist as needed. The twine should be running along the base of the tomato plants to give support to the bottom part of each stem.
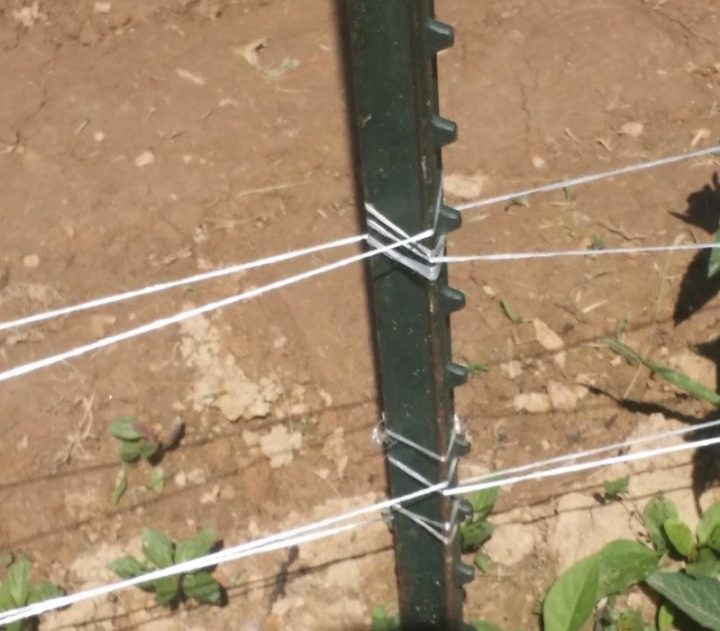
When you reach a T-post, direct the PVC pipe around the post three times. You’ll notice the twine is pulling tighter with each wrap around the post.
After the third wrap around the t-post, begin walking again. You’ll continue this pattern until you reach the end of the row.
5. Finish Up
After you’ve finished the front side of the row of tomatoes, you’ll wrap the twine around the final T-post at least three times.
When you feel the twine is supporting the front side of the tomato plants adequately, begin walking back to the other end of the row.
This time you’ll be supporting the backside of the tomato plants. As you reach each T-post, be sure to wrap the twine around it at least three times to make sure the tomatoes are well supported.
As you reach the end of the row, it’s time to cut the twine and tie a knot to secure the first level of support for your tomato plants.
You’ll continue this same method to add support higher up the tomato plants. Add as many levels of support as needed and don’t feel like you have to add them all at once.
Add more support to your tomato plants as they grow.
6. A Few Pointers
The biggest problem faced with this style of staking is lacking support in the middle of a row. If you place a T-post every six feet in the row, you shouldn’t have this problem.
However, if by chance you do, you should add more T-posts. You could have abnormally large or heavy tomato plants which need it.
But don’t feel like you’ll have to go back and redo the entire process if you find later on you need added support.
Instead, incorporate the new T-posts when you add the next level of added support.
The Second Method
As mentioned previously, there is a second method to performing the Florida Weave. I prefer the approach mentioned above because of the simplicity of placing the twin in straight lines on the front side of the tomato plants and the back as well.
Plus, you get to add support to your plants in simple layers.
However, if you’d like a fancier method, instead of running the twine in straight rows you weave the twine in between each of the plants. It should form a zig-zag pattern.
You’ll do this on the lower levels and can continue the same zig-zag pattern as the plants grow, or you could use the straighter method on the higher levels.
DIY Cucumber Trellis
I love to raise cucumbers, but I don’t like how they run all over my garden. It’s difficult to harvest them in a timely fashion, and they make the garden look cluttered.
Well, my husband and I put our heads together to find an inexpensive solution to creating a simplified garden trellis. You may have some of the materials on hand to make this inexpensive solution for you as well.
Here’s how you build a DIY cucumber trellis:
You’ll need:
1. Gather Supplies
We were working out in our garden a few days ago putting up our Florida Weave when I looked over and saw how much our cucumber plants were growing.
I was concerned about how much space they were going to take up in the garden, even though I planted them near the edge.
After putting our heads together, my husband and I headed to the barn to see what we on hand to create a quick trellis.
We had step-in fence posts leftover from our electric fence, and we had scrap pieces of fencing from where we’d built different things around the property.
After gathering the necessary supplies, we went to work.
2. Plant the Posts
The first step in constructing this inexpensive trellis is to place the step-in fence post into the ground approximately a foot in front of the plants.
You’ll need to leave enough room to fit the fencing in between the plants and the fence posts. When you have them all pressed into the ground, you’re ready to move forward.
3. Spread the Fence
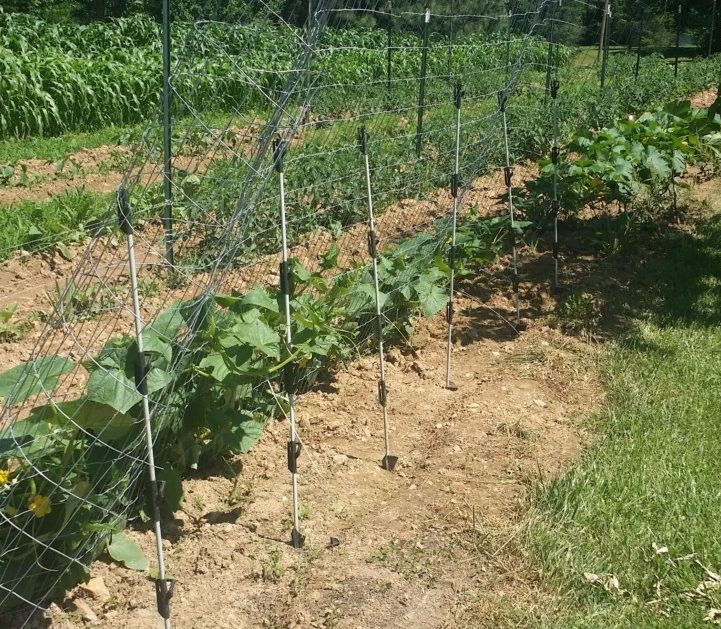
Next, we unrolled the fencing and placed it as close to the cucumber plants as we could get it without damaging the plants.
When the fencing was standing tall, we leaned it toward the fence posts. The reason I recommend using the step-in fence posts is that they’re meant to have a wire run through them.
We attached the fencing to the posts by sliding it into the areas on the posts meant to hold wires. The trellis should be ready for use at this point.
4. Feed the Plants

The final step is to feed the plant through the trellis. If you wanted to use this trellis for heavier plants such as pumpkins, you’d want to use a sturdier type of fencing such as hog fencing.
But if you’re trying to support cucumbers or even squash, typical wire fencing or livestock fencing should do the trick.
When the trellis is fully functional, begin feeding the cucumber plant through the trellis. This should train the plant to climb rather than sprawl.
However, you’ll need to check the plants regularly to see if any shoots are sprawling rather than climbing.
If they are, you’ll need to feed them through the fencing as well and continue to train the plant to climb.
Well, you now have three different ideas for staking multiple types of plants in your garden. It should help increase your harvest by supporting the vegetables and keeping them from the ground.
Also, it should give your garden a tidier look. We wish you all the best in your gardening efforts this year and hope these tips will help you to save money too.


