Do you like to recycle? Does it make you feel good to know that you are doing what you can to reduce, reuse, and recycle?
Well, if so, then you are the perfect candidate to begin making your own compost. Compost is when you take your yard waste and old food, then place it in a bin with worms or fungi and allow it to break down over time.
Then you use the rich soil to plant in. Your garden loves it and so does the earth and your wallet. You can use our guide to help you know what you can and cannot compost.
However, if you are going to begin composting why not build your own compost bin?

How to Build a Compost Bin
Here are 3 different ways to go about it:
DIY Compost Bin #1

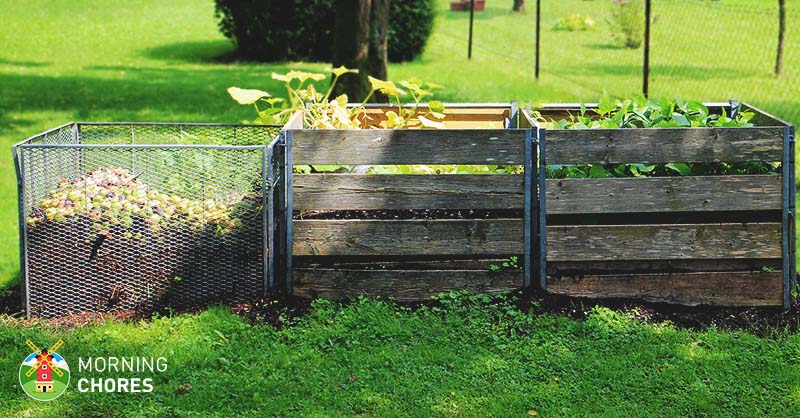
Our first compost bin is going to be made from a material I love to recycle…pallets! I love pallets so much because they can be used in so many different ways.
So why should building your own compost bin be any different?
1. Collect Your Pallets
If you’ve been around the blog very long, then you know I always share where you can possibly find pallets easily and hopefully free.
In our experience, I’ve always had good luck going to small businesses and collecting their pallets. My go-to place is actually a local nursery. They have to pay someone to come to pick up the pallets and recycle them.
If I come along, then they can give the pallets to me for free. This is a win-win for everyone. Just be advised that some big box stores will not give you pallets.
So try to stick with local companies that are looking to save as much money as possible. Some people may also sell pallets online.
However, I recommend trying to find them for free first. Once you’ve located your pallets, load them up and take them home so your project can begin.
I must add, when building the pallet compost bin try to find the pallets where the slats are closer together.
Obviously, this will help your organic matter stay put. If you can’t find those types of pallets, then you may have to add some wood to the sides of the pallets so your material doesn’t fall onto the ground.
2. Figure Out Where You Want Them
Next, you need to figure out where you want your compost bin. It doesn’t really matter where you put it. As long as fresh air can get to it, then you should be good.
Still, I would recommend keeping it somewhere close to where you will be using it.
For instance, if you will be using your compost in your garden, then you may want to put it near your garden for easier spreading.
Just take the time to really think about where you want to place it.
However, keep in mind, that compost is rotting food and other organic material. You won’t want to put it too close to your home so you don’t attract pests or have an undesirable odor. Just think it through. You’ll come up with the right place for you.
3. Put Them Together
After you know where you want your compost bin to go, it is time to begin creating your masterpiece. Start by gathering your tools. You’ll need an impact driver if you have one. If not, then you can use a hammer and nails.
Then you’ll set-up your pallets to form a square or rectangle. I recommend a square shape because that should be big enough for most small gardeners.
Actually, you should have some left over to sell, but you can be the judge.
Then you simply nail the pallets into place. If you are having a hard time getting your pallets to stay erect, then try driving some t-posts into the corners to add some extra support.
Now that you have your actual bin, you are ready to move on.
4. Begin Filling It Up
Once your bin is together and where you want it, it is time to begin filling it up. You’ll need to refer back to our list as to what you can compost and what you should not compost.
Then you’ll begin adding these items to the bin. You can add your own worms or hope that your organic matter will draw them. That is a personal preference.
However, once you have organic matter, worms, fungi, and air the composting process will begin to occur. Over time, you’ll have a rich dirt that is amazing for your plants.
5. Wait
Finally, you wait. It takes time for everything to break down.
So patience is required, but you’ll be glad you waited once you see the amazing soil you’ve created for your plants.
Plus, your wallet will thank you as well because good compost is not cheap when you go to buy it.
DIY Compost Bin #2
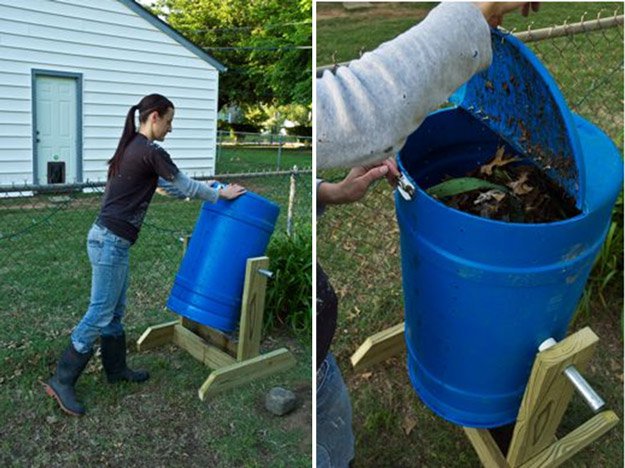
This next composting bin idea is one that my husband created around our house. It worked really well our first couple of years gardening and is something that is pretty budget-friendly too.
1. Gather Your Materials
This project calls for 3 metal poles and a plastic barrel with a lid, like this one. You can buy them at most farm supply stores, yard and garden stores, or order them online.
Once you have your materials in place, you are ready to go. Also, I recommend having an impact driver or electric screwdriver of some sort to make your job a little easier because you will be creating holes in this process.
2. Decide Where You Want It
Now that you have all of your materials, it is time to decide where you want your compost bin. As mentioned above, compost can get a little smelly so you’ll want it in a convenient location, but not so convenient that it attracts odors or bugs to your home.
Think it through before you put it in place. This is another compost bin that is meant to stay where you put it.
Therefore, it would be a little challenging to move it. Just think it through before you start building.
3. Put It Together
After you’ve found the perfect location, you are ready to begin.
Start by cutting 2 circular holes into the side of the plastic barrel. Then drill holes in the top of the barrel with the lid on.
Also, you’ll probably want to create a little door on the top of the barrel or on the side to make it easier to drop food in the barrel.
Then you’ll take one pole and cut it in half and screw it into the sides of the barrel. This will be the part that allows the barrel to spin.
Next, you’ll place the other 2 poles into the ground at the right distance for the barrel to fit in between.
Then, you’ll need to attach the barrel to the poles. We used elbow PVC pieces to attach the poles, but whichever you can attach them is fine as long as it gets the job done.
Now, you should have a barrel that is in the air enough so you can spin it. Once you’ve accomplished this, you are ready to move on.
4. Add Your Composting Materials
Once you have your composting barrel functional, it is time to begin adding your composting materials. You can use this list as a guide on what you should and should not compost.
Still, also remember, when you have a compost barrel that spins, you create something called compost tea. This is basically the water that drains out of the organic matter.
So place a bucket underneath your compost barrel so you can catch it. It is great to add to your plants for a little extra boost of nourishment.
5. Wait
Finally, you just wait. Over time your organic matter will break down and form a beautiful compost. A word of advice, since this barrel is up off of the ground, I recommend adding your own worms to help the process along.
DIY Compost Bin #3

This is probably the most simple compost bin you will make. It is also very cost-effective as well.
So if you are someone that wants to make just a small amount of compost, and you need your bin to take up minimal space, then you may want to really consider this idea.
1. Gather the Materials
This is basically a compost tub that you can store anywhere you choose.
Again, I recommend thinking this through so you don’t end up with odors or bugs in or near your home, but it is mobile so if where you put it originally doesn’t work, you can always move it.
So for this bin, you’ll just need a plastic tote with a lid, and an electric drill or impact driver to create the necessary holes.
Once you have your materials, you are ready to begin.
2. Create the Bin
You’ll create this compost bin, by drilling holes in the top and bottom of your bin. You’ll need the holes in the bottom to help any water drain from your compost.
However, you also want holes in the top and bottom for air circulation. You need air to help the composting process along.
Also, I would recommend purchasing worms (or just finding some out in your yard) to add to your compost. This will help the composting process along too.
And now you have a functioning compost bin for very little money.
3. Add Your Materials and Wait
Now that you have your bin ready to go, you’ll need to just add your materials. Here is a guide on what you should compost.
Then once you’ve added the necessary organic matter, you just wait for the process to happen.
Now you have 3 different compost bin options that you can create yourself. We have always worked on a pretty tight budget when it comes to homesteading and gardening.
So I feel confident in saying that these compost bin options are all budget-friendly options as well. Hopefully, they will also help save you money as well on adding nutrient-rich substances to your plants this growing season.


