
Summer’s end is within sight, and many new gardeners might feel like the best of the growing season has already passed. But no need to fret! There’s still plenty of time to grow oodles of delicious plants and so many things to do before the gardening season truly ends.
You can grow almost as much in an autumn vegetable garden as you can in a summery one. It’s just a matter of choosing the right species.
The edible plants to cultivate from now until wintertime need to embody two important traits: they need to grow quickly and withstand cooler temperatures.
How to Start a Fall Garden Successfully
Here are some tips to help you start a fall garden and have a successful fall harvest.
1. Prepare Your Garden Beds
If you’ve been growing lots of spring and summer crops in your vegetable garden, there’s a good chance your soil may need a little maintenance before you plant your fall crops.
Because weather conditions tend to be less predictable as we move into fall, making sure your plants have access to all the nutrients they need to mature on schedule is critically important. Make sure your soil is well-suited and stocked for the plants you plant to grow.
- Check your soil pH to make sure it is correct for what you want to plant. Use fast-acting lime (to raise pH) or sulfur (to lower pH) if necessary to adjust your pH for immediate planting.
- Check the nitrogen, phosphorous, and potassium (N-P-K) of your soil using a home soil test kit. Fertilize as necessary using organic fertilizers such as feather meal, bone meal, rock phosphate, worm castings, chicken manure, compost, and other natural amendments.
- Apply basalt or granite dust to your garden beds to remineralize the soil.
- Water soil deeply, after amending and before planting, to integrate and activate amendments.
2. Find Your First Frost Date
Since most garden vegetables don’t grow best in cold weather, your goal is to have your plants almost fully-grown before the colder days set in.
Use our handy tool to find your probable first frost date.
To determine what plants you still have time to start and grow before it gets too cold, you need to know your average first frost date. The actual frost date will vary every year. However, knowing when it is most likely to occur by will help you plan your plant selection.
Three columns of dates will tell you whether you have a 10, 50, or 90 % probability of your first frost occurring by those dates. It also gives you the dates for three temperatures 36, 32, and 28ºF.
Most fall or winter grown plants can take some cold and even survive temperatures below freezing. However, frost — which happens when moisture in the air freezes on the plants – can be much more damaging to plants than cold weather alone.
Frost can even occur before temperatures are at or below freezing. Which is why the table includes probable first frost dates at 36ºF.
If you want to be abundantly cautious, then you use the 10% probability date at 36ºF to determine when to plant all of your fall crops.
Calculate the Right Date to Start Planting
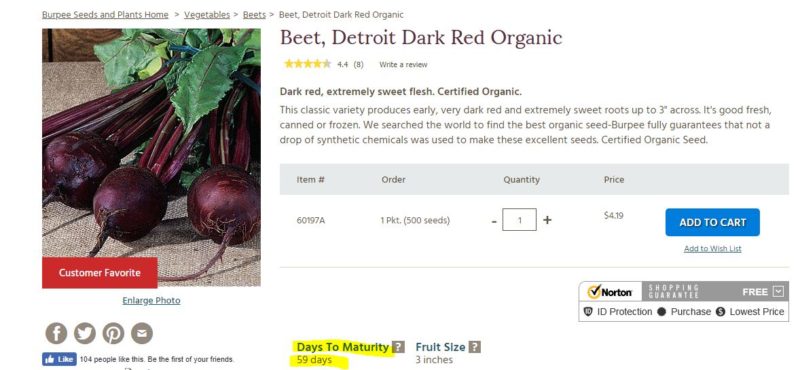
To figure your planting dates, subtract the “days to maturity” for your plant variety (shown on your seed packet or growing guide) from your frost date. Then plant your seed by that date or earlier.
For example, if your 10% frost date at 36ºF is October 3 and you want to plant beets that take 59 days to mature, your plant by date would be August 5. You can use free online date calculators to figure your dates easily.
Many cool-season crops are hardy enough to keep on growing through a few occasional touches of frost. So, if you want to push your limits a bit, then consider using different probability figures and temperature threshold frost dates to create your planting for different plants.
– Use the 10% Probability Frost Date at 36ºF for Warm Season Crops
The first frost at any temperature will usually kill the foliage of warm season plants like tomatoes, peppers, sweet potatoes, and others. Ideally, you should plan to have fully harvested all of your warm-weather plants before the 10% probability frost date at 36ºF to prevent crop losses.
– Use the 50% Probability Frost Date at 32ºF for Some Cool Season Crops
Some cool weather crops like cabbage, winter lettuces, and snow peas can withstand a few light touches of frost before they become too damaged and begin to die back. For these crops, you can still usually have success if you calculate your planting date using the 50% probability at 32ºF.
– Use the 50% Probability Frost Date at 28ºF for Cold Hardy, Frost-Improved Crops
Many seed sellers offer varieties of carrots, cauliflower, cabbage, parsnips, Brussels sprouts and more that become sweeter tasting after frosts. Check your seed catalog descriptions for good options.
For these kinds of “frost-improved plants,” you still want most of your plant growing done before it gets too cold. However, you have a bit more leeway on your planting dates. For these kinds of crops, you can often get away with using the 50% probability of frost at 28ºF frost date.
This may even be beneficial, so plants are still young when harvested after a few frosts.
3. Choose Fall and Winter Plant Varieties
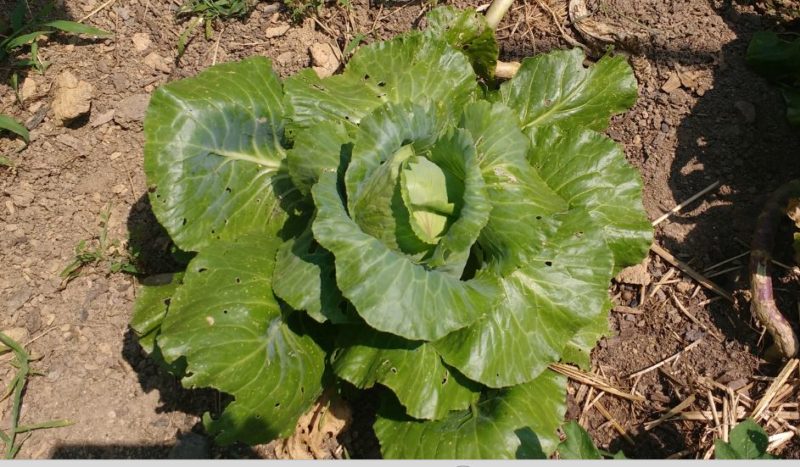
Even though things like cabbage and lettuce are often called cool season crops, there is a lot of difference in how much cold weather different plant varieties can tolerate.
For example, “early” cabbages, like the Early Jersey Wakefield, are great for starting in early spring because they mature quickly before the weather gets warm. However, as a fall crop, they are not as cold-hardy as some of the other ball-head type cabbages like the Brunswick.
Focus on planting vegetable seeds that are marketed as being fall or winter varieties rather than early spring varieties for best results.
4. Plan Ahead for Fall-Planted Vegetables
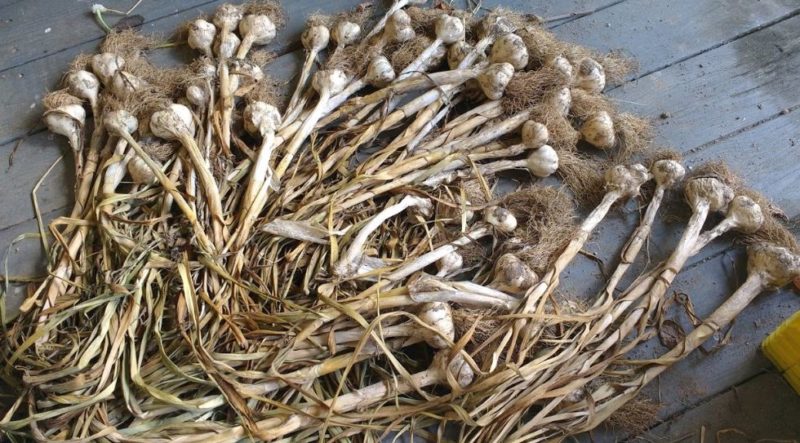
There are a few true fall planted vegetables like garlic, shallots, and hard-winter wheat. They grow quickly in cool weather so they are best planted in fall, usually just a few weeks before the first frost.
As soil temperatures drop, these plants become dormant. In early spring, they’ll start growing again. They are usually ready for harvest around late spring or early summer.
Make sure to reserve space in your fall garden beds for these late-planted vegetables. Or, you can plan to harvest some of your faster maturing fall-harvested crops at about the time you need to put in these few true fall-planted crops.
5. Plan To Protect Plants
Many people also use various methods to extend the fall growing season beyond the typical frost dates. It’s important to match the form of season extension you use with the amount of protection your plants will need in your climate.
– Floating Row Covers
Things like floating row covers can prevent frost from settling on plants and causing damage. However, they only increase the temperature around the plant and at the soil level by a couple of degrees. These are good for protection from unexpected early frosts, but they won’t extend your growing season by much.
– Plastic Covered Hoop Structures and Cold-Frames
Hoops covered with plastic and cold frames offer better wind protection than floating row covers and also prevent frost from settling. These also generate more heat on sunny days and may warm the soil enough to help plants finish maturing in fall. However, they also limit the amount of sunlight that reaches plants.
Overall, these kinds of structures tend to work well for extending the growing season in early fall while there is still sufficient daylight. They also help protect come and cut greens that are ready to harvest. Finally, they help keep the ground from freezing so you can continue to collect cold-hardy root vegetables longer.
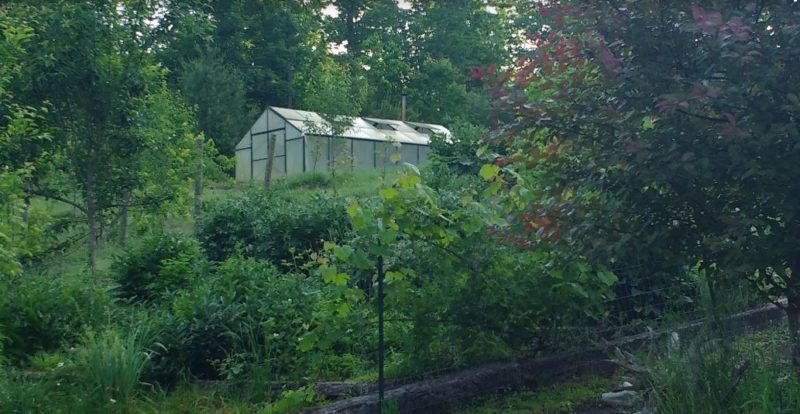
– Heated Hoop Houses or Greenhouses
For true season extension that will allow your plants to continue growing and maturing past your last frost dates, you will need to grow inside a structure that will enable you to regulate temperatures. Propane burners, solar heaters, or heat sinks such as large water tanks can help.
By keeping daytime air temperatures in your structure close to 70ºF and evening temperatures at 50ºF, you can continue growing plants well through fall. As days become shorter, though, plants will only grow relative to the amount of light. Depending on where you live, some supplemental light may also help plants reach maturity in fall and winter.
22 Plants to Grow in your Fall Vegetable Garden
When people talk about a spring vegetable garden, they usually mean the crops that are actually planted in spring. So when people talked about having a fall vegetable garden, beginner gardeners assumed that meant there were lots of vegetables they could plant in the fall. That’s not the case with fall gardens, there are only a few true fall-planted vegetables and most of the vegetables in a fall garden are actually planted in (late) summer.
1. Lettuce

Since lettuce tends to bolt in hot weather, starting these seeds in September (or even later) will result in a healthier, more prolific harvest. Better still, there will be fewer ravenous insects around to devour your crops.
Aim for mesclun mixes, Bibb, and other leafy varieties rather than Romaine-style or Cos. They grow more quickly, and you can sow successively every couple of weeks for a constant harvest.
Add a bit of nitrogen-rich fertilizer into the soil now and then to boost production, and avoid depletion.
2. Carrots

Do you have a growing bed that’s full of loose, well-drained soil? Pop some carrots seeds in there 8–10 weeks before the first expected frost date. If you choose small varieties like Little Finger or Parisienne, you can harvest them in about 55 days.
Remember that carrot tops are edible too! This can double their usefulness when it comes to your autumn vegetable garden. Triple, if you also use those greens to feed livestock or herbivorous animal companions.
3. Beets

The average beet takes 50–60 days to mature, and they actually get sweeter and crunchier as the weather gets cooler. They need to be sown directly into the same loose, well-draining soil like carrots, and they can even be grown together as companions.
Best of all, beets are dual-purpose food plants. Their greens can be harvested as soon as the leaves are large enough to be worth eating. Eat these raw in salads, or used like spinach or chard.
4. Arugula

This diminutive member of the brassica family is also known as roquette (or “rocket”) and is prized for its delicious, peppery young leaves. Since it bolts in a heartbeat during hot weather, it’s perfect to sow as soon as the days grow cooler.
Here’s a tip: sow seeds successively every couple of weeks so you can harvest straight through ’til mid-November.
5. Parsnips

These tasty root vegetables aren’t as popular in North America as they are in the UK, but they’re worth trying out. They taste like spicier carrots and sweeten exponentially once colder weather arrives. In fact, they’re so hardy that if you cover their bed with straw, you could harvest them well into winter.
They can also be companion planted alongside radishes, so you can double your harvest in a single bed.
6. Cabbage

If you have the space to grow cabbages, then dive in and get some growing! They’ll do well right into wintertime, provided they have nutrient-rich, well-draining soil, and plenty of sunshine.
Now, we’re not kidding when we say nutrient-rich soil. These plants are heavy feeders. Make sure to work plenty of aged manure or compost into the soil, and replenish with compost tea or other nitrogen-rich fertilizer every other week until mature.
7. Peas

Peas don’t thrive well in summer’s heat, so planting them as the weather cools will give you healthier plants, and a heartier yield. They grow and mature rapidly, so you’re sure to have at least one harvest before the snow starts to fall.
Go for petite varieties, as they’ll mature more quickly than larger pods. Dwarf varieties like Tom Thumb produce even faster and are ideal for balcony container gardens, too.
8. Kohlrabi

You may not be too familiar with kohlrabi, but they’re hardy, rather tasty members of the cabbage family. Their leaves aren’t particularly tender, but their bulbs are crunchy and can be eaten raw or cooked.
This is another species that tastes better once exposed to the cold. As a result, feel free to sow it late, and grow it well into November or December.
9. Spinach

Since spinach can take a while to mature, it might not immediately come to mind as ideal for an autumn vegetable garden. That said, if you plant seeds in late summer, and do successive plantings every couple of weeks, you can harvest the baby leaves as soon as they’re a couple of inches long.
These plants are heavy feeders, so if your soil is depleted from summer crops, work some nitrogen-rich compost in before sowing.
10. Radishes

If you’re searching for a dual-purpose crop that grows quickly, look no further. Radishes can reach maturity in just over two weeks, and their leaves are as nutrient-dense and scrumptious as their roots. Sow directly into loose, well-drained soil, and let ’em go.
They’re also sweeter when picked young—if left in the soil for too long, they can get woody and lose their flavor.
Aim for small varieties rather than massive ones (looking at you here, daikon!), and harvest them as soon as they start to push themselves free from the earth.
11. Broccolini (aka Broccoli Rabe, Rapini)

This broccoli cousin is smaller, leafier, and more sharply flavored than the stuff you’ll find at the grocery store. It’s also easier to grow.
Sow seeds directly into fairly nutrient-rich soil in full sun. If your winters are quite mild, you can grow rapini straight through into springtime. Furthermore, it won’t be devoured by white cabbage butterfly larvae in the cold weather, so you’ll have a lot more to enjoy.
12. Kale

Are you seeing a trend here? Kale is yet another member of the cabbage family and absolutely thrives in the cold. In fact, if you choose varieties that are specifically suited to chilly weather, such as Siberian/Russian kales, you can likely grow them in your autumn vegetable garden until the snow buries them.
This nutrient-dense vegetable is great to sow successively too, since you can allow some of the plants to grow to maturity while harvesting others as baby plants. They’re tender when young, ideal for eating raw, while mature plants are best cooked.
13. Green Onions

Most onions grow well in cooler weather, but green onions, in particular, are well suited to an autumn vegetable garden. That’s because these beauties grow quickly, so you can harvest a crop even if you sow the seeds in late September.
Here’s a tip: green onions are some of the easiest edibles to regrow from scraps. Save the root end of your onions after you’ve used the green bits to cook with. Then pop them into the soil, water them well, and you’ll have bright new green growth in no time.
14. Currant Tomatoes

As their name suggests, currant tomatoes are even smaller than cherry or grape varieties, and mature earlier as well. Seeds planted in rich, well-draining soil will reach maturity in about 70 days.
These plants can be quite prolific. Although they’re much smaller than other varieties, they produce vigorously, and you can expect to keep harvesting right into wintertime. Be aware that wildlife such as squirrels, raccoons, and deer seem to enjoy them too.
15. Swiss Chard

Much like spinach and kale, this green normally takes a long time to mature but can be harvested young as baby greens. Pre-soak the spiky little seeds to help accelerate their germination, and plant them in fertile, moist soil.
16. Green Beans

Pole beans are edible as haricots verts long before they mature into large seed pods for dry storage. Plant them now and train them up a trellis, bean tent, or other support structure. Then harvest the tender green bean pods and either enjoy them fresh or preserve them for pantry storage.
Freezing these beans is ideal, but if you’re keen on canning, you’ll need a pressure canner in order to preserve your green beans safely.
17. Bok Choy

Did you know that dwarf or “baby” bok choy varieties grow from seed to maturity in only 6–8 weeks? Find out your area’s first expected frost date, and count 30–40 days back from that, depending on the variety you choose.
As an added bonus, dwarf varieties are also ideal for container gardens.
18. Escarole (Curly Endive)

This delicate green vegetable isn’t nearly as well-known as it should be. It’s related to chicory, tastes rather like radicchio, and needs cooler weather in order to thrive. Sow seeds in compost-rich soil in full sun, and make sure you keep the soil moist! If you let it dry out, the leaves will go bitter.
Harvest after 60–75 days, and either eat it raw or cooked like spinach. Actually, if you’ve never tried Tuscan escarole and white bean soup, it’s a great autumnal recipe to highlight this fabulous vegetable.
19. Snow Peas

As their name suggests, these luscious, sweet peas do wonderfully in cold weather. They can even keep growing after the first frost, provided that their roots are protected.
Grow them in compost-rich soil, and feel free to amend it further with bone meal, if you have it. Make sure they get plenty of sunshine, and they’ll be ready to harvest in about 60 days.
20. Collards

These brassicas can grow quite huge in the right environment (generally moist, compost-rich soil that’s high in nitrogen), but the leaves can be harvested as soon as they’re about palm-sized. They get sweet and tender after a frost and are ideal for an autumn vegetable garden if you’re in zone 6 or lower.
When people say that they’re not fond of collard greens, it’s probably because they haven’t cooked them properly. Although some people like to use the large leaves as gluten-free wraps, my favorite way to eat them is braised, with plenty of garlic.
21. Brussels Sprouts

It’s funny how the bane of most childhood dinners can become so beloved once we reach adulthood. Brussels sprouts are beyond delicious when prepared correctly, and are some of the best options for a late-season harvest.
The seeds need full sun, moisture, and rich soil in order to do well. If you can provide all of those, you’re in luck. They’ll grow right beyond the first frost, and even straight into winter if provided with a bit of shelter from deep snow.
22. Miner’s Lettuce

This plant made it to our list of edible wild plants you can forage, and it just happens to be ideal as a cool-season crop as well. It only takes about 50 days to mature, is delicious and vitamin-rich, and only thrives in cooler weather. In fact, it may even keep growing after a light snowfall or two, depending on your growing zone.
It grows best in shaded areas. Scatter the seeds liberally into moist, rich soil that has quite a bit of sand content. Keep the soil damp, and harvest before it gets too leggy, in 50–55 days.
Common Fall Pests to Watch Out For
While many of these pests can attack at any time of year, they are particularly bothersome in the garden during the fall.
Cabbage Loopers

Cabbage loopers (Trichoplusia ni) overwinter in your garden and emerge in spring to eat their way through many of your vegetables. They’re often still going strong in fall.
These are fat, green caterpillars, growing up to 2 inches in length. Usually, they’re about an inch long. Loopers can be distinguished from other green caterpillars by the way they raise their middle segment as they inch along.
They’re enthusiastic eaters, and love those fall vegetables like cabbage, cauliflower, broccoli, and brussels sprouts, along with lettuce, potato, and tomatoes. They also nibble on flowers like carnations and nasturtiums.
They have a voracious appetite and can do a lot of damage in just a little time.
To control them:
- Handpick them off plants.
- Use row covers in the spring and summer.
- Apply neem oil every few days if you spot them.
- Use an organic insecticide such as Bacillus thuringiensis.
Fall Armyworm
Technically, the fall armyworm (Spodoptera frugiperda) is a type of cutworm, but they behave like an armyworm.
If you find one fall armyworm, there are many, many more lurking in the garden. As their name suggests, they decimate gardens and move from plant to plant in large numbers like a little insect army, typically moving around at night.
These pests love fall vegetables like cabbage, collards, and carrots. They also enjoy citrus, avocado, and various flowers. The bertha armyworm is particularly fond of cabbage and broccoli.
Go out with a bucket of hot water, mixed with a tablespoon of dish soap. Pick the armyworms off the plants and drop them in the water. Leave them in there overnight.
Homemade pesticides that contain pepper or garlic are effective. You can also use neem oil if you spray early enough and regularly throughout the fall.
Fall Webworm
Not to be confused with tent worms, (these come out in spring), fall webworms (Hyphantria cunea) appear in trees, shrubs, and veggies and cause serious leaf damage. They’re a worldwide problem and can be hard to control.
After flitting around all summer, the small white moths lay eggs that hatch into the larvae that cause all the damage.
Webworms weave webs around plant foliage to create little protective homes. This web can cover small areas or entire branches. At the same time, they eat the leaves of your plants.
Go out with a broom or rake and pull down the webs to prevent the pests from reproducing. Insecticides are rarely necessary.
Cutworms

Cutworm is the name for the larvae of several nocturnal moths. Many of them lay eggs that hatch in the fall. These pests normally live in the soil and emerge to eat the stem of the plant.
Cutworms also eat the roots and most lower parts of young plants. Because they cut plants off at the base, they usually die due to the damage.
I’ve found the best way to prevent cutworms is twofold. Mow the lawns around your garden and keep all grass two feet away from your garden. There should be a two foot barrier of open dirt.
Then, be sure to clear all weeds and debris away to deny these pests a place to hide.
Use diatomaceous earth around plants as another layer of defense. You can also place a cardboard collar around your plants to prevent cutworms from nibbling.
Aphids

Aphids are as much of a pest in the fall as they are in spring and summer. They’re sap suckers who cause damage and grow in numbers quickly. Like most sapsuckers, they excrete honeydew, which attracts ants, wasps, and causes issues like sooty mold.
Use organic sprays like neem oil and pyrethrum. Aphids are tricky little pests, so a number of sprays may be required. If you like using neem oil, it needs to be regularly. For that extra knockdown effect, add the pyrethrum for the first couple of sprays.
Fall Garden Diseases to Watch For
Some garden diseases thrive in the fall climate, so you’ll want to keep an eye out for them as the summer winds down.
Many diseases continue through fall, right up to winter.
Sooty Mold
Do your plants look like they are covered in black fuzz? You could have sooty mold.
This often goes hand-in-hand with aphids, because the spores land in the sticky honeydew and reproduce rapidly.
The first step is to get rid of those aphids. Next, carefully wash the mold off with warm, soapy water.
You’ll need to do this repeatedly until the mold is gone and stays away.
Powdery Mildew

Powdery mildew makes it look like your plant is covered in flour. This disease starts out as little yellow spots which eventually develop a white, fuzzy coating.
Over time, the foliage yellows and dies off.
This fungus is spread by the wind, so once it’s present, it will go from plant to plant in your garden.
There are a lot of homemade recipes. Some are as simple as baking powder, water, and dishwashing liquid. You can also combine water and milk in equal parts to spray as a preventative.
Once powdery mildew starts, it spreads rapidly, so keep an eye out for it and treat it straight away.
Leaf Spot
As you may have guessed, leaf spot causes yellow and brown spotting to form on leaves. It can attack a range of veggies and trees in the garden.
It helps to keep your garden clean and to give your plants plenty of good air circulation. That means raking up the leaves in the fall and keeping up on pruning.
You should also water at the soil rather than on the foliage. Prune away infected leaves.
Rust

If you have ever seen the orange rust on a piece of scrap metal, then you know what rust on plants looks like. It typically shows up as orange spots and can cause leaves to die off.
You can prevent it much the same way that you prevent leaf spot, with plenty of air circulation and keeping water off the leaves by watering at the soil level. Trim away infected leaves.
You can also create a treatment spray using a tablespoon of baking soda, 3 tablespoons of vegetable oil, a teaspoon of dish soap, and a gallon of water.
Fall Garden To-Do List
Depending on where you live or when you read this part of the guide, you may or may not have much growing in your fall garden. First frosts may have already sweetened up your collards or killed off the last of your tomato vines and pepper plants, as they just did mine.
In the fall, regardless of exactly what planting zone you are in, the one thing we have in common is the shortening of day length. This simple fact means that the garden will slow down.
All the insects that usually buzz-busily about your flowers will slow their activities. Some will suspend them entirely and find places to overwinter and survive the cold.
As this transition takes place, you can take advantage of some of nature’s tricks to improve your garden for next year.
Divide Mature Plants
Plants do a lot of root, rhizome, and tuber development in late summer and early fall. In areas with milder winters, mid to late fall can be a great time to divide overly large plants and replant in new locations.
Without the stress from hot weather new and old plants will quickly establish new roots and acclimate to new locations. Without the heat and long days of sunlight, the soil tends to stay moist. Also, as insects burrow deeper into the ground in preparation for winter, they create passages for roots to follow and set deeply into the earth.
The trick is to make your divisions while mature plants are still growing strong and you still have enough time for new plants to anchor themselves into new locations before the ground freezes.
If you only have a short fall-to-winter transition, such as in USDA planting zones 5 or less, you may want to put your new plants in pots and overwinter them in a warm, sunny space like a greenhouse. Alternatively, you can cover your new plants with cold frames to protect them from the wind, create a microclimate, and encourage faster growth.
Test and Adjust your Soil pH
Over the summer, your crops sucked nutrients out of the soil to grow and thrive. Now that the gardening season is at an end, you need to see what your soil is lacking. Out of all the fall garden tasks, I think that this one is the most important.
Testing your soil helps you to understand the composition of your dirt. It shows you the soil’s pH level, as well as levels of potassium, magnesium, calcium, and sulfur. All of this is vital information that enables you to produce a larger yield in the following year.
If you need to raise or lower your soil pH, this is a perfect time. Perform your pH test and use the prescribed amendments to correct your pH for the plants you plan to grow in spring.
Use slow-acting formulas of sulfur or lime to transition your soil over winter without causing traumatic shock to all your soil inhabitants.
Mineralize Your Soil
If you grow food, you are inevitably robbing your soil of nutrients each time you harvest. You’ll add some back when you fertilize, add compost, and mulch. However, this still may not be a sufficient trace mineral supply for a really productive garden.
Applying rock dust as you put your garden to rest for the winter, is a great way to restore mineral content. I live near a granite quarry and use granite dust as my mineral source. But any rock dust – basalt, glacial dust, and others can all be used.
About once every 3-4 years, I will incorporate approximately 14 pounds per 100 square feet into my soil over my entire garden. Some of my beds run short on minerals a bit sooner, though. So, during the growing season, I make notes about any beds that need a mineral boost and add half that amount, or 7 pounds per 100 square feet, as an interim boost.
The best time to apply your mineral source is before putting compost and mulch on your beds (which happen to be the next two things on the list).
Add Compost
There’s a lot of confusion about the reasons for using compost these days. Many people think it works as a fertilizer for their plants and so they wait to apply it only when they plant.
To some degree this is true. However, the even better way to look at compost is as food and habitat for your soil life. That soil life, such as fungi, bacteria, worms and more, use the compost to create fertilizer and release minerals in your soil so your plants can access them.
Applying compost in spring when you start a bed helps plants grow. But, by applying it in fall, you give all the life forms in your soil an excellent winter food supply and added warmth, so they keep doing their good work longer.
Like the insects that create pathways for roots, these life forms also move deeper into the ground over winter. As they do, they will take bits of compost with them, incorporating it into your soil.
In effect, by adding compost at the time when all the micro and macro critters who live in your soil start to make their transition deeper underground, you use them to till in your compost without destroying your soil structure. Then, all winter long, and into the start of spring, they use that compost to free up more minerals from the inert matter in your garden and to create more nitrogen for your plants.
Apply Leaf and Wood Mulch
In fall, trees lose their leaves. Those leaves land on the ground and overwintering critters hide under them and help decompose it for you all winter long.
That mulch not only provides a safe haven for some of the most beneficial biological life forms in any thriving eco-system, it also builds new soil faster than just about anything else you can apply to your garden (except ready-made soil, of course).
By applying leaf and wood mulch, similar to what happens in a forest, you can dramatically increase your winter soil production and protect what’s already in place.
These two mulches also increase the beneficial fungi and bacteria count in your garden soil. Soils with more of these kinds of good guys can grow bigger, better tasting veggies even when your soil is deficient in nitrogen than without them.
You can layer these on your beds up to 3-4 inches deep. In spring, rake these aside to plant seeds if they have not fully decomposed. Then side dress your plants with this matter to preserve moisture as they grow.
Note: Do not incorporate these into your soil or you risk locking up nitrogen until they fully decompose.
Collect and Burn Diseased Plant Matter
I keep a trash can with a tight-fitting lid at the side of my house to use to dispose of any diseased plant matter year round. For example, if one of my tomatoes has early blight or my peaches get brown rot, I put them in this sealed trash can.
In late fall, I do a final sweep of all my gardens. I pick up and put any other potentially diseased plant matter from around the yard into my trash can. I also include any plant matter that likely hosts my least favorite pests (e.g., winter squash vines that may be harboring squash bugs).
When I am sure I have everything, I drag out that trash can out into an open area and burn all my diseased plant matter to ash.
Sometimes I’ll even enjoy a cordial or glass of elderberry wine and toast to the future health of my plants as I watch all that diseased, pest-infested stuff go up in flames!
Apply Chickens
If I had any kind of pest invasions in my garden beds during the growing seasons, I like to let my chickens work those beds for me before the ground freezes.
I’ll put up a temporary fence around the problem area and put out a bucket of water. Then I’ll pick up a few of my best workers and carry them over to their job site.
Usually, my chickens start digging. However, if they don’t, I use a shovel and flip over a few scoops of dirt in different places to show them the good stuff underneath.
Sometimes I have to bring them back each morning for a couple of days. But, it’s so worth it not to have to pick as many pests off my plants next year!
Selectively Situate Garden Debris
I am an organic gardener. By that, I mean I hand pick pests and don’t use pesticides of any form. I also rely heavily on beneficial predator insects to help me keep my pest populations in check. So, I don’t subscribe to the policy of maintaining an overly tidied over winter garden.
In late fall, as we move toward the dormant period, I gather up my garden debris and put it in select locations around my garden. This creates an overwinter habitat for all my beneficial helpers. Also, by putting it in piles, rather than just leaving it all around, it makes it a lot easier for me to handle the next chore on my list.
Mulch or Cover Your Garden Beds

Nothing is worse than starting your spring garden and having to remove tons of weeds. Between winter and the start of the gardening season, weeds can quickly take over your garden beds. That makes it challenging to put in your new plants.
To help keep weeds at bay in the springtime, apply 3 to 4 inches of mulch to your garden beds in the fall. Mulch retains moisture, prevents future weed growth, and insulates the plants and soil from temperature fluctuations.
If you don’t want to use mulch, you can opt to cover the garden bed with something else. I’ve used cut up cardboard boxes. Cardboard decomposes over time if left out in the weather for long enough. You can also use layers of newspaper.
Some people use black landscaping fabric. Whatever you decide is fine, the goal is to stop sunlight from reaching the weeds.
Cover Paths
Most of us gardeners do a lot of weeding in our beds to keep the pressure down for our preferred plants. Pathways, though, can get a bit out of control late season. Sometimes we mow them down rather than weeding them.
As a result, paths can sometimes become a breeding ground for non-preferred weeds. To decrease weed pressure in the next year, I heavily line my paths with some kind of weed suppression cover.
Fresh fall cut hay, laid thickly over paths, is very slow to decay. If I apply it as part of my fall into winter transition, a few bales will often keep the weeds down into late-spring when the next cutting of hay is likely to occur. In my area, hay is cheap and readily available, so it’s my go-to for my paths.
Some people prefer to use plastic or landscape fabric. Those wear out and lose effectiveness pretty quickly. So, if you cover your paths with that method, check for holes, scrape off the accumulated soil, and apply new layers as necessary to provide sufficient weed protection.
Other forms of mulch such as straw, leaf, or wood also work. Just use very thick layers since they are favorite food sources for fungi and bacteria and tend to decay quickly.
Consider Planting Cover Crops
Cover crops are underrated, but they should be high on your fall garden tasks list. These plants suppress weeds, help foster healthy soil, and control pests. Most cover crop plants don’t require too much work on your end, and they grow in almost any climate. In areas that have a lot of rain or snow, cover crops help to reduce soil erosion.
Most people assume that cover crops are only for large-scale gardeners, but they’re wrong. You can use them in your home garden beds. Loosen up the soil and spread cover crop seeds over the ground. You don’t need to plant in rows; spread them like grass seed and rake them into the soil.
Plant cover crops after the last summer crops are harvested but before cold weather starts. Many cover crops are legumes and add nitrogen into your soil. Gardeners know that nitrogen is necessary for a successful, healthy garden.
Collect Any Leftover Dried Seeds
If you save your seeds, now is the time to finish collecting them. Gather any leftover dried seeds that are in your garden beds. Collect seeds from open-pollinated flowers and veggies. It’s easy to do this when you’re removing the dying or dead plants from your garden.
For example, I leave many pea pods on my vines to dry. Once the vines are brown, I take off the pods, which are full of dried pea seeds ready for storage. Most people know that they should gather seeds in the summer, but it’s also an essential fall garden task.
Cut Back Perennials
Now is an excellent time to cut back diseased perennials and remove all of the foliage. Make sure you don’t put those plants into the compost. Otherwise, you risk spreading diseases throughout your compost, which will later infect your garden beds.
Plants like daylilies have a mat of leaves that surround their plants. If you don’t cut them back, the plant has to grow through the carpet of matter around it. Plus, leaving decaying materials around your garden bed looks unsightly.
Clean Out Cold Frames
The best time to clean out your cold frames and season extenders is before it gets too cold. Clean out your structures in the fall so that they’re ready to be used in the spring. You also can take down and store away any hoop houses that you aren’t using. Storing them allows you to reuse them the following year.
Take Cuttings

At the end of the growing season, it’s time to take cuttings from plants before a frost hits. A cutting is a piece of a plant that you cut away and root to become a new plant. They typically come from stems or branches, but roots, sprouts, and rhizomes can form cuttings as well.
It’s easier to bring in small cuttings of plants to over-winter rather than huge pots of mature plants. Later, in the spring, these cuttings will be ready to transplant into your garden beds once the soil warms up.
Herbs propagate particularly well through cuttings. Try cuttings from:
Build New Raised Garden Beds
Do you plan to have a more extensive garden next year? Fall is the perfect time to build new raised beds. Garden soil is usually deeply discounted at this time of year, so filling a bed is much cheaper. You can lay down cardboard, grass clippings, and compost to kill the grass before filling your frame with soil.
Clean and Store The Garden Tools

Finally, the last of your fall garden tasks is to clean, sand, and oil garden tools. You also need to sanitize the tools because they might have come in contact with a diseased plant. Here are some ways to prepare your garden tools for the next growing season.
- Use warm water and soap to clean all of the garden tools. Remove all traces of dirt, plant material, and rust.
- Sharpen pruners and any other cutting tools that you have with a whetstone at the same angle as the blade.
- Coat the tools in a fine layer of oil, such as motor oil or linseed oil before putting them away for the winter.
Make Notes for Next Year
As the growing season comes to an end, sitting down and taking good notes on your successes, failures, problems, and wishes is a great way to get ready for next year. During winter as you start your garden planning and seed ordering, you can reflect on your notes and make good choices for next year.
What NOT to Do During Fall into Winter
There are also a few “don’ts” I have on my to-do list as reminders.
Don’t Forget the Birds
Don’t cut down self-seeding flowers and herbs. Instead, leave those skeletal forms and their seed heads as bird feed for the long winter. In late winter and early spring, when it’s time to prune trees and vines, then cut back any dead material still standing.
Don’t Prune (yet)
It’s tempting to start pruning as soon as trees and vines drop their leaves. However, plants often suffer winter damage that you cannot anticipate this early in the season.
By waiting until you’ve gotten through the worst of winter to start those activities, you ensure you have enough living limbs and stems still intact to have a productive season next year.
Don’t Fertilize
Fertilizer, added in fall, encourages plants to produce heavy top growth that will be more subject to winter frost damage. Then come spring that damage can become entry points for plant pathogens and diseases.
Wait for spring to fertilize with any fast-acting nitrogen sources.
That’s all for this guide, but before you go, there are a whole lot more gardening things to do in the fall that are not strictly related to gardening tasks. I’m talking about garden projects, planning, and problem-solving, which are best to tackle in the fall and early winter. We purposely do not include them in this article because not everyone needs to do them, but if you’re interested check out this article.


