Before I started growing our food, I spent a fortune on salad ingredients. It wasn’t just the lettuce that cost so much. There were the tomatoes, herbs, specialty greens, radish, cucumbers, and more that went into making salads healthy, beautiful, and satisfying.
When I did start growing my own food at home, at first, it was hard to produce all the ingredients for a salad at the same time. My lettuce heads would be ready before everything else. Then they’d bolt before I had a tomato ready to chop into a salad.

How to Grow A Salad Garden

Initially, I was naive on the salad growing front. I mostly tried to grow all the stuff I picked up at the grocery store. Those supermarket salad fixings—shipped in from all over the planet and sprayed with who knows what—were about as fresh as last year’s apples. They didn’t belong in a healthy homegrown salad.
Now, I understand that growing year-round salads on the homestead is an entirely different proposition than buying ingredients from the store. Homestead salads are so much more flavorful, colorful, diverse, and nutrient dense. Here are some tips to get you growing.
What is Salad Gardening?

Salad gardening is vegetable gardening but with a particular purpose. Instead of growing a whole bunch of the same thing and harvesting all at once, your goal is to have a continuous supply of different ingredients throughout the year.
For a great salad, you’ll want to grow a variety of greens, some herbs, and a few tasty additions like tomatoes, cucumbers, radishes, and onions to round out your bowl. You may also want to kick your salads up a notch and grow some edible flowers. All of this is doable with the application of a few key salad gardening strategies.
Select Seasonally Appropriate Seeds

Sweet potato greens
Most lettuces prefer cooler growing conditions. In hot weather, lettuce wants to flower and seed. This is called bolting, and it’s terrible news if you wish to have sweet greens. Bolting makes most plants bitter.
Many lettuces are also too tender to withstand hard frost. At the first signs of cold, they blacken and shrivel into worm fodder.
When buying seeds for your salad garden, select a wide range of plants for your seasonal weather variations. Think beyond lettuce heads. Focus on leaf lettuces and lettuce substitutes that serve the same function (e.g., a vehicle for dressing!) without the fuss.
In cold growing areas, consider greens that germinate early like mustard, arugula, kale, upland cress, chicory, mache, and wild options like dandelions. If eaten when the leaves are small, these make tasty, tangy lettuce alternatives with seed germination possible down to 40° F.
In hot periods, opt for slow-bolt lettuce varieties. Add in alternative greens like New Zealand and Malabar spinach. Use leaves from summer grown plants like sweet potatoes, amaranth, collards, turnips, and chard in salads too!
In many places, it’s hard to start greens in mid-winter. However, it is possible to keep your fall planted greens growing well into winter. Cold-hardy greens like spinach, collards, cabbage, kale, mustard, radicchio, and arugula can be started in fall and harvested into winter. They may need some protection such as cold-frames or row covers in icy areas.
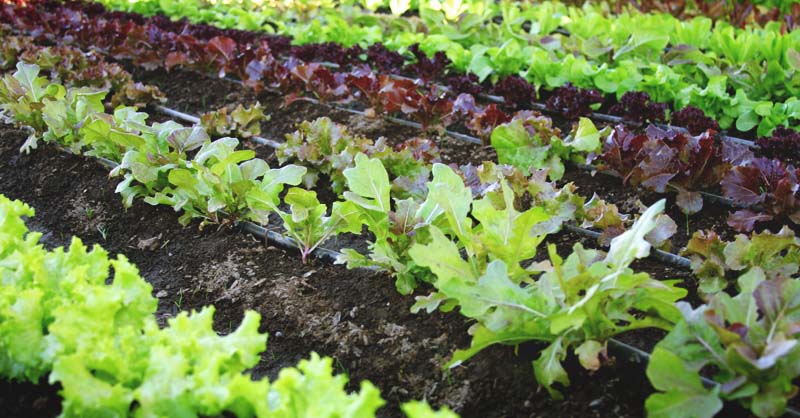
Create a Come-and-Cut Lettuce Bed

If you have hot summers or even occasional hot spells in early spring, you may have challenges growing giant heads of lettuce. Focus on cut greens, like mescalin mixes, to shorten your growing time to harvest. Continuous cutting also reduces the plant energy for flowering and minimizes the risk of bolting.
I was pretty confused about how to create a come-and-cut lettuce bed when I first started. Finally, I found a system that works for me. This is what I do.
1. Buy Leaf Lettuce Mixes in Bulk

Buy mixed leaf lettuce seeds in bulk. You’ll frequently be planting throughout the season. The small packs at the hardware store just won’t be enough to grow a real come-and-cut lettuce plot.
2. Plan Your Space and Prepare Beds
Calculate how much salad you want (and have room) to grow. To grow a big salad every day, it will take a lot of garden space. I grow about 60 square feet of come-and-cut lettuce to make meal salads every day for two adults and still have extra to take to potlucks.
Lettuce greens need loamy, nitrogen-rich soil, with a pH of about 6.5 for best results. Add compost or vegetable soil mixes as necessary to prepare your beds for intense lettuce production.
3. Overseed
Once you’ve decided on your space needs and prepared your beds, heavily overseed your area. Scatter the seeds on top of the soil and water them in, so they don’t settle too deeply. Consider floating row covers for faster germination and pest protection.
Scatter more seeds over any areas that don’t have quick germination. Slow-germinating seeds are often weaklings that won’t be as productive in the long-run.
4. Water Regularly
Lettuce is 95% water. Without adequate water, it simply won’t grow well. Consider irrigation or plan to water once a day in cool weather and twice a day in warm weather until the lettuce leaves cover your bed area.
After your leaves cover the bed area, they act as a mulch holding moisture in the soil. Check your soil by pushing your fingertip into the soil. If your soil is dry more than a half inch below the surface, your lettuce beds need watering.
5. Fertilize as Needed
For continuous lettuce production, you will need to fertilize about every 2-3 weeks or use a slow release fertilizer in your soil mix. I water with compost tea made from worm castings about once every week to add a nitrogen boost to my lettuce beds.
6. Harvesting

For come-and-cut lettuce, I like my plants about two inches apart in all directions. The extra plants in between can be harvested when they are about 2 inches tall and used as baby greens. Cut off the leaves at the ground and let the baby roots stay in place. Keep your most vigorous plants in the ground.
When lettuce plants are about 4-6 inches tall, you can begin harvesting in earnest. Start at one end of your row. Cut off all the leaves from each plant, leaving only one inch of green above the ground. It should look like you mowed a section of your lettuce bed when you have finished harvesting.
The next time you harvest, move further down your row. When you get to the end of your row, start back at the beginning when your plants are at least 4-6 inches tall again.
After harvesting, your soil will be exposed again. Water recently harvested beds as you would new plantings until their leaf mass acts as a mulch again.
7. Reseed Often
When I start my second round of harvesting, I scatter seeds between my existing lettuce plants and water regularly. The new seedlings may not grow as fast in the shade of the larger plants. However, as they begin to take off, usually around the 4th or 5th round of harvesting, I cut the old plants down to the ground.
Those old plants are often beginning to exhaust and try to flower at the end of their life cycle. Cutting the plants to the ground is usually a death sentence. It makes space for the new plants without disturbing the new roots by trying to pull out the old plants.
8. Remember to Seed for Your Season
Change your seed mixes to be seasonally appropriate throughout the year. Use early germinators in spring, slow-bolters in summer, and cold hardy mixes in fall for a long-winter growing season.
9. Use Crop Rotation
Using a bed this intensively for one crop depletes nutrients and invites pests. Rotate your bed to a new location next year. Try only to plant a come-and-cut lettuce bed in the same area once every four years.
Grow and Harvest Seasonal Salad Fixings
Lettuce does not a salad make. You need cucumbers, radish, tomatoes, herbs, and more. Those too should be planned for continuous harvest or extended harvesting.
Tomatoes
Tomatoes can either be determinate (produce all at once) or indeterminate (produce heavily over an extended period). Smaller tomatoes produce earlier, faster, and more regularly than large heirloom types. Plant a few cherry bushes near your salad beds for regular harvesting.
Radishes
Cherry radishes can be grown in 35 days in optimal conditions. Plant some each week to keep a regular supply.
Cucumbers
Cucumbers come in pickling and fresh eating varieties. Choose cucumber plants that have been selected not only for tenderness but also for long production periods.
Alliums
Bulb, or storage type, onions take many months to grow and are great for winter eating. Alternatives like green (bunching) and spring (young bulb onions) take only a couple of months from seed for earlier spring eating. Perennials like common or garlic chives, multiplier or walking onions, also extend the harvest period for fresh onion-like flavors.
Herbs
Basil, dill, and cilantro are all fresh salad favorites. Dill and cilantro grow and taste better in cooler weather so grow those early in the season.
Basil can produce for long periods in hot weather as long as you harvest often enough to encourage continued leaf growth over flowering. You can also grow lettuce leaf basil which has much more leaf mass and a milder flavor.
French tarragon and Mexican marigold also add an in impressive anise flavor punch minced in salads.
Edible Flowers

Nothing wows guests like a few edible flowers thrown in a salad. Nasturtiums are a perfect option for warm weather, and the leaves are edible in salads as well. Chive, arugula, mustard, borage, hollyhocks, squash, clover, and dandelion flowers are also fun for salads. Many culinary herb flowers too, such as chives, oregano, and lavender.
Sunflowers make for excellent table dressing while eating a salad. Plus, the seeds can be roasted and tossed into salads for a tasty treat.
Homestead Meal Salads

Growing and making excellent homestead salad requires you to think beyond the supermarket aisles and get out in the garden year-round. Don’t be afraid to add in all those other tasty things you have on your homestead. Hard-boiled eggs, dried herb mixes, homestead cheese, grilled duck, and more can all take your salad from being a dull side to a stand-alone meal.
With just a little planning and continuous planting, you can say goodbye to grocery store salad and hello to homestead happy meals!


