
My husband and I met an amazing family a few years back. Even though all of the kids are grown and now have kids of their own, this family still lives on a huge amount of acreage together. Plus, each individual family has its own slice of the homesteading pie to sustain the family as a whole.
It is a really nice thing to witness.
These people are so special to us because they taught us a lot about bees. They are actually the family that encouraged us to begin raising honeybees.
So this past summer when my husband came to me with the idea of building a solar wax melter to help this family melt their beeswax, I was totally enthused about it.
Bringing us to where we are. I’m going to share with you how to build your own solar wax melter for virtually no money.
Let’s get started:
What is a Solar Wax Melter?
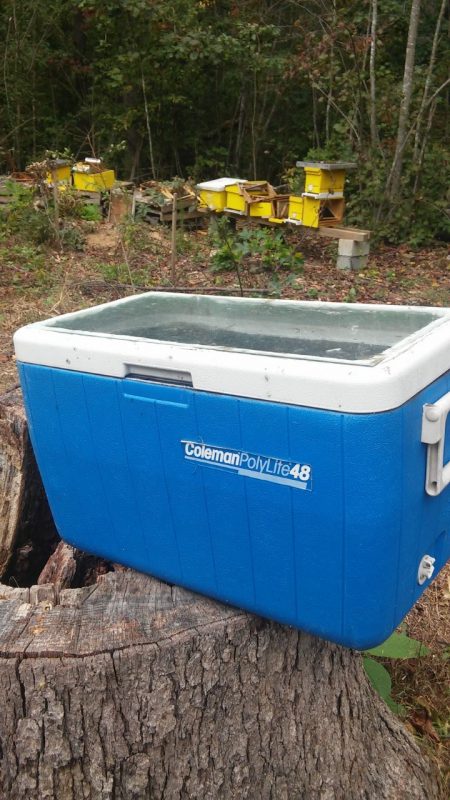
If you are new to beekeeping or maybe you don’t keep bees at all, then you may have never heard of a solar wax melter. Well, the name kind of gives it away. It is basically a box with a see-through lid that allows sunlight to get inside the box and heat the wax that has been placed inside the box.
Beeswax is like any other wax. When it is heated, it will melt. Once it has melted, it can be used for a number of projects.
Don’t be discouraged from doing this project if you don’t keep bees. You can actually buy beeswax from a local beekeeper, or you can purchase it online to melt it down and use it any way you choose to.
Why Do I Need a Solar Wax Melter?
It is simple, really. When you raise bees, you get beeswax. Which means you can perform a lot of different projects with this beeswax. I will share some recipes later on with you in this post to help you utilize the beeswax more specifically, but for now, I’ll give you a general overview.
With beeswax, you can make your own foundation for your hives. You can also make beauty products. It is also great for making candles.
As you can see, there are a lot of things that you can do with this lovely gift that your honeybees leave for you. Now, you just need a way to melt it down. And what better way to accomplish this than with the energy free solar wax melter.
Which leads us to how to make our own.
Materials
You will need:
- One cooler or ice chest
- One piece of plexiglass (depending upon the size of the cooler)
- One tube of clear adhesive
- A saw (like a hack saw)
I have included links to the materials in case you needed to know exactly what you were looking for. Or if you wanted the ease of ordering these items online.
How to Build a Solar Wax Melter
1. Locate Your Supplies
First, you need an old cooler. You can buy one (either new or used.) We actually had quite a few old coolers on hand. We were so fortunate to land all of these coolers because my husband is the type of person who picks up anything he thinks he can use, even if it was discarded as garbage.
I give him serious credit for that because he has saved us a lot of money on projects like this one.
If you happen to know someone who is throwing out old coolers, or if you see one at the curb on trash day, stop and pick it up. It will cut your costs dramatically with this project.
Second, you need a clear adhesive. Fortunately for us, we already had this on hand as well. However, if you want to see what you could use around your home, I’d go with something like Gorilla Glue, Super Glue, or any other kind of strong adhesive.
Third, you need some plexiglass. We actually had a friend that had an old racecar windshield just sitting around his property that his wife wanted him to get rid of. So my husband took it off of his hands. He made a great hay feeder for our goats using part of it. Then we used the remainder for this solar wax melter project.
However, if you have to buy it, it isn’t that expensive. Still, finding some second hand (or free) plexiglass or something similar will cut costs on this project as well.
2. Cut the Top off of the Cooler and Add the New Lid

When you find the cooler that you want to use, you will have to cut a hole in the lid. You will basically go around the inside of the lid so you have a rectangular hole.
Also, don’t worry about how smooth the cut is. You won’t have to stick your hand through it. You just need the hole there so the sunlight can get into the cooler for the melting process.
Once you have the hole cut on the top of the cooler, you’ll have to cut the plexiglass down to size. We had a glass cutter that we bought for our bathroom remodel.
If you don’t have one, the good news is that they are inexpensive. After you get the plexiglass cut to the correct size, you will use the adhesive to glue it to the top of the cooler directly over the hole.
Then let the adhesive dry before use.
3. Put the Solar Wax Melter to Use
Your solar wax melter is now intact and the adhesive has dried. What is next?
Well, you have to find a sunny location on your property. You need a place that will not only be easy to access so you’ll actually use your wax melter but also gets a sufficient amount of sunlight.
Then you’ll put a liner in your solar wax melter so the wax won’t get stuck to the bottom of the cooler. We used disposable tin pans. Once the tin pan is at the bottom of the cooler, place the piece of wire mesh over the tin pan so that the mesh is larger in width than the pan.
After this, you’ll place your beeswax (either the purchased one or one that will probably be mixed with honey from your hives) on a piece of cheesecloth on top of the wire filter.
Then you leave it. When you return your honey and wax might be separated and that is a good thing. You just need to scrape the wax off, and you can still use the honey for cooking even though it was intermixed with the wax.
You can go back and check on your wax every day to see if has melted. The melting time will vary depending on the amount of sunlight that your wax melter gets and also on how much wax you placed inside the wax melter.
So just keep all of these variables in mind when melting your beeswax. And that is all there is to creating and utilizing your very own solar wax melter.
Plus, if you (like me) have these materials on hand then you can build it for free! However, even if you have to purchase a few of the items, this project should cost you very little and requires very little time to make it.
How Do I Use Melted Beeswax?
Now that you know where to find beeswax and how to build a solar wax melter, I want to give you a few recipes to help you get started on utilizing the beeswax.
Here are a few great recipes to get you started:
1. Beeswax Cotton Wraps

This might be one of those things that make you go “hmmm” but stay with me. Are you trying to get rid of items in your home that you can’t make or reuse? Well, if so, with this recipe you can kiss plastic wrap good-bye!
This post walks you through it all: taking old bedsheets and beeswax and turning them into a useful item that will help preserve your food after you’ve opened a canning jar for use.
2. Beeswax Crayons

Do you ever worry about those crayons that your children inevitably stick in their mouths and up their noses?
Your kids aren’t the only ones that do that! Mine do too! I find myself worrying about exactly what they are shoving into their little mouths. Well, thanks to this recipe, I don’t have to worry about that anymore.
Now, I’ll know it is just beeswax.
3. Candles

Beeswax candles are stunning. They can be made into any scent that you like.
Plus, they are all-natural so no more worrying about what you are inhaling when you burn them. The best news is that they are very frugal to make and they make wonderful presents as well. So why not give them a try and put your beeswax to good use?
4. Body Lotion

Beeswax and body lotion? Do they go together?
Well, actually they do. Beeswax is what makes lotion thick. Who knew that you could rub this wonderful, natural substance on your skin and be treating your skin with so much care.
This recipe is great because it can be made into different variations. However, the main recipe itself only has three very simple, easy ingredients, the others are just optional. Check it out.
5. Soap
Honey is an amazing item to add to your homemade soaps. Now you can take it one step further when making this soap recipe. Instead of just adding the honey, you can add the beeswax too. Beeswax has a lot of health benefits.
You might as well take advantage of beeswax and make money in the process. We share a post on How to Sell Honey and Beeswax to make the process even easier.
Well, I hope you have learned something new today, whether it be how to build your own solar wax melter or a new use for the beeswax you’ve melted.


