
When I first started homesteading, I only had about ¼ of an acre to use to grow food. I partitioned part of that to use as a vegetable garden. Then, I earmarked the rest of the space as a mini fruit orchard and herb garden.
As my budget allowed, I bought a fruit tree or two, ordered some grapevines, picked up some herbs at the hardware store. In under a year, of “here and there” planting, I had filled up most of my space.
When I moved to a rural 10-acre property, with 2.5 acres of cleared potential-food-growing-land, I tried to take the same approach. One year in, I had only filled up ¼ of an acre or 1/10th of our cleared land.
If I’d kept on with that strategy, it would have taken me ten years to turn our homestead into an incredible edible landscape. In the meantime, I would have spent all my time battling weeds and trying to keep the woods from swallowing back up our cleared land. I’d also be missing the lush landscape I’d created in my smaller yard.
I’m not that patient a person. So instead, I hit the books – gardening books – and figured out how to turn a few plants into a few hundred plants in a hurry.
I started a lot of plants from seeds. I also visited all of my gardening friends and took stem cuttings from their plants to make my own at home. Those methods worked great.
But I still needed a lot more plants to fill our space.
What is Layering?

In horticulture, layering is a plant propagation method that encourages an above-ground stem to grow roots while it is still attached to the parent plant and then later detaches as an independent plant.
Layering is the easiest method of propagation with the highest success rate because unlike cuttings, the new plants are still supported by its parent until they’re ready to live on their own.
Layering is originally a natural process. If you’ve ever grown tomatoes or tomatillos and had them lean over and grow new roots from their stems, then you already have a good idea of how this technique at works.
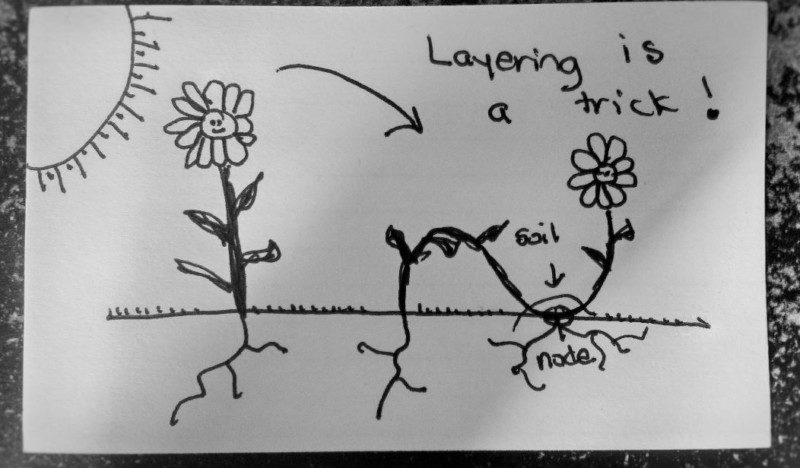
When gardeners propagate a plant by layering, what is happening is that we trick them into thinking that it’s time for them to layer. When the plant stem and leaves change directions, it disrupts the hormone distribution and directional drive in the plant so part of them want to grow towards the sun, and the other parts want to sink into the soil.
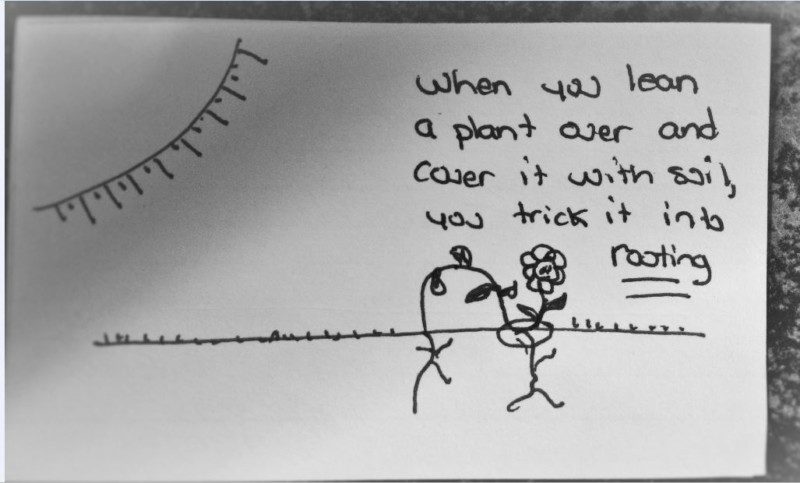
Then, when the plant stem is in prolonged contact with soil, it’ll grow roots naturally.
Plants to Propagate by Layering
Plants like tomatoes and tomatillos are great layers. They lay over easily and set roots naturally. Many plants in the mint family are also layering prone.
Quite a few other plants, though, are not. They need some encouragement to lay down and create a new plant, in the middle of the growing season.
With some encouragement, you can layer most of your fruit bushes like blueberry, raspberry, blackberry, goji, currants, and more. Vining plants like grapes and kiwi are easy to layer. You can also layer shrubby trees like elderberry, seaberry, and citrus fruits (lemon, lime, etc.)
Slow-growing herbs like lavender, rosemary, bay leaf, and more are also great options for layering. Decorative plants like hydrangea, forsythia, crepe myrtle, dogwood, and other ornamental shrubs are also perfect for this technique.
Plants NOT to Propagate by Layering
You should not try to use this procedure to create new plants from anything that has been grafted. Many fruit trees and some grapevines are made by tricking hardy rootstock into growing tastier varieties by adding in another stem above a graft. You can tell a grafted tree by the bulb on the bottom below the thinner graft above.
If you layer grafted plants you’ll be growing the tasty plant on its rootstock which is likely to be disease prone and weak. Introducing those kinds of weak plants into your garden invites diseases and pathogens to take up residence.
You also want to avoid layering plants that are patented. Patented plants must be marked as patented on any advertising materials used by the owner or their licensees. If you know the variety name of the plant, you can check with online retailers to determine if plants are patented.
How to Encourage a Plant to Layer
Now that you know what kind of plants you can and shouldn’t layer, it’s time to start layering. You can create the perfect conditions for layering to produce more plants in a hurry in three easy steps.
Step 1: Prepare the Soil
Similar to planting a seed or a stem cutting, you will have the best results if you layer your plant in well-prepared soil. You can do this directly in the ground near the parent plant. Or, you can also layer into a pot of good soil.
Note: If you use a pot, just like when you are container gardening, you will have to water the pot more often than you do a plant layered directly in the ground. This is because containers of potting soil inherently drain faster than ground soil.
Step 2: Lean the plant over
This is the hardest part of layering. You need to bend the plant without breaking it.
– Technique for Flexible Plants
With plants that have long arms like blackberries, grapevines, goji berries, kiwi, and more, you can pick a long arm and gently arch it into your prepared soil. Completely inverting the leaves is a surefire way to get the plant to root.
– Technique for Bushes or Shrubby Trees
With shrubs and plants that will likely break or split if arched, you need to carefully lay the plant stem over at a 90º angle (or greater) while the plant sap is high. You don’t want to try this when the plant is dormant, suffering drought conditions, or flowering because it will be more brittle.
For plants that have stiff stems, like rosemary, lavender, aronia berries, fig, currants, seaberry, elderberry, and other shrubby trees, plan to layer before the plant flowers. Late summer or early fall are good times to layer stiffer stems as this is when the plants are stockpiling nutrients in preparation for winter dormancy.
– The Multi-Stage Approach
You may also need to do this in stages. You can bend a branch or stem part way toward the ground and hold it in place by tying it to a brick.
Give the plant a few days to recover. Then, after a good rain or deep watering, bend the stem the rest of the way toward the ground or pot.
Step 3: Hold the layered plant in place
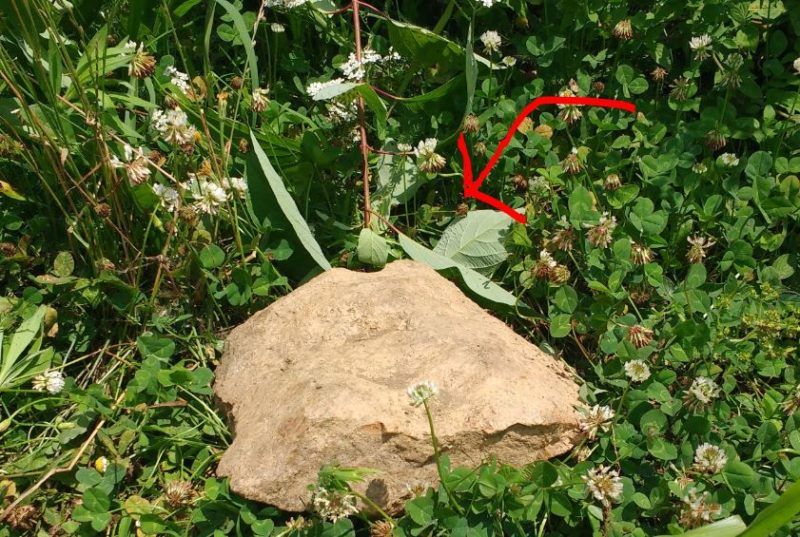
Some plants have a strong desire to stand back up and grow towards the sun. To ensure they stay down and relax long enough to set roots, you need to apply a weight to lock them in place.
I use broken pots, bricks, rocks, containers of water, or whatever else I have available. I also like to use things that will stand out in the landscape, so I remember that I am layering something and don’t accidentally cut my overgrown plant when I am weed trimming.
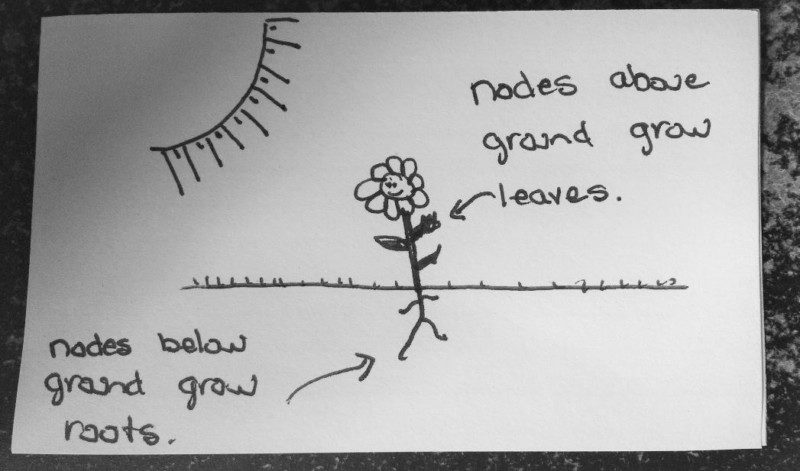
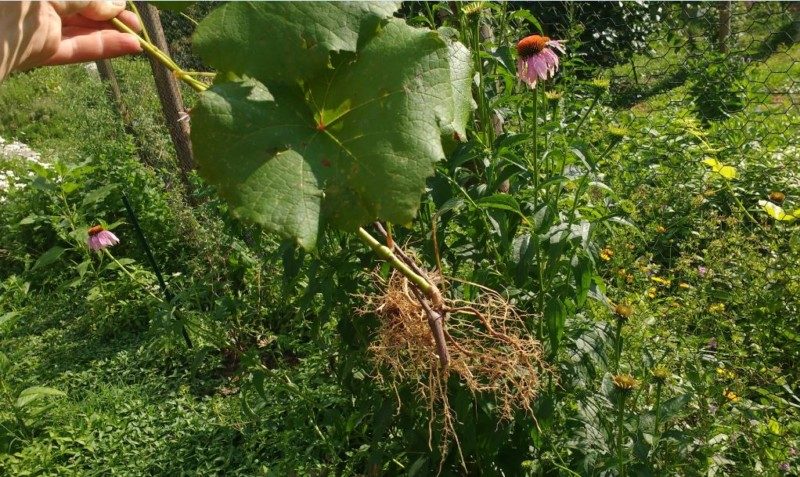
For best results, remove the leaves from the section you are layering. Cover the node (the area where the leaves grew from) with soil. Then, set the weight right over the soil-covered node.
How to Separate Your Newly Layered Plants
Some plants layer quickly. Others take months to root. In many cases, plants that grow fast root faster than those that grow slowly. The more often you use this technique, the better you’ll get at discerning when a plant is ready for separating from its parent plant.
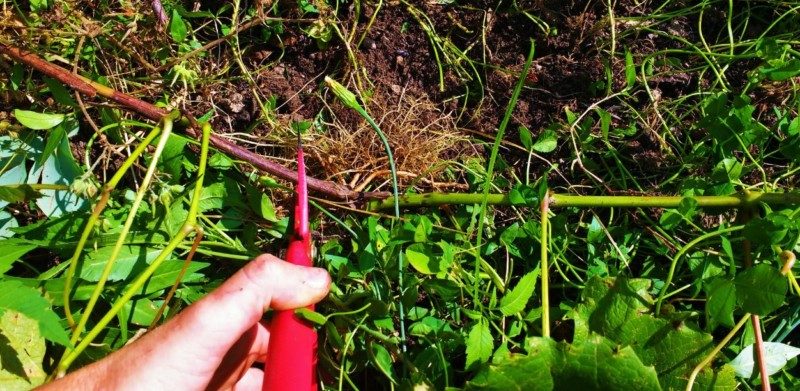
When I suspect I might have good roots in the new plant, I’ll remove the weight and lightly pull on the plant stem. If there’s good resistance, then I’ll dig around the base to get a sense of how well-rooted the new plant is.
When it feels like I have at least 1-2 inches of root mass around and below the node, I’ll make a cut between the parent plant and the layered plant.
Then, I give the plant a few weeks to recover from its separation from the parent plant. I used to dig up and transplant my layered plant at the same time as I made the cut. However, I have learned that the new plants grow better, and suffer less transplant shock if I give them a few more weeks in the ground after cutting the ties to their parents.
Your new plant will have shallower roots than the parent plant. So, after you make the cut, water regularly so those new roots don’t dry out.
Transplanting and Caring for Your New Plants
Once your layered plants are recovered, treat them like a new purchase from the garden center.
Plant them in prepared soil. Water regularly until the plants begin growing again. Mulch to keep those young roots moist. Also, follow any plant-specific growing instructions related to your plant.
For example, some plants require fertilizer a few months after planting. Some plants need a specific soil pH to grow well. Other plants require a lot of compost for good results.
Your plants, started by layering, should get the same care that a plant you purchased in a pot would receive to grow well.
Different Methods of Plant Layering
There is more than one type of layering. We’ve talked one, here are some different methods you might want to know and try.
1. Simple Layering
As the name suggests, this is the simplest of all layering methods. In fact, the method we’ve talked about above is exactly what simple layering is.
2. Tip Layering
Quite similar to simple layering, except instead of bending the mid-part of the plant, we use the tip. This method works best for plants with stiff stems and smaller plants with short stems, to give the new plants a bit of spacing.
3. Serpentine Layering

This method works best for vine or vine-like plants such as grapes. With serpentine layering, you bend and bury the vine multiple times into the soil, producing multiple new plants from a single stem.
4. Mound Layering

To use the mound layering method, you’ll first need to cut the plant’s main stem to about one inch above the soil in its dormant season. On the next spring, you’ll see multiple new shoots growing from it. When that happens, cover or mound the shoots with soil and roots will grow from the covered shoots. Then on the next dormant season, you can remove the new rooted shoots.
This method works best for heavy-stemmed plants, shrubs, and fruit trees.
5. Air Layering

Unlike all three ground layering methods above, air layering doesn’t need soil at all. Which is why it works best with tall and big plants.
Air layering works by peeling the bark from a healthy 1-2 years old straight stem, cover it with a good amount of moist sphagnum moss or coco coir, wrap it together with plastic, then seal both ends. Check periodically, and you should see signs of new roots inside the wrap within a year. When it’s ready, remove the wrapping and cut the stem.
Cut your Plant Budget with Layering
Now that you know the technique, you can use it to expand your plant population quickly with the right strategy.
Tip 1: Buy 2 Get 10, 15, 20…
I wanted to have about 20 kiwi plants on my property. However, they cost about $20 each from the edible landscape nursery. So, I bought one male and one female plant. (Most kiwis need male and female plants to produce fruit.)
I planted those kiwis in spring and began layering them in fall. Then, the following spring, I dug up the new plants and spread them around my landscape.
Buy one of each variety of plant you want more of to start. Try to get the biggest, most vital plant specimen you can find. Once it is healthy and vigorously growing in your landscape, use it to layer new plants.
If your plant requires cross-pollination, make sure to buy at least two different plants that are suitable for cross-pollination.
Tip 2: Start with a Healthy Parent Plant
Don’t try to layer plants that aren’t healthy in the first place. Layering takes energy away from the parent plant. Also, poor-performing plants often have underlying health problems that may be transmitted to the layered plants. Only propagate the best of the best.
Tip 3: Use Good Plant Care Practices While Layering
Just like propagating plants by any other method, this only works well if you take good care of the plant as it is establishing. Trying to grow a plant from seed without regular watering won’t work well. Layering a plant is no different.
Your soil should be fertile and moist at all times for best results. You should also layer when plants are at their best not when they are stressed by drought or excessive rain, etc.
Go Layer!
Once you catch the layering bug, you’ll have plants rooting all over your property all the time! After I learned this technique, I turned my yard into a virtual obstacle course with all the weighted plant arms I had laying over.
Based on my own experience, I encourage you to layer responsibly. Keep layered plants out of walkways, mower paths, and other high-traffic areas. Don’t – I repeat – don’t use your good glass and dishware as layering weights. (Trust me!)


