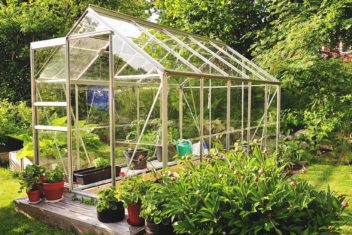
The purpose of a greenhouse is to create a controlled microclimate where your plants can grow better when the outside condition doesn’t support it well. Mostly though, it is used to keep the area above freezing temperature so you can have a longer growing season.
A greenhouse can raise the temperature passively by trapping the heat from solar radiation. However, people living in colder areas might need to heat up their greenhouse actively.
This is where walipini comes in.
In theory, walipini or underground greenhouse can keep the temperature inside higher than a normal greenhouse because, in addition to solar radiation, it also gets its heat from the earth’s natural heat.
In this article, we’ll discuss what a walipini is and should you build one instead of a greenhouse.
What is a Walipini?
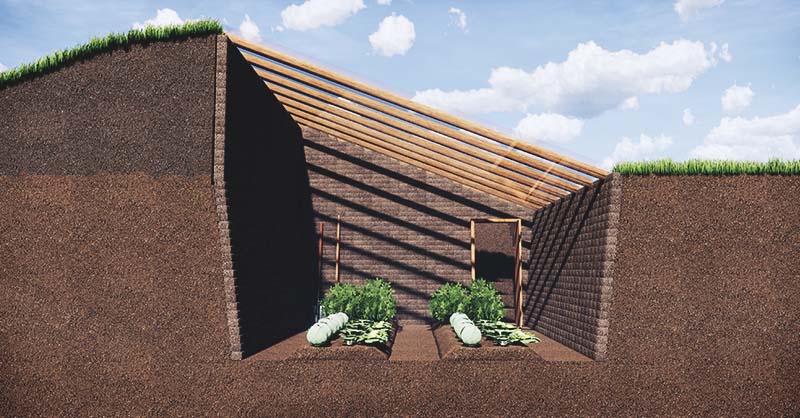
Walipini, also known as sunken greenhouse, underground greenhouse, pit greenhouse, or earth-sheltered greenhouse, is a structure with the growing area dug into the ground. Having the growing area under the ground level gives you the thermal benefits of being cool in warm weather and warm in cold weather similar to a root cellar.
The word itself originating from the Aymara Indian (located in what now becomes Bolivia) which means ‘place of warmth’.
Unlike a root cellar, though, you’ll be putting a greenhouse top on your dug-out space. That will allow the sun to come into the area and make it even warmer. Plus, that sunlight will be used to grow your plants.
To build a walipini, dig a 6-8 foot deep area in the ground. Then install a greenhouse type roof angled toward the sun. If you have earth-moving machinery or live in an area where this kind of work is inexpensive and can be performed without a permit, you can save a lot of money building a walipini instead of a full-blown greenhouse.
Considerations to Building a Walipini
Now before you spend all your time planning your perfect walipini, there are a couple of things to consider. Your soil type, for instance, will have a significant impact on whether your location is suited to constructing a walipini.
Soil-Type
One of the soil’s many functions is to hold or drain water. Clay soils, for instance, have excellent water holding capacity. However, this makes them very heavy at times and susceptible to collapse if your walipini is not properly engineered.
Sandy soil provides too much drainage and is hard to stabilize. So, it might not make the best choice for a walipini without structural support for the walls. Bedrock, loam, silt, and other soil conditions may also necessitate special construction techniques to ensure the security of the walls.
Similar to installing an in-ground pool there are options such as back-filling, wall-building, and other methods that can be used to create a structurally sound walipini. However, the more additional engineering necessary, the more work and potential cost involved.
Water Flow
Beyond soil type, the amount and way that rain falls in your location may have an impact on your building methods. For example, in areas with limited rainfall, building a berm around and covering the perimeter of your walipini with a non-permeable membrane may be sufficient to keep rain from penetrating and collapsing your walls.
In areas with continuous heavy rains and in coastal areas where the water table is high and can penetrate deep into the subsoil, it creates more challenging circumstances. In those cases, retaining walls, drainage routes, and more may be necessary to redirect water flow from the walls of your walipini.
Radon
Like root cellars and basements, radon can be an issue in some parts of the world. Radon is a radioactive invisible gas formed naturally in the earth’s crust and is the second leading cause of lung cancer after smoking. Make sure to test for radon in your property before deciding to build a walipini.
Walipini Design and Construction
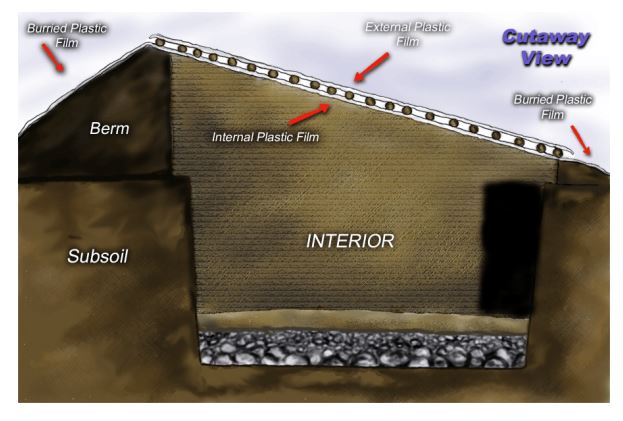
Given the challenges detailed above, each walipini design will be a bit different based on the demands of your location. In general, there are a few key features that all walipinis need to address potential concerns.
Sloped Walls
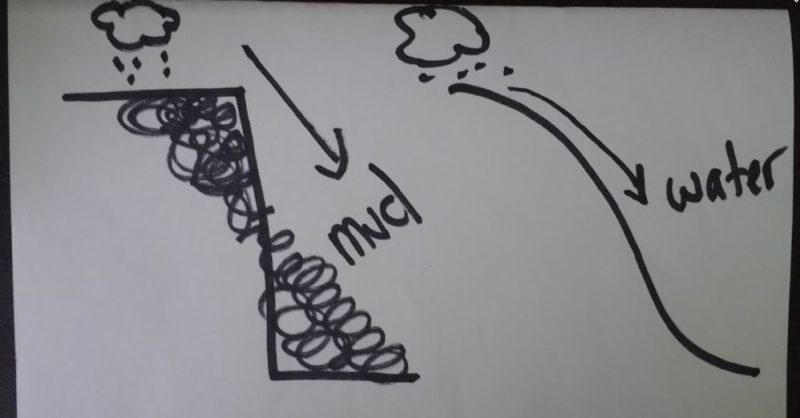
The walls of a walipini are sloped in the same manner as irrigation ponds are. In the case of a pond, these slopes are used to create a bowl-like effect that keeps water trapped inside while reducing the amount of silt and sediment that washes into a pond. For a walipini, this shape serves the same function, except that rather than catching water other design features whisk it away.
Floor Level Drainage
To be safe from water, the bottom level of walipini should be at least 5 feet above the water table.
If water runs into the walipini, a self-draining floor and water evacuation channels are often used to pass water back out of the walipini. Simply by grading the floor in a slightly downhill direction, creating low points for water to drain, and then installing pipes to send the water well away from the walipini can do this.
In some cases, similar to basements, some people also use sump pumps. When the water hits a certain level, a float valve then turns on the pump to lift the water out and away from the walipini.
Bermed Back Side
As another measure to reduce the amount of water that flows inside the walipini, the non-sun catching side (e.g. Northern side in the US), is bermed to cause water to flow away from the walipini. This is basically the same concept we use on houses with sloped roofs.
Just like with roof coverings, depending on the amount of rain, snow, etc. the angle and area of the berm can be used to adjust for regional precipitation flow rates. A longer berm slope, that drains further away from the walls of the walipini, might work better in areas with continuous, penetrating rains. A steeper slope might help in areas with heavy flows that need to be moved quickly.
Roof Angle to Catch Sun (and Divert Rain)
The point of a walipini is to allow for winter growing and in some cases more comfortable summer growing conditions. Since light is essential for plants to grow, a roof that allows for maximum light is needed.
The ideal angle for the roof depends on your location. To give your plants the optimum solar radiation and the least reflection year-round, you need to angle your roof perpendicular to the sun on the winter solstice.
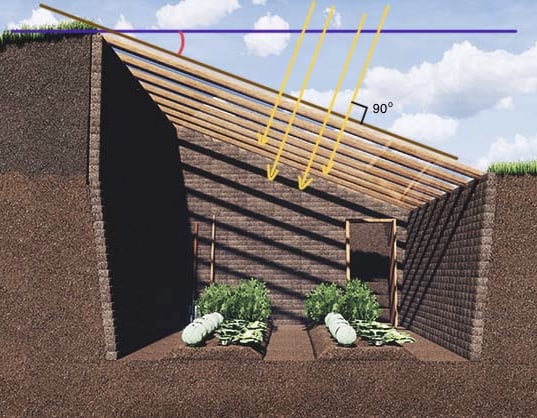
Here’s an easy way to calculate your best walipini roof angle:
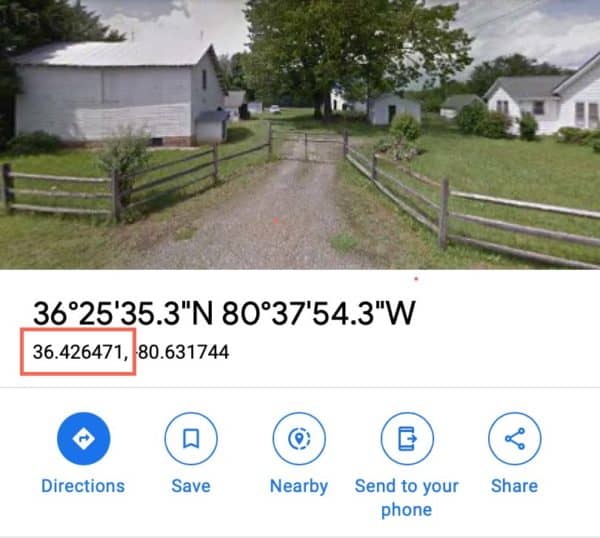
- Open Google Maps and locate your garden area
- Click/tap on your land, and you’ll find the latitude and longitude as DMSes (Degree, Minute, Second) and decimal degrees. If you can only see the DMS numbers, use this tool to convert them into decimal degrees.
- Use the first number of the decimal degree (the latitude, or the number in the red square from the example below)
- Add 23.5 to your number, and that is roughly your ideal roof slope
The slope and the longer dimension of the rectangle should face toward the winter sun for optimal light exposure in the underground area. Typically to the south if you’re in the northern hemisphere and the north if you’re in the southern hemisphere.
Similar to the reasons for sloping walls and berming around the walipini, having a sloped roof is necessary to control water flow. Your roof should divert water down and away from the interior of the walipini.
Rain Collection Methods
Since you will need water for plants inside the walipini, many people use the roof area to catch rain in tanks. Similar to the way that you use rain barrels on a house roof, gutters or channels catch and redirect the rain to downspouts. In this case though, instead of running down outside a house, they channel water back to containers stored inside the walipini.
For rain barrels on a house, most people have an overflow valve at the top of the tank that connects to a hose that redirects water away from your house foundation. With a walipini, it’s a bit trickier to safely redirect excess overflow since you are underground.
Planning adequate collection tanks is important. Using linked tanks to allow overflow from the primary tank to a secondary tank can help. Out-letting to the drainage areas in the floor and planning sufficient flow rates for extra rain drainage are important.
Also, adding a way to redirect flow outside the walipini can be critical during heavy flows. So, when tanks approach full, just stop the flow into the walipini and redirect flow to some location well away from your walls.
Non-permeable Perimeter Protection
Adding non-permeable surfaces such as a roofing membrane, pond liner, or plastic sheeting over your berms and integrating that with your roofing design can really cut down on the amount of unplanned water that flows into your walipini.
This material is not usually very attractive. So, you may need to consider design ideas to make them less obvious. Techniques like making a sloped living roof can be integrated with your walipini design. These things will increase work, cost, and time to build but can make for a much more aesthetically pleasing walipini.
Venting
Similar to root cellars, a walipini can get dank, humid, and overly warm without proper venting. Having the ability to open windows in your roof area can help. Also, using chimneys to draw warm air out and using solar vent fans to draw cool air in can be lifesavers on sunny, warm days or in heavy humidity.
Access
Depending on your design, access can be as simple as having a hatch with a latter to climb down into. Or, you can dig an exterior stairwell with a reinforced door jam.
Stairs are much easier when trying to haul in plants and materials and carry out your harvest. But if you plan to harvest daily rather than all at once, then carrying a basket up a ladder isn’t terribly difficult. Things like bags of compost can just be dropped down your hatch since they are non-breakable.
If you are already implementing a more elaborate design, then having a staircase entry is totally worthwhile. But if you trying to keep things simple, the hatch can also work.
Growing Area
Since the point of the walipini is ultimately to grow things out of season, planning a proper growing area is key. Generally, good quality soil is brought back in after excavation and the completion of the drainage in the floor.
To get the most thermal benefits, keeping the beds in contact with soil will help. Often raised beds are installed. Alternatively, the entire floor can be used as the planting area with small pathways left open, similar to a garden.
Whichever method you use, make sure to bring in sufficient soil. Since excavation has removed all the topsoil and at best your beds are being built on subsoil or drainage rocks, I suggest at least 8-12 inches of high-quality soil as a good starting point. You will need to continually replenish this with nutrients and compost for good growing results.
Alternative Growing Methods
Some people also use a walipini as a climate-controlled environment for alternative planting methods such as aquaponics or hydroponics. These do require electricity and methods for occasionally flushing out the water systems.
The drainage floor or sump pumps may also be used for draining these systems in the event that whole system cleaning is needed.
The Benefits of Using a Walipini
All the considerations above sound like a lot of work and possibly expense. So, you might be wondering why walipini might be the better option to build instead of a normal greenhouse.
Making a walipini is more work at the outset, to be sure. However, for people who live in certain areas, walipini has some serious benefits to offer.
Better Temperature Control
It can add up to a huge amount of work and resources to heat a greenhouse during the cold months depending on your climate. Also, in the heat of summer, even with all the windows and doors open, greenhouses can get so sweltering that it becomes difficult to grow anything. Some gardeners have to turn on fans just to keep heat hardy plants like olive and lemon trees alive.
With a walipini, the earth helps regulate your temperatures. The climate is much more regulated in a walipini than in a traditional greenhouse on both the hot and cold front.
Less Panel Cleaning Maintenance
Greenhouse walls and roof panels need to be cleaned periodically because pollen, dust, and more will begin to limit the light passing through over time. So, having a design that only requires cleaning of a roof area and not all the walls as well, means less maintenance work.
Potentially Lower Cost
In some areas, you can get someone out to dig an area the size of a super large septic tank for just a couple hundred dollars. Bulk gravel, soil, and lumber can also be fairly cheap. Add the costs of the roof and other materials, and if it’s still less than the cost of a greenhouse kit, then a walipini is definitely cheaper.
This won’t be true for everyone, but it’s worth exploring cost savings in many locations.
Avoid Wind Worries
If you live in a windy area, even if you chose a somewhat wind-protected area for your greenhouse, you could still have issues with wind. As such, you will have to build pretty significant concrete footers to secure your greenhouse against winter winds.
On windy days in a windy area, there are chances you can’t open the greenhouse windows or the wind-facing door because the wind might rip them off. When that happens, you might have to find other creative ways to keep plants cool on excessive hot and windy days like running a fan over an ice chest.
An in-ground walipini would simply not have the same wind issues.
Conclusion
The idea of using a walipini for season extension is starting to gain a bit of popularity. In fact, there are even some pretty cool guides out there to help you plan your construction. These ideas are even being incorporated into house designs and modified using other alternative building techniques like rammed earth homes, rocket mass stoves, and other passive solar techniques.
Even if you don’t decide to build a walipini, know that there are a lot more options for season extension than a traditional greenhouse these days. So, make sure you do your research and find the season extension design that will work best for your conditions.
