
Do you remember those old-fashioned keys, nearly half a foot long, some so intricate they looked like works of art? The receiving side of the lock called to mind the outline of an angel.
When you put the key inside and turned, everything would click into place, and magical doors would open (or at least beautiful, heavy wooden doors that cost a fortune at vintage markets these days).
Now imagine that you are the key and you are standing in the center of that lock. Instead of this being a lock, though, you are in the center of a keyhole garden bed.
From your central position, you can extend your arms and quickly reach the planting areas all around you. No need to walk down long rows, those rows are instead wrapped around you. YOU are the center of your garden!
The bed is raised to either hip or waist level depending on which height is most comfortable for you. No hunching, no kneeling, no kneeboards to prevent soil compaction – just you, standing comfortably, extending your arms, maybe bending just a bit at the waist to plant, water, weed, and harvest.
This bed fits you just like, well, like a key fits a lock – as if you were made for each other.
This, my fellow gardeners (or gardeners to be), is the magic unlocked when you garden using a keyhole style raised garden bed.
Other Reasons to Build a Keyhole Bed
Besides the comfort of gardening while standing up, and having the garden revolve around you, there are a few other good reasons to try this concept.
1. Vole, mole, gopher, and rabbit resistant
Since your planting area is elevated off the ground, with the right construction, you can minimize or eradicate risks from diggers and ground level garden eaters.
2. You can skip a trip to the landfill
I don’t know about you, but I feel guilty about all the stuff I throw away. When you build your keyhole bed, you can use your unwanted junk as the base for your keyhole bed. (I’ll show you how shortly.)
3. Prevent pathogen problems
If your soil has pathogens, such as tomato or potato blights, those can live in the ground for years – almost ten years in fact. By building keyhole beds raised to hip or waist level and using disease-free soil to fill your bed, you can quickly get back to growing your favorite veggies in your new keyhole bed.
4. Can be built in just a few hours
You can build a keyhole bed that functions as an enclosed garden in just a few hours. Similar to straw bale or other forms of raised bed gardening, you can also build pest protection right into your keyhole bed design, so there’s no need to fence in your keyhole bed.
All you need to do is integrate taller posts into your bedsides and wrap or cover those with fencing, netting, or row covers as needed.
How to Plan Your Keyhole Bed
Now that I have (hopefully) convinced you to try keyhole bed gardening, the next step is to build it.
There are no set rules for how to build this kind of bed. It is all about what works for you and appeals to your design aesthetic. However, there are some necessary steps to go from concept to planting.
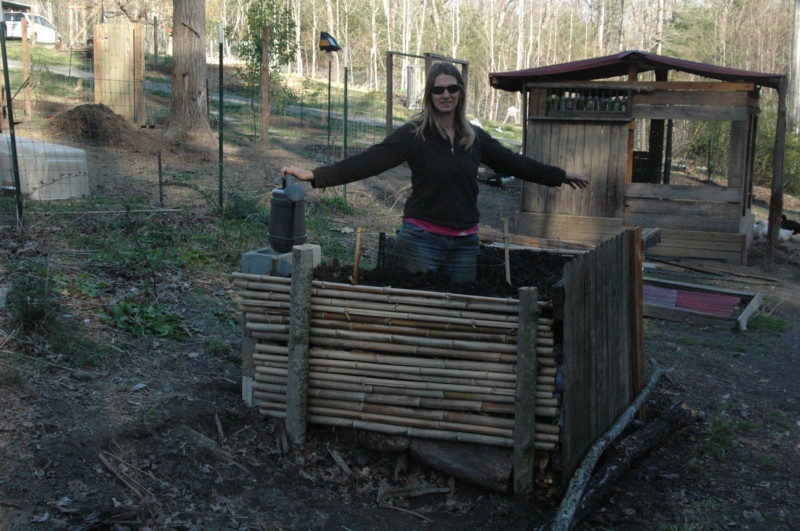
Rather than tell you how to do it, I decided to build one to show how easy it is.
Source Materials for Your Keyhole Bed
Since I homestead on a tight budget, I didn’t want to spend any money on this project. So, I started by scrounging materials from around my property. This was the longest part of the process because I had to do an inventory to figure out what I had to work with.
I decided to use these things as my base:
- A broken picket fence panel (previously destined for the landfill)
- A few fence stakes that I had on hand
- Bamboo posts I had cut down in the fall
- Four-inch diameter poplar posts that I felled with a folding saw for this project
- A run of 4-foot wide weed mat that I recently pulled from my pathways
- Rocks, branches downed in recent winds, junk mail, paper feed bags
- A few cinder blocks we had left from other projects
- A run of welded wire fence left over from building a duck paddock
- A few screws and some wire
Believe it or not, this random mish-mash of materials will become the base, walls, and growing area of my keyhole bed.
Choose Your Location
Unless you have long arms or use thick materials to make your walls, most keyhole beds are roughly a 6 x 6-foot square or a 6-foot diameter circle. Choose an area that will fit your bed and has full sun. If your chosen site happens to be weedy, mow them down and build right over them.
Bill Mollison, one of the founders of the permaculture movement, and a huge advocate for keyhole beds suggests putting them close to your house. This makes it more likely that you’ll visit your garden often to tend and harvest.
Since your growing area will be raised above the ground, you don’t have to think about drainage in the way that you would an in-ground garden. You do want to make sure you aren’t standing in mud sludge every time you garden. Also, water should drain from your bed without creating a big mess.
Wind protection is also essential for almost any annual garden.

Try On Your Keyhole Bed on Before You Build
Since a keyhole bed is meant to fit you perfectly, try it on before you start building. Mark out your proposed bed area.
Stand in the center and stretch out your arms. Can you easily reach all parts of your imagined growing area? Can you go wider or does it need to be narrower for your arm-span?
Pretend you are watering and weeding. Then decide how high you want your beds raised. I like my beds at my hip level since I hand water daily and that felt easier with a lower bed. If you use drip irrigation or a sprinkler, then you may want your bed higher so that it’s perfect for weeding and seeding.
Imagine yourself gardening in your new bed. How does it make you feel? Warm and fuzzy or exposed? How’s the view?
When I tried mine on, I ended up changing the orientation because I realized I wanted to look out onto my duck pond while I worked. Also, I liked facing my driveway rather than having my back to it.
Build Your Keyhole Bed
I can’t tell you exactly how to build your bed. Part of the fun of this project is figuring it out using what you’ve got.
Construction methods will depend mainly on what materials you use. However, here’s how I built mine to give you an idea of the basic process.
Step 1: Exterior Walls
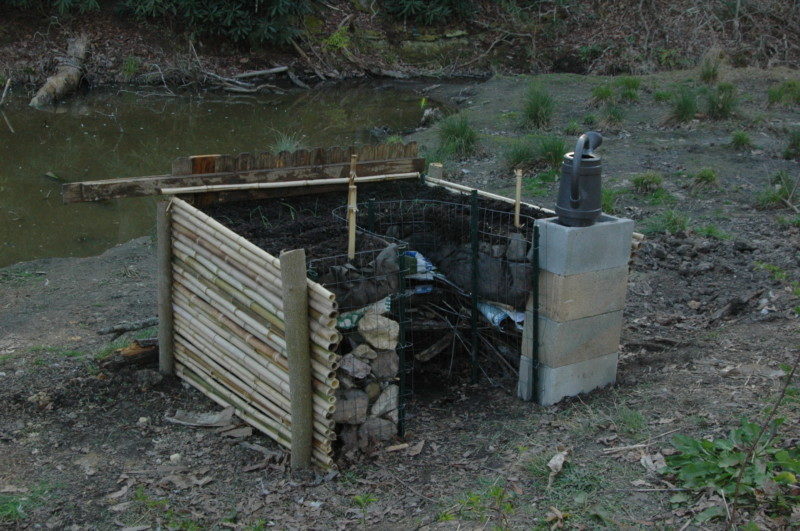
I set my exterior walls first. My broken fence panel became the front of my bed so that others would see that when they come down our driveway.
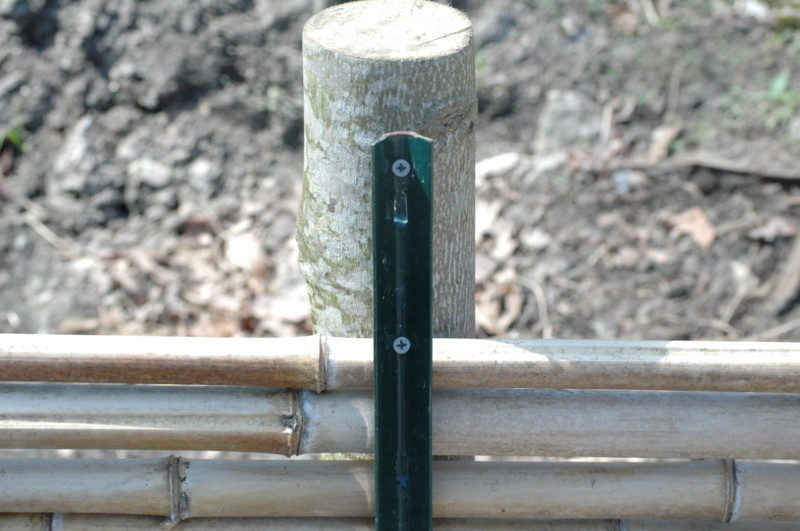
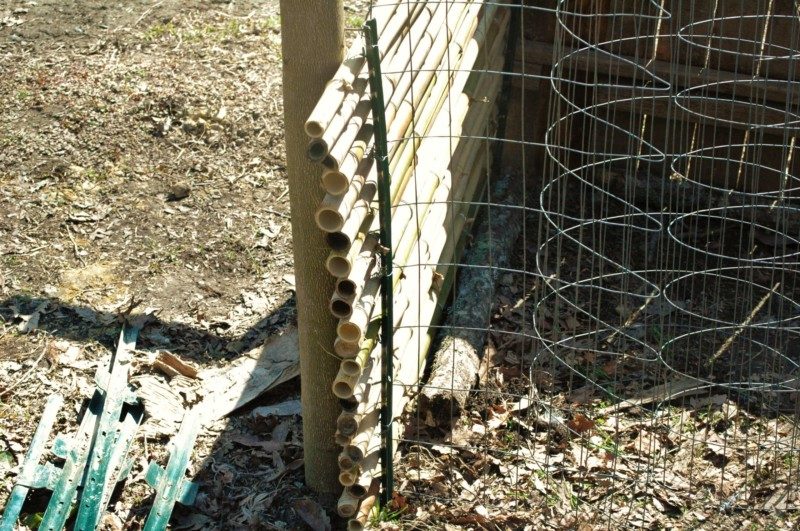
I dug my poplar posts two feet into the ground, in the corners, as my anchors. They keep my bed from sliding downhill since I decided to build on a sloped site.
I used four stakes and my bamboo posts to make my long sides. I made a kind of bamboo sandwich by putting two stakes on each side of either end of the bamboo. I also used holes in the stakes to screw the stakes into my anchor posts to lock the bamboo between the stakes.
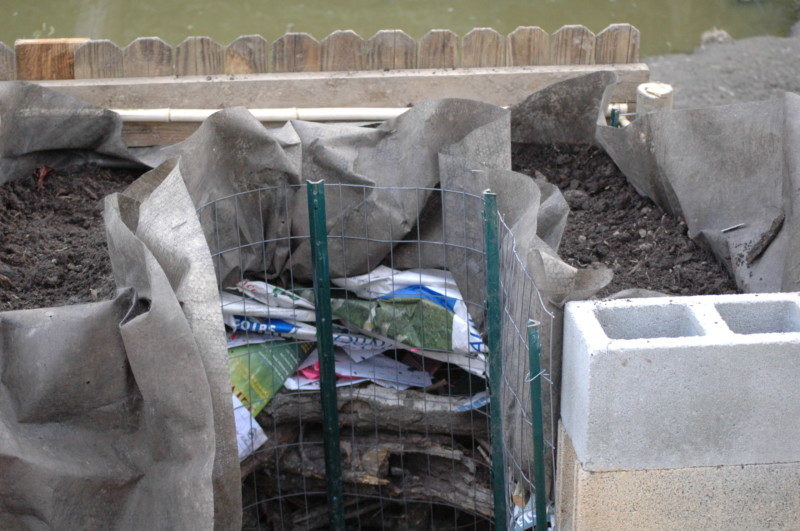
Step 2: Make the Keyhole
I used a few more stakes and leftover welded fence to shape the interior keyhole area of my bed. After driving the stakes into the ground, I formed the wall into a kind of bulb around where I will stand.
I wanted a solid surface to set my transplant trays, seed basket, or watering can on. I leveled and stacked up a few cinder blocks on the short side of my keyhole area.

Step 3: Make the Base
This is where all your old junk comes in. You are going to stack it up and make a base for your raised bed.
I used downed tree limbs, branches, and junk mail as my base layer. Then I smoothed it out with biodegradable paper feed bags.
My base is almost like a huge mound and will decay over time. I did this intentionally because I only plan to use this bed for a couple of years (because I have other long-term plans for that area).
If you want yours to last longer, use more permanent materials. People have used stacked glass bottles, aluminum cans, polyethylene feed bags, old concrete, broken bricks. You have lots of options since you won’t be growing in this area, you are just trying to build mass up to about 6-12 inches below the top of your bed walls (to leave room for soil).
There are three things you want to keep in mind when building your base.
- You need to stack stuff in such a way that water can run through from your bed to the ground and move away from your bed.
- You might not want to use toxic stuff because if it does degrade over time, the water that runs through from your bed can wash toxins into surrounding areas.
- You want your base to be stable since this is the most “structural” part of your bed and lots of soil will sit on top of it.
Otherwise, cram stuff in place. This is fun, like assembling a puzzle.
Step 4: Make the Growing Area
The one place you will want to use more ideal materials is for your growing area. Whatever you use here needs to drain well and still hold your soil in place.
If you are going to plant perennials in your keyhole bed, you can use less permanent materials for your growing area. Things like cardboard layered thickly or lots of newspaper will work. When these materials eventually degrade, your plant roots will hold your soil in place.
If you plan to grow annuals, you’ll be uprooting plants regularly and adding new soil or compost at times. So, you’ll want to use more permanent materials to make your growing area.
I doubled up a run of weed mat and shaped it over my base and around the sides to create something like a giant growing bag for my soil. Plastic bags with holes punched in for water flow can also work. Tubs with holes drilled for drainage or wooden boxes with space between the slats are also good options.
After I had my weed mat shaped around my base, I added soil one shovel at a time. As I added it, I smoothed out my weed mat and made sure it wasn’t drawing down below the top of the bed.
Step 5: Add the soil
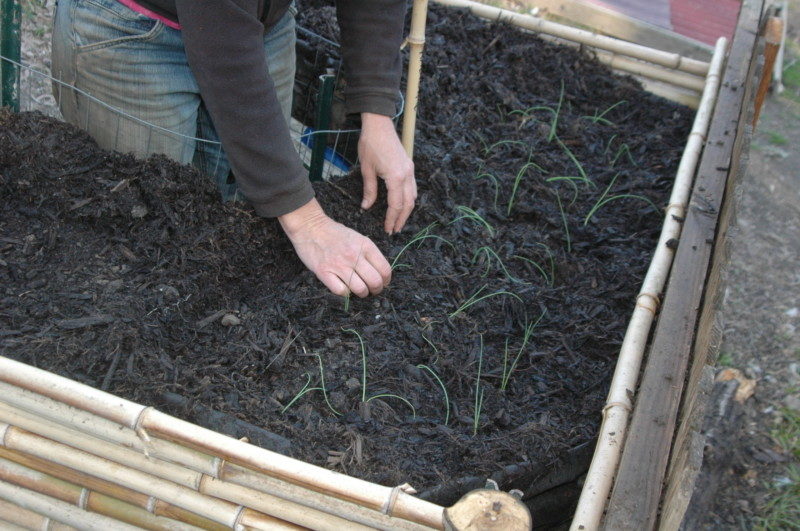
This is the final step before planting. Add the soil, at least 6 inches of soil depth, but more depth is better. I usually opt for about 8-10 inches. If you plan to grow potatoes or sweet potatoes in this bed, go for at least 12 inches of soil for best yields.
I built my keyhole bed in an alluvial area with fertile soil, already fertilized by my ducks. I dug out the native soil before I put down my base and then used that to fill my growing area. If you don’t have good native soil, then buying or making your own potting mixes work great.
I also like to finish my beds with a layer of mulch such as straw or double-shred hardwood. I move this aside to plant then push it back near the plant base as the plant grows. Mulch keeps the soil moist between watering.
What Can You Plant in a Keyhole Bed?
Now, you’ve got your bed built. So what can you plant?
As a rule of thumb, you can plant pretty much anything that you can grow in a 1-gallon container.
Since your bed is already raised, you also probably want to grow things that will not get taller than you can reach. Otherwise, you are taking away the benefits of growing in your easy-to-reach zone.
I love to use these beds for things I often harvest like lettuce, chard, kale, and other cut greens. They work great for annual herbs and cut flowers too. Vegetables that form a root ball like onions, beets, turnips, and round radishes are also good choices.
Bush tomatoes work well. For vining tomatoes, you can build a trellis on the side of your bed and grow your tomatoes up and access them with a footstool.
Or…you can run your trellis outwards like a table and vine your tomatoes over the trellis. You may have to leave your keyhole to harvest, but you keep your tomatoes off the ground and limit fungal risks.
Now, that you are in the know, unlock the magic in your garden and build yourself a perfect-for-you keyhole bed!


