
Have you ever considered raising rabbits for meat?
They are a great small meat source. You can get hundreds of pounds of meat per year from a few rabbits. Who would’ve thought? And with the right recipe, rabbit could be your family’s favorite type of meat.
But if you are going to raise rabbits for meat, you’ll need to fully understand how to properly butcher a rabbit.
So I’d like to walk you through the steps when you butcher a rabbit. If it sounds like a lot at first, don’t worry. The more you do it, the easier it will become.
Here is how you can efficiently and effectively butcher your meat rabbits:

1. Cull Them

https://www.youtube.com/watch?v=cXBgfwJzWhY&ab_channel=pattiShort
The obvious first step when you butcher a rabbit is actually culling it. If you are unfamiliar with that term, it simply means to humanely end the animal’s life. You’ll have two options for ending the rabbit’s life.
First, you can do the old fashion method, which is bopping it over the head. You’ll find a heavy object or club and hit the rabbit over the head really hard. This ultimately knocks the rabbit unconscious.
Then you’ll hang the rabbit upside down and slit its jugular in order for it to bleed out. All of this is done while the rabbit is still unconscious.
The other option is my preference. I’m a homesteader, but I have a hard time hitting fluffy farm animals over the head with large objects.
So I take the easy way and use the Hopper Popper. With this, you slide the rabbit’s head in the v-shaped slot and then pull. This separates the rabbit’s spinal column and ends its life quickly and humanely.
Personally, I would recommend going with the Hopper Popper if you are feeling a little uneasy about culling animals.
But it is about your comfort level and personal preference. These are two of the most common ways to cull rabbits in my neck of the woods.
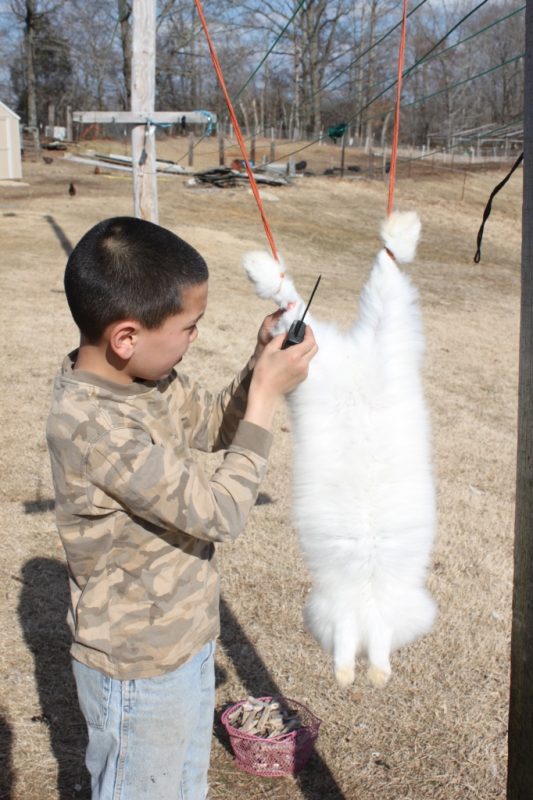
2. Skin the Rabbit
https://www.youtube.com/watch?v=SbJUkxRlaT0&ab_channel=3213089
After the rabbit has been culled, you’ll need to skin it. You’ll first need to be sure you have a butcher station. Our butcher station is a basic A-frame design that has clamps at the top to hold the feet and funnels beneath to funnel the blood to the buckets waiting beneath.
However, if you don’t have a ready-made butcher station, you’ll need to find a way to hang the rabbit upside down. You could hang it on the side of a building, or hang it from a tree with some rope. Just be sure that you can drag a water hose to where you are butchering because you will need it in future steps.
So after the rabbit is hung up, you’ll begin the skinning process. You’ll do this by hanging the rabbit upside down by its feet. Then progress by making little slits around its feet. When you begin skinning the rabbit it will look like it has sock feet because of the slits that you just made.
Next, you’ll start at the slit on one side (which side doesn’t matter), and begin cutting the skin away from the meat until you reach the inside area of the rabbit’s legs.
Then you’ll do the same on the opposite side of the rabbit. Once you’ve got the skin loose on both legs and met in the middle, you’ll start working down the center of the rabbit. Be sure to carefully place your fingers between the meat and the skin of the rabbit. This will keep your knife from cutting too deep.
Finally, once you’ve cut all the way up the rabbit, you’ll want to stop when the skin is loose around the rabbit’s shoulder area. Then you’ll gently pull until all of the skin is loose and stuck on the rabbit’s head. At this point you can’t go any further.
So you’ll then want to cut the rabbit’s head off which will release the skin and the rabbit head simultaneously. If you want to keep the skin to tan it, you’ll then need to cut the rabbit head loose from it. If not, then just toss it in a bucket waiting below the butchering area. Be sure to hose the meat down to get any loose hair off of it before you move on.
3. Gut the Rabbit
After all of the skin has been removed from the rabbit it is time to gut it so you can enjoy the meat. You’ll want to begin by cutting straight down the center of the rabbit. Be sure to start around the anus area.
However, be sure to use your fingers to put space between the rabbit’s organs and your blade. You don’t want to bust any of the organs as it contains the nasty stuff that you don’t want to eat. Be especially careful around the intestines.
Now, as you cut down the rabbit, organs will begin to fall out. This is a good thing. You’ll just want to try to aim for the bucket waiting below the rabbit. When you are finished be very sure that you’ve removed all of the rabbit’s intestines and also cut the anus out as well.
Once all of the guts have been removed from the rabbit, you’ll want to hose the meat down really thoroughly to be sure that any blood and other contaminants have been removed from the meat.
If you’ve ever read this article about how to butcher a deer, then you’ll probably notice there is a lot of similarities.
Basically, once you learn how to butcher one animal, you can pretty well figure out how to butcher any of them because the process is usually pretty similar. Here is another article on butchering chickens. It requires a few extra steps, but you’ll see the process is pretty much the same.
So if you are new to butchering animals, don’t grow weary. You’ll get the hang of it after you’ve done it a few times.
4. Butcher a Rabbit

Now that the skin and guts are removed from the rabbit, you are ready to actually section the meat. Your rabbit is pretty well fileted open at this point.
So I usually begin by cutting the fat off of the side of the rabbit’s belly. This makes pretty good bacon. Then I cut the front legs off. You can search for the joints to unlock the legs, but because rabbits are so small, I usually just use pruning shears. It cuts right through things easily.
Next, I cut the body of the rabbit loose by snipping the back legs (which the rabbit is hanging from) loose from the body. You can pull the ribs out of the rabbit, but for me, it’s a lot of extra work for not a lot of meat so I don’t fool with it, but it is all about your personal preference.
Finally, I cut the feet loose from the back legs. As you are cutting this meat off of the body you’ll need to have a large pot or bucket filled with cold water that you can easily toss the meat into. This will keep it cool until you are done butchering.
Also, it is good to start pulling as much blood out of the meat as you can for better taste quality. The soaking will help with this process.
One final option when you butcher a rabbit is to leave the rabbit whole. Some people cook whole rabbits and if that is what your recipe calls for, then you can skip the tedious work of cutting it into different cuts of meat and just cut the feet off.
Then you’ll need to let it soak in the cold water while you are cleaning up.
5. Prep the Meat
After the meat has been butchered, you’ll need to clean up your area. The guts of the rabbit are great protein for other animals like chickens, ducks, or pigs. The skins can be tanned and repurposed.
However, be sure that you get all of the blood and guts completely cleaned up and disposed of because they will draw predators if you aren’t careful.
Finally, you’ll want to take the meat that has been soaking in the cold water and place it in the fridge. I usually let my meat soak for around 24 hours before I begin the storing process. The longer it soaks, the more blood is removed.
Just remember, you don’t have to let rabbit meat soak and drain like you do deer meat. Rabbit is all white meat so it has a milder flavor, in my opinion. After 24 hours or so of soaking in cold water in a fridge, your rabbit meat should be ready to be stored for the long term use.
6. Store the Meat

There are multiple ways to store your rabbit meat. You could potentially butcher a rabbit as you need them for cooking then and there on the spot. Just remember to do so a day in advance, or at least earlier in the day, so it has time to drain.
The second option is to process the rabbit to freeze. We do this sometimes when we have to process a lot of grow outs. Freezing is very simple. You’ll just pull the rabbit meat out of the pot and place the meat in a freezer safe bag. Be sure to label it, seal it, and then toss in the freezer until you are ready to cook it at a later date.
However, my favorite way of storing rabbit meat is to can it. I love it because it is so simple and great for a fast meal later.
So you’ll do this by pulling the rabbit meat out of the water it was soaking in while hanging out in your fridge.
Then you’ll place the meat in a pot on the stove and let it boil for a few hours. You want it to be cooked and falling off of the bones. You could also use your crockpot for this step too if you don’t have a lot of rabbits to process, or if you have that large of a crockpot.
Once the meat is cooked and falling off the bone, let it cool so you don’t burn your hands. The next step is a little tedious. You’ll need to debone the meat very carefully. Be sure you remove all of the bones as they are super tiny and can be hard to miss.
Next, you’ll need to follow the process of sanitizing your jars and prepping them for canning. Then pack the meat into the jars and place boiling water over the meat.
Finally, place the lids and rings on the jar and process in a pressure canner. You’ll need to follow your canning guide on how long to can them and how to properly use your pressure canner. Here is a great guide to help you purchase the most practical canner for your needs.
Not totally sure on how to can your own food or where to start? Well, don’t worry about that. We have this great article that can help you gain a basic knowledge of canning.
So that is all there is to know on how to butcher a rabbit. It may sound like a breeze, or it may not. Just remember that practice makes perfect.


