
Grafting is the act of manually forming a union between two similar plants, often with the goal of making a new one with the best characteristics of the parent plants. You most often hear of this being done with fruit trees, but it’s a handy method to reproduce a variety of shrubs, veggies, and trees.
So why learn how to graft? For one, it’s a way to propagate plants when there are no other options. Say you want to save a prized apple tree that’s been damaged. Grafting could be the answer.
You can also develop stronger flora by combining the best attributes and eliminating the weaknesses in existing plants. For example, you could combine two trees to develop one that is more resistant to disease and hardier to cold weather.
Additionally, grafting enables you to choose the size and the shape of your plant, whether you want to make a dwarf variety or a weeping type. It’s faster than traditional propagation from seed, as well.
So how does it work? Basically, you attach the bottom part of one plant (the rootstock) to the top portion of another plant (the scion). Of course, there’s more to it than that, and this article will give you everything you need to know to get going with grafting.
Terms To Know
Before we get started, there are a few terms you’ll come across in grafting.
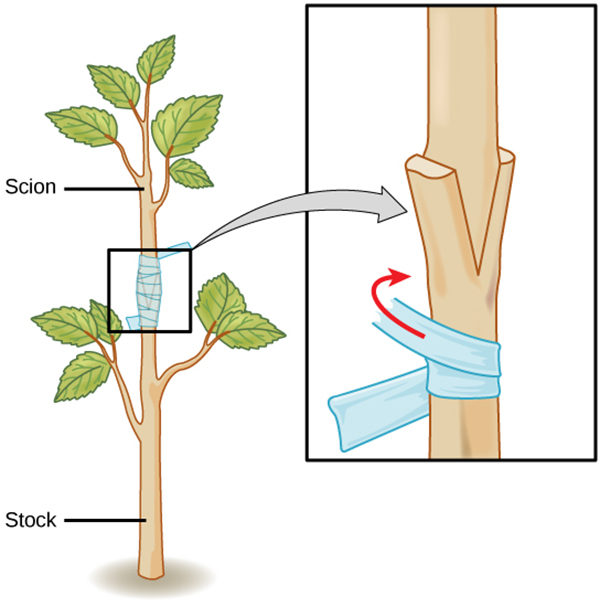
- Scion wood – This is a shoot or twig from a plant. It usually consists of the previous year’s plant growth and may have dormant buds attached. The scion forms the upper part of the graft.
- Rootstock – Also known as stock. This consists of the roots and lower stem of a plant. It will form the lower part of the graft.
- Graft – The graft is where you join both pieces together.
- Cambium – This is an inner layer of cells between the wood and the bark that you expose when you cut into the plant.
- Callus – After cambium from two plants are joined, the cells begin to divide and form a callus layer, which is a bridge between the old and new plants.
Tools For Grafting
There are several tools and materials you need to get started with grafting.
- Knives – Budding and grafting knives are about three to four inches long. You can also use an Exacto knife with removable blades
- Pruners – You’ll need large pruners if you plan on collecting scion and cutting it from trees, and a small pair of pruners for making cuts.
- Gloves – Sturdy leather gloves will keep your hands safe.
- Rubber bands, string or grafting tape – You’ll use these to bind sections securely together.
- Hot wax – This helps keep the air out to prevent disease.
- Wedge or chisel – This is for wedge grafting. Make sure they are clean and sharp..

Keeping your tools clean is essential because plants are vulnerable during this process. Clean your tools with alcohol to prevent pathogens, wash your hands with soap and water, and use clean gloves.
Keep your tools sharp as well. If you try to make a cut with a dull knife, you’ll end up with ragged edges. This will prevent callus cells from growing and joining the scion and rootstock together.
Selecting Your Scion

Selecting the right scion is vital. Remember, the reason you are grafting is to make improvements, so you want the best examples you can find.
The ideal scion wood comes from last year’s shoots. If you can, pick scions that have one or two unopened buds – though not all plants bud in their first year’s growth. Avoid any shoots that have insect or disease damage.
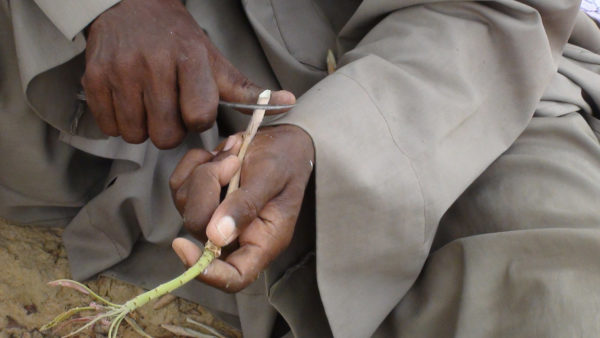
Cut shoots from the tree or plant with a sharp knife or pruners and put them in a damp burlap bag or a plastic bag. Scion wood should be about 6-inches long and a fourth-inch wide – about the size of a pencil.
Only harvest what you need for that day. Don’t hold over wood for another day. If you are doing more than one variety remember to label your plants.
Choosing Rootstock
Good stock is necessary because it’s the element that helps your plant adapt to weather and resist disease. It also controls size.
You can grow your own rootstock from seed, root cuttings or layering. You can also purchase specially-grown stock. Catalogs like Fedco have a large selection. Alternately, you can use an offshoot from an existing tree, or a sapling.
Rootstock should be exposed to cold weather for six weeks before grafting to ensure that it’s dormant.
Graft Union Types
There are many kinds of graft unions, each with advantages and disadvantages.
Wedge Graft
A wedge graft is one of the easiest grafts to make. It works well when your scion wood is smaller than your stock wood. Basically, you’re making a notch and placing your scion wood into the stock.
- Make a V-shaped cut at the end of your scion wood.
- Make a wedge in your stock wood that is slightly larger than the scion v-shaped cut.
- Insert the scion into the split rootstock and align them.
- Tightly wrap the union together with a rubber band, tape or string.
- Seal the union with hot wax. You can also use tree wound dressing.
Whip Graft
A whip graft, whip-and-tongue, or slice graft, involves cutting the rootstock and scion at opposite angles so they can slide together. This is the most common type of graft, and it works well because it gives you plenty of surface area to work with.
The trick to getting this one to work is that the two ends must be cut precisely so they join together on the flat sides, and the stock and the scion need to be similar in diameter.
The whip graft is considered hard to master since the cut must be exact. However, if you can master it, it has the highest success rate.
I actually think this one is the simplest grafts to do, but it’s best when you work with a partner. That way one person can hold the scion and stock together while the other person wraps it tightly in place.
If you’re by yourself, you can use a vise or a wrench to hold things in place, but make sure you don’t clamp the parts too tightly.
- Compare the diameter between scion and stock and find a spot where they are about the same size.
- Cut the scion at an angle, leaving up to 2-inches of sloping wood.
- Cut the stock at an opposite angle to match scion. If you want to be precise, you can use a vernier caliper. Or eyeball it from various sides.
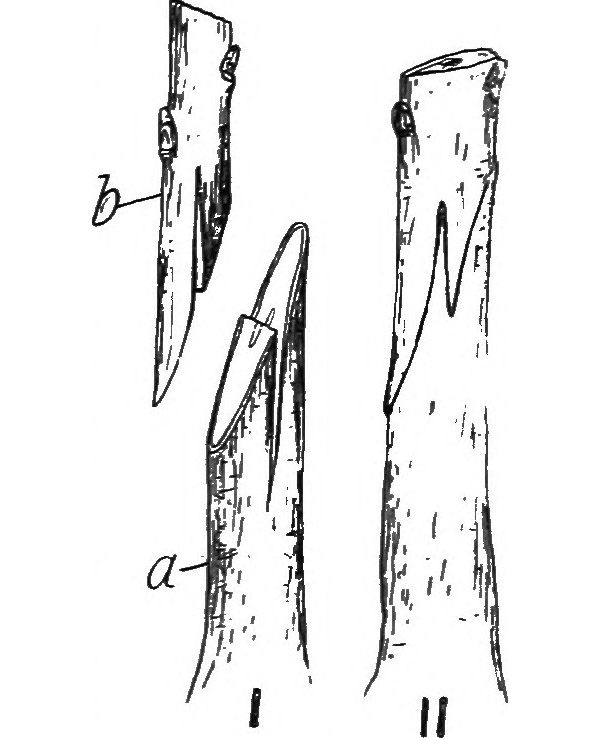
- Optionally, you can make a “tongue” cut, which gives the wood more surface area to connect. A third of the way down the scion cut, slice straight down into the face of the wood about half as long as the original cut. This will leave you with a tongue (see the image above). Repeat on the stock.
- Fit the two pieces together.
- Bind with a rubber band, string or tape.
- Apply hot wax or tree wound dressing to protect the union.
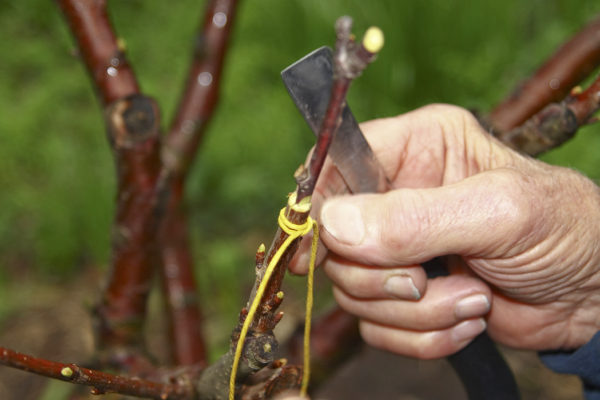
Chip or Bud Grafting

This is the same process as above, but you’re using the bud of the plant instead of the whole stem. This is popular for flowers like roses, as well as deciduous trees. Unlike most grafting, this one can be done early in the growing season.
- Choose high-quality rootstock that is about a half-inch around.
- Remove any leaves or branches where you want to graft the bud.
- Slice the bud from the parent plant.
- Slice a similarly-sized piece out of the surface of the stock.
- Place the bud onto the slit.
- Secure with a rubber band or parafilm tape, taking care not to cover the bud.
Caring For Your Graft
Treat your new graft gently. Graft unions aren’t strong at first, and they’ll break if mishandled.
After you’ve completed your grafting, if the plant is moveable, put it in a cool, humid protected area. An unheated garage or basement works well.
If you’ve done everything right, healing callus cells begin forming in one week, and after two weeks you should have xylem and phloem cells forming. Xylem and phloem are the cells necessary to transport food and water throughout the plant.
Once the threat of frost has passed, you can harden your new plant off and put it in the ground.
Grafting Tips
- Not all plants can be grafted. For botanical reasons, some plants do not have the right structure. Plants such as grasses like wheat and rice, or bulbs like daffodils and tulips, lack cambium and need to propagate by other means. Be sure the plant you intend to graft is a good candidate.
- Most grafting is done in winter and early spring because you want to graft when the plant is dormant. You’ll need a place to work on them where you won’t freeze, as well as a place to store your grafts.
- If you’re struggling, you can use interstock in between the stock and scion. Interstock is an intermediate plant part that is compatible between the stock and scion.
- Watch your cambium. It must be lined up right between both sides to get a suitable graft.
Some people are intimidated by grafting at first, but don’t let it scare you. Once you get out there and play around, you’ll find it’s easier than you think.
Many extension agencies offer hands-on grafting classes so you can get your feet wet and get started with a mentor.
Once you gain some confidence and skill, you can purchase rootstocks and start grafting new varieties of fruit trees. You can even make a “fruit salad” tree that grows a variety of fruits.
Be sure to share your grafting adventures with us in the comments below.


