It was about four or five years ago when my husband and I started exploring alternative methods to gardening. We were working ourselves to death outside and wondered if there were any other methods that maybe wouldn’t be quite so labor intensive.
Then we came across different videos on YouTube that discussed the idea of no-till gardening. I’ve shared my experiences with no-till gardening on the blog before. I’ve even shared a few tips on how to get started.
But I’d like to take a more in-depth look at no-till gardening. That way, if you wish to try it you’ll know exactly what to do, how to do it, where to look for resources, and both the pros and cons to this type of gardening.
Here is what you need to know about no-till gardening:
What Is No-Till Gardening?
via emaze.com
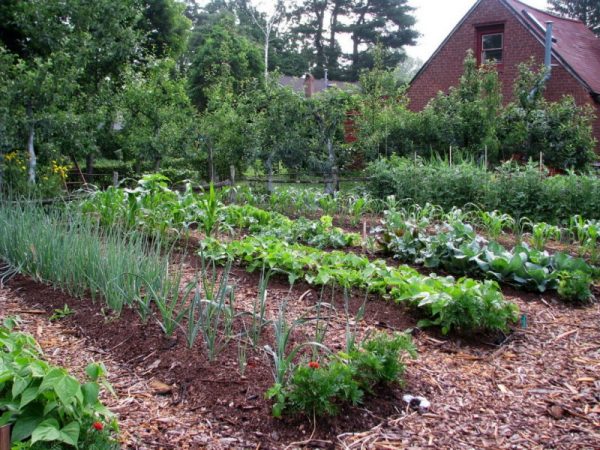
A no-till gardening style applies to a garden that does not require tilling. You don’t expose the dirt when you get started.
Instead, you place composting materials on top of the garden and let nature take care of the ‘tilling’ for you.
Now, you can do this in above-ground garden beds or in a larger garden setting. That is totally up to you. The idea behind no-till gardening is that you don’t have to break your back tilling and that the plants grow in a natural setting.
So theoretically, it should help take care of garden pests and allow for gardening in a more organic manner without a lot of fuss or expense.
If this sounds great to you, then you’ll want to learn how to do this with your own garden.
How to Create Your Own No-Till Garden
1. Pick Your Gardening Space
You’ll begin this process by picking your gardening space. You’ll obviously want to get as much sunlight as possible.
So keep this in mind as you pick your gardening space. Once you have your space picked out for your garden you are ready to move on to the next step.
2. Gather Materials
Now that you know where you are going to garden, you’ll need to begin gathering materials for your no-till garden.
So some items you’ll need are newspapers, old leaves, compost, chicken fertilizer, and wood chips. The newspaper will be what you need to lay in thick layers over your grass. It will kill the grass off while also being biodegradable. The newspapers will end up adding something to your garden as they break down.
Then you’ll need composting items. You can actually add compost itself, leaves that you rake during the fall, and chicken fertilizer. I actually recommend adding all of these items in layers. You’ll need a lot to get your garden moving in the right direction right off of the bat.
Then you’ll need to either purchase or call a tree trimming service to (hopefully) have free wood chips delivered to your home. You’ll need to spread those wood chips out over your garden in a thick layer. It is recommended that you start this method in the fall so the woodchips and other items have time to begin breaking down before planting.
3. Begin Layering Your Garden
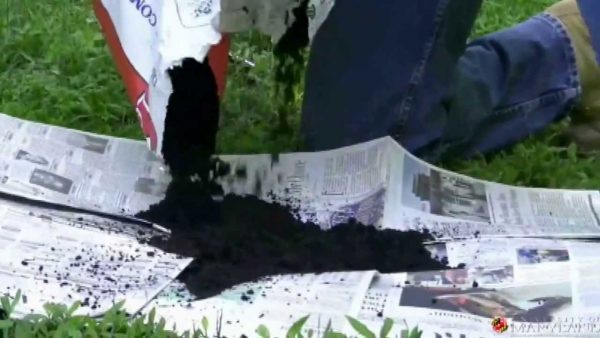
Now that you have all of your items, you’ll need to begin layering them. You’ll begin with the newspaper as I mentioned above. You will want to cover every inch of your garden space in newspapers.
Then cover them again. This is how you stop grass from sprouting into your garden. If you don’t layer it thick enough, you will be creating a perfect mixture for grass to grow (thickly).
So be sure that you cover the ground with thick layers of newspaper. Cardboard could work effectively here too. You just need something that will break down over time.
Next, you’ll need to add a layer of leaves. This is good to go between the newspaper and compost because it holds them in place so they will break down and begin to compost there on the ground.
Then you’ll add a layer of compost. If you have a small gardening space, you may be able to make enough for your garden area.
However, if you have a larger garden area, you may need to purchase compost by the scoop. It is usually priced pretty reasonably at nurseries. Just be advised that you’ll probably need to line up purchasing that in advance.
Next, you’ll need to add chicken fertilizer. If you raise your own chickens, then you may have enough to place it out over a small garden space. We actually did this ourselves.
So we created a screen. The frame was made of wood and then we covered it in wire mesh. We would sift our chicken’s scratch through the screen. This stopped any big particles from making it in the garden.
Then we’d load it in wheelbarrows and place it in our garden.
However, we had a large garden space and would often be offered chicken fertilizer from local chicken houses. We would take it and save ourselves a little work. If you have rabbits, their fertilizer is great to go into your garden at this point, too.
Finally, you add the wood chips. They are heavy, great for retaining moisture, and also compost over time. They can still be acidic when placed in the garden because they will sit and begin to break down over the winter.
However, if you are doing this and don’t have time to allow all of this to sit, then you’ll need to buy mulch to go in the garden so the acid doesn’t burn the plants.
4. Wait and Then Plant
After you have your garden all layered with good stuff, you’ll just need to wait. We usually added all of this to our garden in the fall and allowed it to rest over winter so it was ready to go in the spring.
When spring arrives, you just use your hoe to develop rows and then plant your items in the ground. You’ll tuck the mulch back around your plants once they’ve sprouted. This will help keep the weeds down.
5. Rinse and Repeat
Once your garden begins to take off, you’ll just watch and harvest it like you would any other garden. The idea is that the plants have such rich soil to grow in that they will develop deep roots which make all of your plants heartier.
So, in theory, this should deter bugs from devouring your plants and stop disease as well. If you have plants that are being attacked, then you should just let them go because they were weak. At least that is what we were always told.
However, in the first few years, while your soil is still developing rich nutrients, you may have a difficult time developing plants with deep root systems so you may still find it necessary to treat bugs and disease. It is up to you.
Then once your harvest is over, you’ll pull up the plants and allow them to be added back to the garden as compost.
Finally, you’ll add the same layers back to your garden year after year. The soil should become a deep black color and become richer over time.
The Pros and Cons to No-Till Gardening
The Pros
There are many pros to gardening in the no-till method. Here they are:
1. It is a more natural way of gardening
You can’t argue with nature. We know that this method works because this is the exact same method that we see taking place in nature.
So when you look in the forest and see plants thriving, you have to know it wasn’t done by tilling. It was done through years and years of natural composting. Which can help those gardening feel closer to nature and better about doing things in a more natural way.
2. In theory, it should make organic gardening easier
If you stick with no-till gardening long enough, you should be able to garden organically a lot easier than some other methods.
For instance, if you still till your garden, often you have to buy different organic fertilizers, etc. With this method, the garden takes care of all of that for you by pulling what it needs from the ground.
So it makes organic gardening more feasible for everyone, but especially those that couldn’t afford organic gardening prior to this method being explored.
3. You should have a larger harvest
If you stick with this method long-term, I’ve seen gardens on the internet that absolutely flourished. They have super-sized harvests that I’ve never seen in my own garden.
So if you give your plans their natural environment to grow in with their natural methods, it appears that you could reap a bountiful harvest because of it.
The Cons
1. It takes a lot of prep work
As I shared on the blog previously, we have actually left no-till gardening. This is the main reason right here. It took so much prep work. I felt like I was always trying to gather materials for the garden.
So since we have such a large garden, it took a lot of time to track down wood chips to cover it every year, chicken fertilizer to cover it, and we never could track down enough newspapers and cardboard to cover.
And that leads me into the next con.
2. If you don’t put the layers on thick enough you could have trouble
If you don’t put your layers of composting materials on thick enough, you have problems.
With us, we have such a large garden that it was difficult to find enough materials to layer newspaper and cardboard thick enough to stop the grass.
So I was constantly battling large amounts of grass in my garden. I was working harder with this method to get rid of grass and weeds than I was when we tilled.
3. I think it has the same amount of labor involved
Finally, in my experience, I think the same amount of labor is involved just in different increments. With a till garden, you do a little weeding and tilling every week or so.
Also, you add different nutrients before you start planting and then till them into the ground.
Well, with a no-till garden it takes a lot of work to spread out all of your materials. I can’t tell you how many days and hours I spent hauling wood chips to cover our garden.
Again, this would be totally different if we didn’t have such a large garden.
Things to Consider
via UMDHGIC
1. Size of Garden
Obviously, as you can tell from my remarks above, what size garden you have will impact your method of gardening heavily.
See, if you have a small garden, then you could save newspapers throughout the year to cover your garden.
Then you could purchase (if you had to) a small amount of mulch or wood chips to spread on your garden. You could even raise a few chickens just to cover your manure needs.
But if you have a super-sized garden, then it becomes a whole different ballgame.
2. Ease of Locating Materials
Next, you’ll need to consider how easy it will be for you to locate the necessary materials you need. If you live in a very rural part of the world that you don’t have access to different companies that could drop off items like compost and wood chips, then this might not make a lot of sense for you to try this method. Unless you have access to all of these items on your own land.
But if you live a little closer to town, then you might be able to access these items easily and it could make perfect sense for you to choose a no-till garden method.
3. Budget
Finally, your budget must be considered. When you choose no-till gardening, unless you can come up with the necessary items needed on your own land, you may not always have access to a free source.
So you need to ask yourself if you could afford to purchase these items. If so, then you must decide which method is most budget-friendly. Do you save still if you had to purchase the materials for your no-till garden, or is it less expensive to just till it?
As you can tell, deciding on whether to till your garden or not can be a pretty complex decision that is impacted by a lot of different variables surrounding the situation.
But I hope if you decide to go with this method, that you now have a clear idea on how to go about it.
Now I want to hear from you. Do you till your garden or no? Why or why not?
We love hearing from you so please leave us your comments in the space below.

