
Do you love the warmth of a wood stove?
Maybe you think you can’t have that in your home because wood stoves can be rather expensive?
Well, don’t worry about the expense any longer. When we moved to our home, it didn’t have a wood stove. I kept saving for the project, but the winter was really cold without the wood heat.
Then my husband came across an idea on the internet about turning a regular barrel into a wood stove.
Naturally, we knew this was our solution and began researching how to complete this inexpensive project, so we could have wood heat for our home.
Here is what we came up with:

How to Build a Barrel Wood Stove
You Will Need:
- A barrel
- A stove kit
- Barbecue paint
- Cast iron grate (optional)
- Barrel stove hot plate kit (optional)
1. Don’t Barrel Over

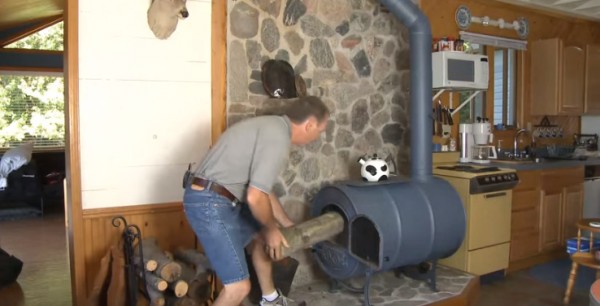
The first step of building yourself an inexpensive indoor woodstove is to find a barrel. It will need to be a metal barrel that has no holes in it.
Now, you may be able to buy one in your neck of the woods fairly cheap.
Or you could ask someone local if they had a metal barrel that they wouldn’t mind giving you. Free is usually better in my book.
Once you have located a metal barrel, then you are ready to move on to the next steps.
2. The Hearth Matters
The biggest part of building this wood stove is making sure you have a sturdy hearth. The reason is that since the metal of the barrel is thin, it is going to put off a lot of heat.
You’ll have to make sure that you build a hearth that is able to withstand such heat. A good example of this would be if you build a stone hearth. If you aren’t quite sure about how to build a hearth, here is a great tutorial to help you out.
In our case, we have decided to go with a tile hearth because the tile is cheaper, but I’m also going to incorporate some stone accent pieces to make it stand out. Unless you can find all of the stone yourself, it can get pretty expensive, pretty quickly.
If you are working on a budget, then tile might be a good option for you. Here is a resource that will help you to understand how the tile can help. In a nutshell, you’ll need a layer of backer board, heat resistant mortar, and the wall tile all built over drywall and a hat channel.
Obviously, you have options that can change along with your budget when building your hearth.
Once you have a sturdy hearth built, you are ready to move on to actually creating the woodstove.
3. Attach the Door
The door will come with your barrel kit. You will need to choose the sturdiest end of your barrel to support the door.
Then you’ll have to stand the barrel up so that the end where you want the door is pointing up towards you. Lay the door on top of that end of the barrel and trace the outline. You’ll then have to use a saw of some kind (hacksaw, jigsaw, etc.) to cut along the outline of the barrel.
Once you have cut the opening in the barrel, you’ll place the door in the hole to make sure it fits. If the fit is secure, you’ll use the nuts and bolts that come with the kit and a drill with the proper drill bit to secure the door in the hole.
When the door is securely attached, you are ready to move on.
4. Add the Legs
Now, I know I talked a lot about creating a sturdy hearth on the budget that you may have. To give your barrel a little more stability, you are also going to add legs to support it on that hearth.
You’ll pull the legs from the kit and place them evenly on what is going to be the bottom side of the barrel.
Again, you’ll need a drill with the proper size bit to secure the legs to the barrel.
Once you feel like the legs are where they need to be and the barrel is properly supported, then you’ll be ready to move on to the next step.
5. Don’t Forget the Flue and Damper
If you’ve ever had a wood stove, then you know the flue and damper are big parts of the project. The flue should be put on top of the barrel at the back. You’ll have to place the part on the barrel where you’d like it to go, and then secure it with the screws that came with it using a drill and the proper bit.
Now, the damper should have been included with the door during that part of the installation. You should take this time to become familiar with it and learn how to open and close it properly.
As you can tell, barrels are easy to create and also very easy to use too.
6. Paint the Town Red
No, you won’t go out on the town and dance a jig because you built a wood stove from a barrel. I mean, not unless you want to.
However, you will need to paint your barrel. This will keep the barrel protected. I’ll be honest, the first time my husband showed me the idea of using a barrel as a wood stove I slightly turned my nose up at it. I thought, “A barrel? Really?”
Then I started doing my own research and saw how you could paint the barrels all different colors and actually make them look rustic chic. This caught my attention.
When I tell you to paint your barrel, you can obviously go with the typical black paint if you’d like.
However, I encourage you to think outside of the box if you are having a hard time dealing with a barrel for a wood stove. Think about painting your barrel red or turquoise. You could even paint it white if you’d like.
Also, realize that if you try to buy a wood stove that has been painted a different color, you automatically pay a premium price.
This is a way to have a colorful, unique wood stove at a fraction of the cost of a regular, more traditional wood stove.
Then once you have your color picked out, take your barrel outside and start a fire inside of it. Let the fire get really hot so it will burn any grease or other components that may be attached to the barrel on the outside.
Next, you’ll let it cool and then wipe the barrel down before applying your barbecue paint of the color that you picked out.
7. Add Your Grate and Hot Plate
If you purchase the grate and hot plate, you’ll use your drill and the screws that came with both to apply them to your barrel.
However, if you didn’t purchase them, then you should know that you can actually add regular gas grill grates to your barrel, and they will work too.
So if you have an old barbecue or gas grill hanging around that you aren’t using, then consider snagging those grates and applying them here.
If you want a hot plate, then consider welding a flat piece of metal to the top of your barrel. It should work the same.
8. Attach to Your Stove Pipe
Since you are using this barrel wood stove indoors, it is important that you attach it to your pipes. If you are installing a wood stove for the first time in your home, then you’ll need to follow this tutorial to learn the in’s and out’s of properly installing a stove pipe.
Remember, wood stoves can often be vented through a wall or your ceiling. In our case, we’ve decided to go through the wall for simplicity’s sake.
Also remember, when in doubt, call a professional. It is important that your stove pipe is installed correctly.
Once you know how you are going to install it, you can find your piping at your local big box store or here.
9. Enjoy Your Hard Work

You could easily go buy a small wood stove for around $300 (or so I found in my research for a wood stove.)
Then you just have to attach it to your stove pipe, and you are done.
However, it will cost you a lot more money, obviously. You can usually build a barrel stove for about 1/3 of the cost of a regular wood stove.
Though the barrel has more work involved, it ends up being something very unique and totally handcrafted by you. It also has a tendency to put off a little warmer heat because of the thickness of the metal involved.
Once it is installed, take a load off. Fix yourself a hot beverage and just relax and enjoy the beauty and warmth of your project.
Hopefully, this will help you to create a gorgeous project for your home that will provide warmth and style to your home for many years to come.


