
Many years ago, I used to watch a French-language TV show on Sundays. Each week they had a different field trip to visit specialty food producers.
Even though I only understood half of what was said, I couldn’t wait for the next episode because the places the host visited were always charming, rustic, and romantic farms or homesteads. In other words, they were exactly what I was dreaming about for my future homestead!
In one episode, the host was out in the woods with a traditional truffle mushroom forager. The man used a trained truffle-sniffing dog to track down underground truffles and harvest them. The dog dug up the truffles and then traded the mushrooms for a dog treat.
In another episode, almost the whole show was filmed in an underground stone cellar where mushrooms were grown in large wooden trays of manure. Light would have disrupted the mushroom growth cycle. So, the cameraman had to shoot the film using those paranormal ghost hunter kind of lights. It gave the whole mushroom operations the feel of being very mysterious and serious.
After seeing those shows, I developed a deep appreciation for edible fungi and the people who grew or foraged for them. I also became addicted to eating mushrooms almost every day. As a result, I started spending way too much at the farmers market, filling my basket with all sorts of exotic mushrooms.

Homestead Grown Mushrooms
When we finally bought our dream homestead, I considered trying to inoculate some hazelnut trees with truffle spawn. But, I discovered how expensive it was to get started and how long you had to wait for mushrooms and opted not to. Then, I thought about building a cellar and growing underground mushrooms…
Luckily, before we put in our masonry order and went to all that work, we discovered how easy it is to grow shiitake mushrooms (at least relatively so)!
Unlike truffles that take 5-7 years to get started, or like underground grown mushrooms that need perfect darkness and dankness to grow, you just need about a year of patience and some partial shade to be able to grow shiitake on logs.
How to Grow Shiitake Mushrooms on Logs

Well, you also need to inoculate shiitake logs. But luckily that’s pretty easy too! Here’s how to do it.
Step 1: Order Your Spawn
To grow shiitake mushrooms, you need spawn. Spawn is basically like shiitake seeds that you’ll be planting in your logs. You can buy it from specialty retailers like Field and Forest (our supplier), Fungi Perfecti, Mushroom People, Mushroom Mountain, and others.
Spawn comes in two forms – plugs and sawdust. To use sawdust, you’ll need to buy a special syringe called an “inoculation tool.” This tool sucks up sawdust spawn and injects the spawn into your logs. A quality inoculation tool can be expensive to buy. So, unless you are sure you want to do this often, I suggest you start with plugs.
Plugs are wooden dowels that you will hammer into pre-drilled holes in your logs. When you buy them, they already have the spawn inside.
Both sawdust and plug spawn come in three different categories: wide-ranging (also referred to as “WR”), cold weather, and hot weather. These categories refer to the temperatures at which the logs are likely to “fruit.” Fruiting is the term used when the logs produce shiitake mushrooms. Wide-ranging is probably the easiest spawn for beginners to use.
Similar to the way you can get different varieties of tomatoes like “Big Boy,” “Brandywine” and “Cherokee Purple,” you can also get different varieties of spawn. Some sellers have what they call “proprietary strains” of shiitake. Others offer a whole bunch of different strains.
To start, I recommend you order from a supplier with a climate similar to yours. Or, choose the variety the seller says is easiest to grow.
The spawn will need to be refrigerated (not frozen) on arrival until you use it. You’ll also want to use it within a month or two of receiving it for best results.
Step 2: Get Your Logs
Next up, you’ll need to get some hardwood logs. When you buy your spawn, the retailer should suggest the best types of wood to use for the strains you buy. For most strains though, red oak is my favorite for shiitake.
The logs should be cut no more than 6-8 weeks before you inoculate them to cut down the risk of competitor fungi occupying your shiitake logs. They should also be aged at least two weeks after cutting to allow the terpenes that prevent fungi from growing in healthy trees to dry out.
Your logs should be cut to 36-40 inches long for easy handling. They should also be roughly 3-8 inches in diameter, so they have sufficient wood for the shiitake to colonize, but aren’t too heavy for you to lift. You also want your logs to have intact, thick bark on them so that the wood inside stays moist longer.
If you aren’t able to fell trees and cut logs, you might be able to order your logs from people who offer firewood for sale in your area. You may need to order in advance and wait a few weeks for your logs. Just make sure the person cutting your wood understands what you need and why, so your logs arrive in the right condition.
Step 3: Gather Your Tools
If you want to get professional and inoculate hundreds of logs each year (like we do), you may want to invest in some special equipment. An angle grinder with custom drill bit attachment and an inoculation table with rollers to turn logs can speed things along. However, for your first time through, I recommend you start with tools you already have to gain some experience.
These are the tools you’ll need to for using plug spawn:
**You only want to drill to the depth of your plug spawn. So, take one of your shiitake plugs and hold it up to the end of the bit. Then, wrap the piece of duct tape around the bit to mark the length of the plug. That piece of tape will be your guide, so you know when to stop drilling and don’t drill too deep.
Optional:
- Pan to melt the wax
- A heat source to use with the pan (e.g., camping stove, electric burner)
- Wax dauber
- Food grade paraffin wax
Unless you live in an area that is rainy and has high humidity most of the time, you’ll get the best results by sealing your plugs with wax. So, while wax sealing isn’t necessary, I do highly recommend it for many locations.
Step 4: Drill Baby! Drill!
Now for the fun part, you have to drill holes for all your plug spawn.
I am slightly ironic here. Drilling takes the most time of all the steps and can get a bit tedious. So, put on some music, invite a few friends, and make a party out of it!
For best results, you want to use a diamond pattern when making your holes. Start a couple of inches from one end of the log and drill holes down the length of the long about every 4 inches. Stop a couple of inches from the other end. Note: You don’t want to drill right on the ends of the logs because those areas tend to dry out too fast.
Start your next row about 2 inches down from your first row. Again, drill your holes about 4 inches apart. Then, move down the next row until you have made it all the way around your log.
Once you have three rows in place, you’ll see what I mean about the “diamond pattern”. And diamonds are a girl’s best friend when it comes to proper shiitake plug spacing!
The number of holes you drill will vary based on the length of your log and its diameter. However, you may want to keep an approximate count as you go so that you don’t drill more holes than you have plug spawn to fill.
Step 5: Hammer in the Plugs
Now, you need to position a plug over each hole and hammer them in. Hammer until they are flush with the log. Hammering is fun – really! Just don’t hit your thumb. (Been there, done that.)
Repeat until all your logs are done.
Step 6 (Optional): Wax On!
If you opted for wax, now is the time to melt it and daub some over the holes where you hammered in the plug spawn. Cover the entire hole, but don’t worry about making it super thick. Just a dab will do.
Step 7: Water and Wait
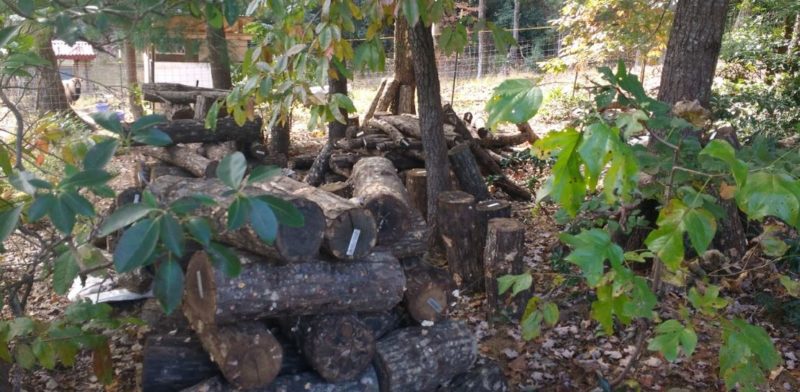
Store your logs in an area with dappled shade. Under a little tree cover, such as in the edge of a forest area, is perfect. If you don’t have that, then you can use shade cloth to create an ideal space.
Keep your logs off the ground. You can set them on some scrap wood or a pallet. Stack them like Lincoln logs (you remember those, right?) or firewood. You want to keep good air circulation flowing around the logs.
Keep your logs continuously moist. Similar to a garden, if you get an inch of rain and don’t have a lot of drying wind, that should be sufficient. But, when you don’t get rain, haul out the hose or watering can and douse your logs with about 2-3 gallons of water each, on a weekly basis until the rain comes back again.
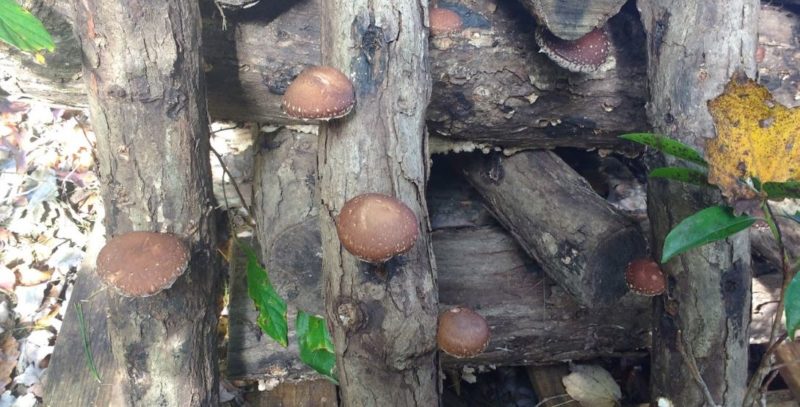
Step 8: Be Fruitful and Celebrate
Around 12 months later, you will start to see what looks like tiny mushrooms forming where your plugs were hammered in. When that happens, dunk your logs in a bathtub or drum of water overnight. Then stand them up on edge (tall wise).
Then guess what??
Yep!! Shiitake happens! (You knew that was coming, right?)
Conclusion to Growing Shiitake Mushrooms
There’s some work involved in inoculating shiitake logs. Sourcing the logs, doing the drilling, keeping them watered all take time.
Generally though, growing shiitake mushrooms is the easiest. They are also one of the most rewarding crops you can produce on your homestead. When you consider they cost $16 a pound at the farmers market and add so much pleasure to your palette, they are worth the time and effort.
Now is the perfect time to get started. So go ahead and get some shiitake (logs) done! Then, after that, feel free to try to grow oysters or lion’s mane mushrooms on logs too. Go wild.


